


2 / 5
Doc ID --197 • REV 05
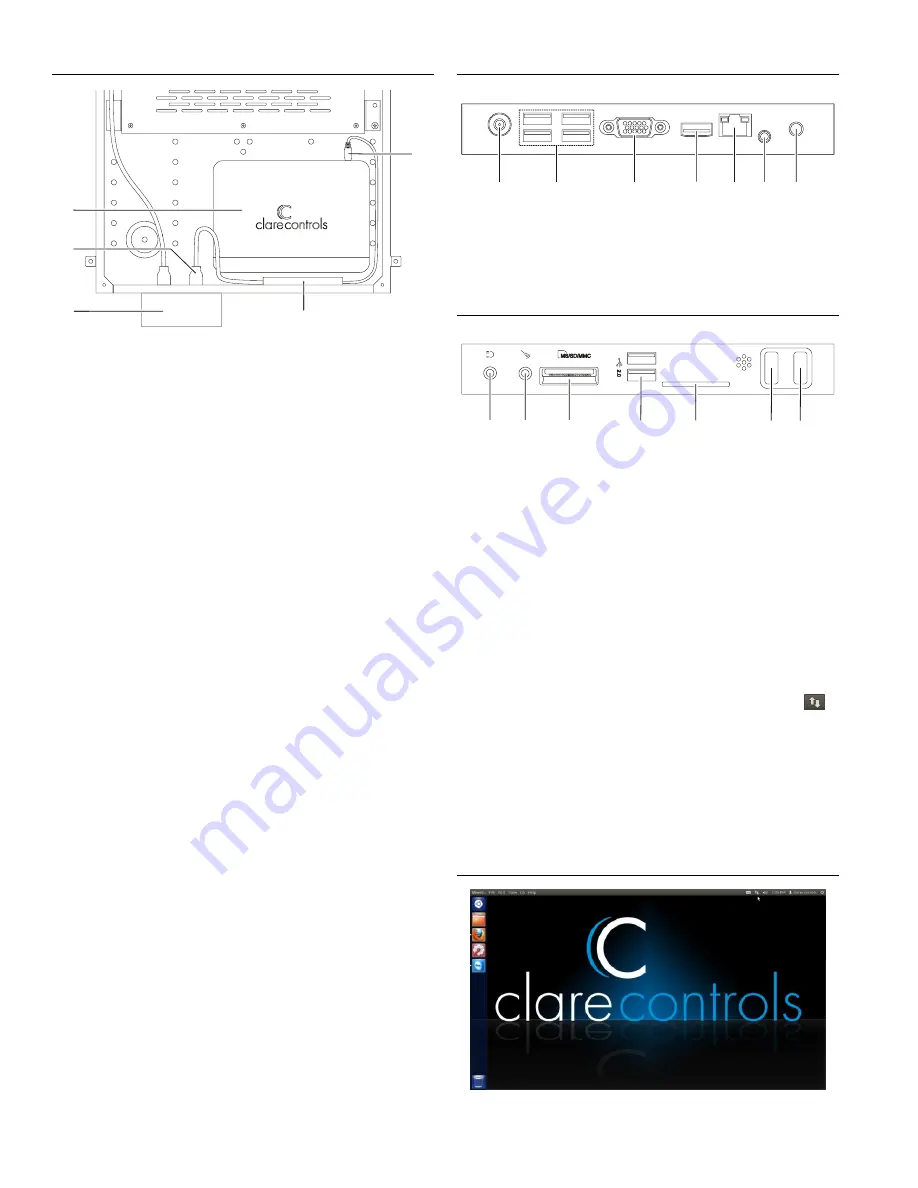
Figure 2: CH-OS-L mounted in bracket
(1) CH-OS-L
(2) Power plug
(3) Electrical outlet
(4) AC power adapter
(5) Power plug to CH-OS-L
Connecting devices to the CH-OS-L
After mounting the CH-OS-L, make the connections to your
other devices. Figures 3 and 4 identify the ports on the rear
and front of the CH-OS-L. Refer to the documentation that
came with each of your other devices for detailed information
about connecting those devices to the CH-OS-L.
To connect the CH-OS-L:
1. Connect a keyboard and a mouse to the USB ports, and
then connect monitor to the Display Output port. You will
need these devices to configure your data and audio
networks. See Figure 3, items 2 and 3.
2. When connecting to a CS-BR-1 Steams Audio Bridge
(optional), use the USB cable included with the CS-BR-1
and connect it to a USB port. See Figure 3, item 2.
The USB connection enables the CS-BR-1 to encode up
to four simultaneous audio streams onto the CobraNet
network.
3. Connect the USB end of the USB Ethernet adapter
(included) to a USB port on the rear of the CH-OS-L, and
then connect an Ethernet cable to the other end of the
adapter and to the CobraNet network switch. See
Figure 3, item 2.
4. Use an Ethernet cable (not included) to connect to your
data network switch. See Figure 3, item 5.
5. Connect the power adapter to the power input port, and
then plug the other end into an electrical outlet. See
Figure 3, item 7.
6. To power on the CH-OS-L, press the power button on the
front of the CH-OS-L. See Figure 4, item 7.
Figure 3: CH-OS-L rear connections
(1) RF port (not used)
(2) USB ports
(3) Display Output port (VGA)
(4) HGMI port (not used)
(5) Network port
(6) S/PDIF out port (not used)
(7) Power input port
Figure 4: CH-OS-L front connections
(1) Headphone port
(2) Microphone In
(3) Multi-function card reader
(4) USB ports
(5) LEDs
(6) Suspend button
(7) Power button
Configuring the CH-OS-L data and audio networks
Note:
Before you begin configuring your CH-OS-L, ensure that
you have a monitor, keyboard, and mouse connected to your
CH-OS-L controller. You will not be able to make changes
without these peripheral devices. Be sure to connect the
monitor and turn it on before booting the CH-OS-L. This
ensures the CH-OS-L recognizes the monitor.
To ensure a secure Internet access, we recommend that you
connect your CH-OS-L controller to the Internet using a
hardwired connection. The wired Internet connection icon
displays in the menu bar.
When you apply power to the CH-OS-L, the system boots and
displays the desktop interface on your monitor, as shown in
Figure 5. Use this interface to configure the system so that the
controller can support both data and audio networks (CobraNet
for audio) and can communicate with all of the devices,
including iDevices.
Figure 5: Desktop interface
(2)
(3)
(4)
(1)
(5)
(7)
(2)
(3)
(1)
(4)
(5) (6)
(1)
(2)
(3)
(4)
(5)
(6) (7)


