9
Italiano
Nederlands
Español
English
Français
Deutsch
English
Français
Deutsch
Nederlands
Italiano
Español
English
Français
Deutsch
Italiano
Nederlands
Español
Figure 10
Figure 10
Abbildung 10
Figura 10
Afb. 10
Figura 10
English
Français
Deutsch
Italiano
Nederlands
Español
12
12
12
12
12
12
NOTE
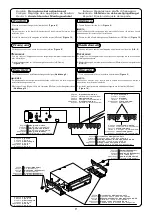
There are notches on the bracket for navigation unit which indicate the location of the
installation holes.
REMARQUE
HINWEIS
NOTA
OPMERKING
NOTA
Fixing bracket adjustment
Réglage des appliques de fixation
Ausrichten der Montagewinkel
Regolazione staffa di fissaggio
Afstellen van de bevestigingsbeugel
Fijación del ajuste del soporte
English
Français
Deutsch
Italiano
Nederlands
Español
Figure 9
Figure 9
Abbildung 9
Figura 9
Afb. 9
Figura 9
Bracket for Navigation unit
Applique pour unité de navigation
Montagewinkel für Navigationseinheit
Staffa per l’unità di navigazione
Beugel voor navigatietoestel
Soporte para la unidad de navegación
Screw (M5x8mm)
Vis (M5x8mm)
Schraube (M5x8mm)
Vite (M5x8mm)
Schroef (M5x8mm)
Tornillos (M5x8mm)
English
Français
Deutsch
Italiano
Nederlands
Español
13
13
13
13
13
13
Screw (M5x8mm)
Vis (M5x8mm)
Schraube (M5x8mm)
Vite (M5x8mm)
Schroef (M5x8mm)
Tornillos (M5x8mm)
English
Français
Deutsch
Italiano
Nederlands
Español
13
13
13
13
13
13
English
Français
Deutsch
Italiano
Nederlands
Español
1
1
1
1
1
1
Navigation unit
Unité de navigation
Navigationseinheit
Unità di navigazione
Navigatietoestel
Unidad de navegación
English
Français
Deutsch
Italiano
Nederlands
Español
12
12
12
12
12
12
Bracket for Navigation unit
Applique pour unité de navigation
Montagewinkel für Navigationseinheit
Staffa per l’unità di navigazione
Beugel voor navigatietoestel
Soporte para la unidad de navegación
English
Français
Deutsch
Italiano
Nederlands
Español
English
Français
Deutsch
Italiano
Nederlands
Español
Installation holes
Orifices d’installation
Haupteinheit
Fori per l'installazione
Installatiegaten
Orificios de instalación
Fasten with screws through the installation holes. (
Figure 9
)
1.
Install the brackets to the navigation unit with the screws (M5x8mm). (
Figure 10
)
2.
English
Français
Deutsch
Italiano
Nederlands
Español
Il y a des crans sur l’applique pour unité de navigation qui indiquent l’emplacement des
trous d’installation.
Attachez avec des vis au niveau des trous d’installation. (
Figure 9
)
1.
2.
Am Montagewinkel der Navigationseinheit befinden sich Kerben, die auf die Lage der
Installationsbohrungen hinweisen.
Mit Schrauben an den Installationsbohrungen befestigen. (
Abbildung 9
)
1.
Befestigen Sie die Bügel mit Hilfe der Schrauben (M5x8mm) an der Navigationseinheit.
(
Abbildung 10
)
2.
Sulla staffa dell'unità di navigazione sono presenti delle tacche che indicano il punto
d'ubicazione dei fori necessari per l'installazione.
Fissare l'unità nei fori con le viti. (
Figura 9
)
1.
Fissare le staffe all'unità di navigazione utilizzando delle viti (M5x8mm). (
Figura 10
)
2.
De beugel voor het navigatietoestel is voorzien van uitsparingen die de locatie van de
installatiegaten aangeven.
Steek de schroeven door de installatiegaten om het toestel vast te zetten. (
Afb. 9
)
1.
2.
Existen unas muescas en el soporte para la unidad de navegación que indican la
ubicación de los orificios de instalación.
Fije la unidad con tornillos en los orificios de instalación. (
Figura 9
)
1.
2.
Notches
Crans
Kerben
Tacche
Uitsparingen
Muescas
Installation holes
Orifices d’installation
Haupteinheit
Fori per l'installazione
Installatiegaten
Orificios de instalación
Installez les appliques sur l’unité de navigation avec les vis (M5x8mm).
(
Figure 10
)
Monteer de beugels met behulp van de schroeven (M5x8mm) aan het navigatietoestel.
(
Afb. 10
)
Instale los soportes para la unidad de navegación con los tornillos (M5x8mm).
(
Figura 10
)

