background image

RMX855Dz

4

RMX855Dz

3

8

RMX855Dz

Use only MDs bearing the 

 mark.

2. PRECAUTIONS

1. When the inside of the car is very cold and

the player is used soon after switching on
the heater moisture may form on the disc or
the optical parts of the player and proper
playback may not be possible. If moisture
forms on the disc, wipe it off with a soft cloth.
If moisture forms on the optical parts of the
player, do not use the player for about one
hour. The condensation will disappear natu-
rally allowing normal operation.

This equipment has been tested and found to
comply with the limits for a Class B digital de-
vice, pursuant to Part 15 of the FCC Rules.

These limits are designed to provide reasonable
protection against harmful interference in a resi-
dential installation.

This equipment generates, uses, and can radi-
ate radio frequency energy and, if not installed
and used in accordance with the instructions,
may cause harmful interference to radio com-
munications. However, there is no guarantee
that interference will not occur in a particular
installation.

If this equipment does cause harmful interfer-
ence to radio or television reception, which can
be determined by turning the equipment off and
on, the user is encouraged to consult the dealer
or an experienced radio/TV technician for help.

2. Driving on extremely bumpy roads which

cause severe vibration may cause the sound
to skip.

3. This unit uses a precision mechanism. Even

in the event that trouble arises, never open
the case, disassemble the unit, or lubricate
the rotating parts.

CAUTION

USE OF CONTROLS, ADJUSTMENTS, OR
PERFORMANCE OF PROCEDURES OTHER
THAN THOSE SPECIFIED HEREIN, MAY RE-
SULT IN HAZARDOUS RADIATION EXPO-
SURE.

THE COMPACT DISC PLAYER and MINI DISC
PLAYER SHOULD NOT BE ADJUSTED OR
REPAIRED BY ANYONE EXCEPT PROPERLY
QUALIFIED SERVICE PERSONNEL.

CHANGES OR MODIFICATIONS NOT EX-
PRESSLY APPROVED BY THE MANUFAC-
TURER FOR COMPLIANCE COULD VOID
THE USER’S AUTHORITY TO OPERATE THE
EQUIPMENT.

 INFORMATION FOR USERS:

.

CHANGES OR MODIFICATIONS TO THIS
PRODUCT NOT APPROVED BY THE MANU-
FACTURER WILL VOID THE WARRANTY
AND WILL VIOLATE FCC APPROVAL.

Handling MD

Handling

• Never open the shutter on the MD cartridge.

Cartridge

Shutter

• Never play a minidisc with an index label that

is peeling off .
If you try to play such a minidisc, you may not
be able to get it back out of the MD player or it
may damage the MD player.

Storage

• Do not expose minidiscs to direct sunlignt or

any heat source.

• Do not expose minidiscs to excess humidity or

dust.

• Do not expose minidiscs to direct heat from

heaters.

Cleaning

• If the MD cartridge is dirty, wipe off the dirt

with a soft dry cloth.
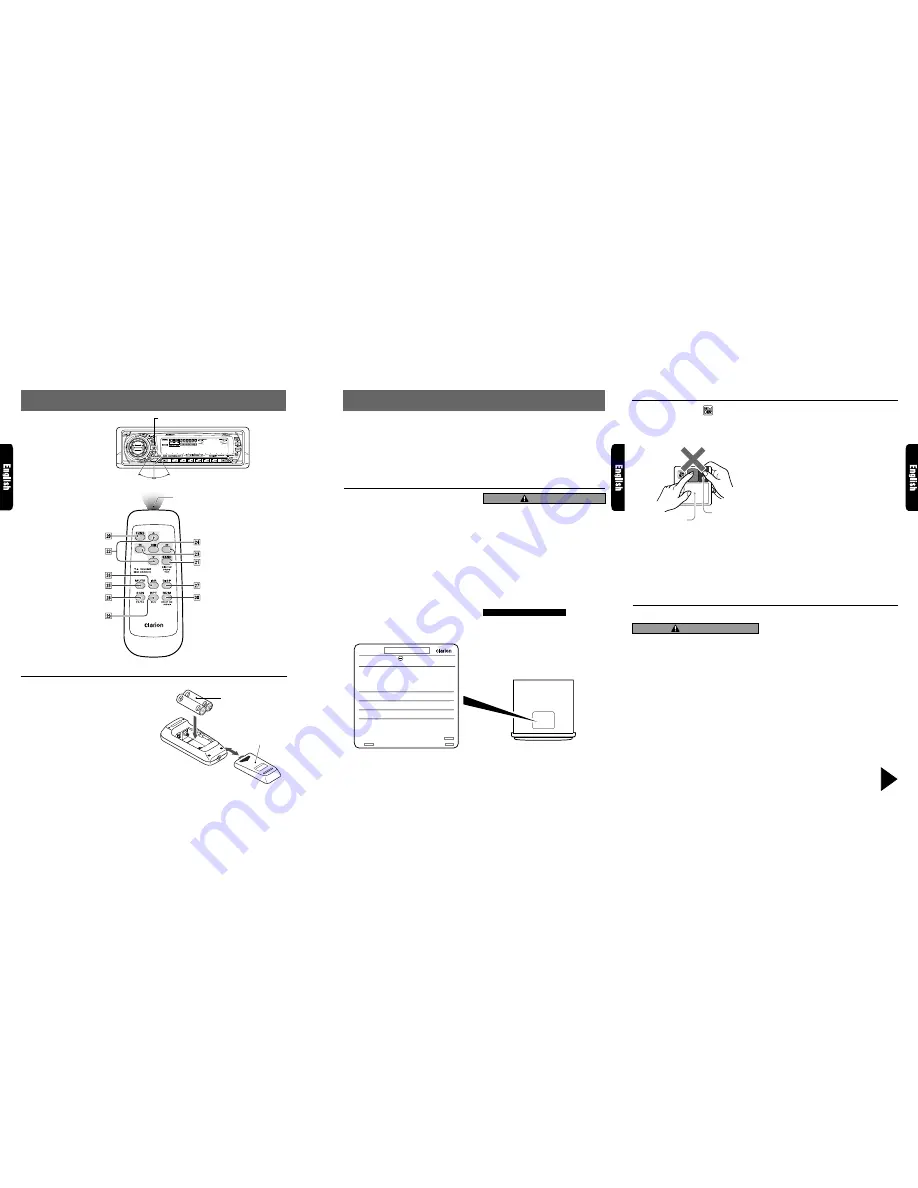
Flip Down Panel

The RMX855Dz uses a flip-down structure that makes possible large-size displays.

CAUTION

When closing the FLIP DOWN PANEL, be
careful not to catch your fingers.  They could
be injured.

1. Always use the RMX855Dz with the FLIP

DOWN PANEL closed.

2. Do not force operations or use this device ab-

normally when opening or closing the FLIP
DOWN PANEL.

3. Do not use the FLIP DOWN PANEL as a tray

to place objects on when it is open.

4. When closing the FLIP DOWN PANEL, do

not press OPEN button 

1

.

5. Strong impacts to the operating or display

section can cause damage or deformation.

6. If the FLIP DOWN PANEL does not open fully,

gently open it with your hand.

Be sure to unfold and read the next page.

Veuillez déplier et vous référer à la page suivante.

Cerciórese de desplegar y de leer la página siguiente.

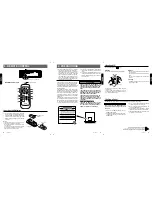
Inserting the Batteries

1. Turn the remote control unit over, then slide

the rear cover in the direction of the arrow.

2. Insert the AA (UM-3/1.5V) batteries that came

with the remote control unit facing in the
directions shown in the figure, then close the
rear cover.

Notes:

Using batteries improperly can cause them to ex-
plode. Take note of the following points:

When replacing batteries, replace both batteries
with new ones.

Do not short-circuit, disassemble or heat batteries.

Do not dispose of batteries into fire or water.

Dispose of spent batteries properly.

6. REMOTE CONTROL

   Remote control unit

Rear side

AA (UM-3/1.5V)
Batteries

Rear cover

Bottom View of Source Unit

12V       GROUND

MODEL

SERIAL No.
PE-

286-               

Clarion Co.,Ltd.

MADE IN                

AM 530-1710kHz/FM 87.9-107.9MHz

THIS DEVICE COMPLIES WITH PART 15 OF THE FCC 
RULES.OPERATION IS SUBJECT TO THE FOLLOWING 
TWO CONDITIONS: (1) THIS DEVICE MAY NOT CAUSE 
HARMFUL INTERFERENCE, AND (2) THIS DEVICE MUST 
ACCEPT ANY INTERFERENCE RECEIVED, INCLUDING 
INTERFERENCE THAT MAY CAUSE UNDESIRED OPERA-
TION.

THIS PRODUCTION COMPLIES DHHS RULES 21 CFR 
SUBCHAPTER J APPLICABLE AT DATE OF MANUFACTURE.

US AND FOREIGN PATENTS LICENSED FROM DOLBY 
LABORATORIES LICENSING CORPORATION

CLARION CO.,LTD.
50 KAMITODA,TODA-SHI,SAITAMA-KEN,JAPAN

MANUFACTURED:

ISR

RMX855Dz

Receiver for remote control unit

Signal transmitter

Operating range: 30

°

 in all directions

Summary of Contents for RMX855Dz

Page 1: ...FMYREPRODUCTORDE MINIDISCOSCONCONTROLDECAMBIADOR DEDISCOSCOMPACTOS MINIDISCOS Owner s manual Mode d emploi Manual de instrucciones All Rights Reserved Copyright 1998 Clarion Co Ltd Printed in China Imprimé en Chine Inpreso en China 1998 12 CL C PE 4015B 280 7234 00 Clarion Co Ltd ISR RMX855Dz ...

Page 2: ...ad Memory Approximately 10 Seconds for Shock and Vibration 4V 4 Channel RCA Line Level Output with Fader Control 4V 2 Channel Non Fade RCA Line Level Output with Volume Control 180W 45W 4 Maximum Power Output 11 ESPECIFICACIONES Sintonizador de FM Gama de frecuencias 87 9 a 107 9 MHz Sensibilidad útil 11 dBf Sensibilidad a 50 dB de silenciamiento 17 dBf Selectividad de canal alternativo 75 dB Sepa...

Page 3: ...be able to get it back out of the MD player or it may damage the MD player Storage Do not expose minidiscs to direct sunlignt or any heat source Do not expose minidiscs to excess humidity or dust Do not expose minidiscs to direct heat from heaters Cleaning If the MD cartridge is dirty wipe off the dirt with a soft dry cloth Flip Down Panel The RMX855Dz uses a flip down structure that makes possibl...

Page 4: ...sh in OPEN button 1 to unlock the FLIP DOWN PANEL If the FLIP DOWN PANEL does not open fully gently open it with your hand 3 Pull the DCP toward you and remove it DCP 4 Close the HOLD FLAP HOLD FLAP CAUTION Be sure to close the HOLD FLAP for safety when removing the DCP With the FLIP DOWN PANEL opened Ouverture du PANNEAU RABATTABLE Apertura del PANEL ABATIBLE Display Afficheur Visualizador 1 OPEN...

Page 5: ...tches between playback and pause Moves tracks up and down When pressed and held for 1 second Fast forward fast backward Switches between playback and pause Turns mute on and off Preset scan When pressed and held for 2 seconds Auto store No function No function Scan play Repeat play Random play Scan play When pressed and held for 2 seconds Disc scan play Repeat play When pressed and held for 2 seco...

Page 6: ...matically remembers its last operation mode and will automatically switch to display that mode 3 Press and hold POWER button 3 for 1 sec ond or longer to turn off the power for the unit Note System check The first time this unit is turned on after the wire connections are completed it must be checked what equipment is connected When the power is turned on SYSTEM CHCK appears in the display so pres...

Page 7: ... the unit s non fader output terminal 1 Press A M button and select NON FADVOL 2 Turning the Rotary knob clockwise increases the output volume turning it counterclockwise decreases the output volume The factory default setting is 4 Setting range 0 to 7 Basic Operations 3 When the adjustment is complete press A M button several times until the function mode is reached Setting tone bypass The tone b...

Page 8: ...direction When Z enhancer 1 is selected you can adjust the bass in the range of 2 When Z enhancer 2 is selected you can adjust the treble in the range of 2 When Z enhancer 3 is selected you can adjust the bass and treble in the range of 2 4 When the adjustment is complete press A M button several times until the function mode is reached Note If you set the Z ENHANCER function to ON 1 to 3 you cann...

Page 9: ...e right or left side of SEARCH button to automatically seek a station When the right side of SEARCH button is pressed the station is sought in the direction of higher frequencies if the left side of SEARCH button is pressed the station is sought in the direction of lower frequencies Manual tuning There are 2 ways available Quick tuning and step tuning When you are in the step tuning mode the frequ...

Page 10: ... ISR button again to return to the previous mode Loading an MD 1 Press OPEN button 1 to access the MD insertion slot behind the FLIP DOWN PANEL 2 After confirming the orientation of an MD insert the MD into the insertion slot Notes Never insert foreign objects into the MD insertion slot If an MD is not inserted easily there may be another MD in the mechanism or the unit may require service An MD t...

Page 11: ...t side of SEARCH button for 1 second or longer Top function The top function resets the MD player to the first track of the disc Press TOP button to play the first track track No 1 on the disc Scan play The scan play locates and plays the first 10 seconds of each track on a disc automatically This function continues on the disc until it is canceled The scan play is useful when you want to select a...

Page 12: ...0 characters long can be stored in memory and displayed for radio stations and CDs The numbers of titles that can be entered for each mode are as follows 1 PressFNCbutton3toselectthemodeyouwant to enter a title radio CD changer or TV Titles cannot be entered for MDs with this unit 2 Select and play a CD in the CD changer or tune to an appropriate TV or radio station 3 Press DISP button and display...

Page 13: ...e user can turn this message display on or off The factory default setting is ON 1 Press and hold ADJ button 4 for 1 second or longer to switch to the adjustment selection display 2 Press the right or left side of SEARCH button to select MESSAGE 3 Press ENT button 2 4 Turn the Rotary knob clockwise to set the message display to ON turn it counterclockwise to set the message display to OFF 5 Pressi...

Page 14: ...disc Note If the CD playing is not a CD text CD or no user title has been input NO TTL appears in the display Scrolling a CD text title When a CD text title is longer than 11 characters you can scroll the display as follows 1 Display the CD text title disc or track 2 Press TITLE button 4 The title scrolls Selecting a CD Each of the Direct button 9 corresponds to a disc loaded into the magazine Sel...

Page 15: ...t track continues to play Repeat play The repeat play continuously plays the current track This function continues automatically until it is canceled 1 Press RPT button 6 RPT lights in the display and the current track is repeated 2 To cancel the repeat play press RPT button 6 again RPT goes off from the display and normal play resumes Disc repeat play After all the tracks on the current disc have...

Page 16: ...ARCH button to move ahead to the beginning of the next track 2 Each time you press the right side of SEARCH button the track advances ahead to the beginning of the next track Track down 1 Press the left side of SEARCH button to move back to the beginning of the current track 2 Press the left side of SEARCH button twice to move to the beginning of the previous track Fast forward fast backward Fast ...

Page 17: ...y continuously plays the current track This function continues automatically until it is canceled 1 Press RPT button 6 RPT lights in the display and the current track is repeated 2 To cancel the repeat play press RPT button 6 again RPT goes off from the display and normal play resumes Disc repeat play After all the tracks on the current disc have been played the disc repeat play automatically repl...

Page 18: ... the current station to that preset memory Auto store Auto store selects 6TV stations automatically and stores each one into a preset memory If there are not 6 stations with good reception stations previously stored in memory remain and only the strong stations are stored into memory TV Operations 1 Press BND button and select the desired TV band TV1 or TV2 2 Press and hold AS button 5 for 2 secon...

Page 19: ...ond or longer to switch to the adjustment selection display 2 Press the right or left side of SEARCH button to select ANA SENS 3 Press ENT button 2 4 Turn the Rotary knob clockwise or counterclockwise to set the sensitivity of the spectrum analyzer You can choose one of LOW MID LOW MID MID HIGH or HIGH for the sensitivity of the spectrum analyzer 5 Pressing ENT button 2 returns to the adjustment s...

Page 20: ... G EQ effect is set to OFF the adjustment made in the G EQ operations is not reflected in the music source Selecting a G EQ menu 1 Press A M button and select G EQ G EQ blinks in the display 2 Press BND button to select BASC basic BASC appears in the function mode indication 3 Press one of the Direct buttons 9 and select the desired G EQ menu To select the user memory press BND button to select US...

Page 21: ...e EFFECT LEVEL INITIAL DELAY REAR MIX REVERB TIME or ROOM SIZE DSP Operations and HIGH or LIVENESS available for the items to be adjusted For details on each adjustment item refer to the owner s manual supplied with the DPH7500z 4 Turn the Rotary knob clockwise or counterclockwise to make the adjustment 5 Repeat steps 3 to 4 to complete the adjustment and press ADJ button 4 6 Press and hold one of...

Page 22: ... or unlit When P EQ is unlit the P EQ effect is set to OFF Note If the P EQ effect is set to OFF the adjustment made in the P EQ operations is not reflected in the music source DSP Operations Selecting a P EQ menu 1 Press A M button and select P EQ P EQ blinks in the display 2 Press BND button to select BASC basic BASC appears in the function mode indication 3 Press one of the Direct buttons 9 and...

Page 23: ...he car is parked in a humid place Replace with a fuse of the same amperage If the fuse blows again consult your store of purchase Consult your store of purchase 1 Turn the unit off 2 Remove all wires attached to the power antenna lead Check each wire for a possible short to ground using an ohm meter 3 Turn the unit back on 4 Reconnect each amplifier remote wire to the power antenna lead one by one...

Page 24: ...wait for a while to cool off MD changer This is a failure of MD changer s mecha nism and consult your store of purchase Replace with a non scratched non warped disc Eject the disc then reload it properly Load a pre recorded MD in the MD changer An MD is caught inside the MD deck and is not ejected An MD cannot be played due to scratches etc An MD is loaded upside down inside the MD deck and does n...

Page 25: ...boratories Licensing Corporation Specifications and design are subject to change without notice for further improvement Audio Maximum Power Output 180 W 45 W 4 ch EIAJ Continuous Average Power Output 17 W 4 into 4 Ω 20 Hz to 20 kHz 1 THD Bass Control Action 30 Hz 15 dB Treble Control Action 10 kHz 10 dB Line Output Level MD 1 kHz 4 V General Power Supply Voltage 14 4 V DC 10 8 to 15 6 V allowable ...

Page 26: ...30 RMX855Dz Memo ...

Reviews: