background image

1-8

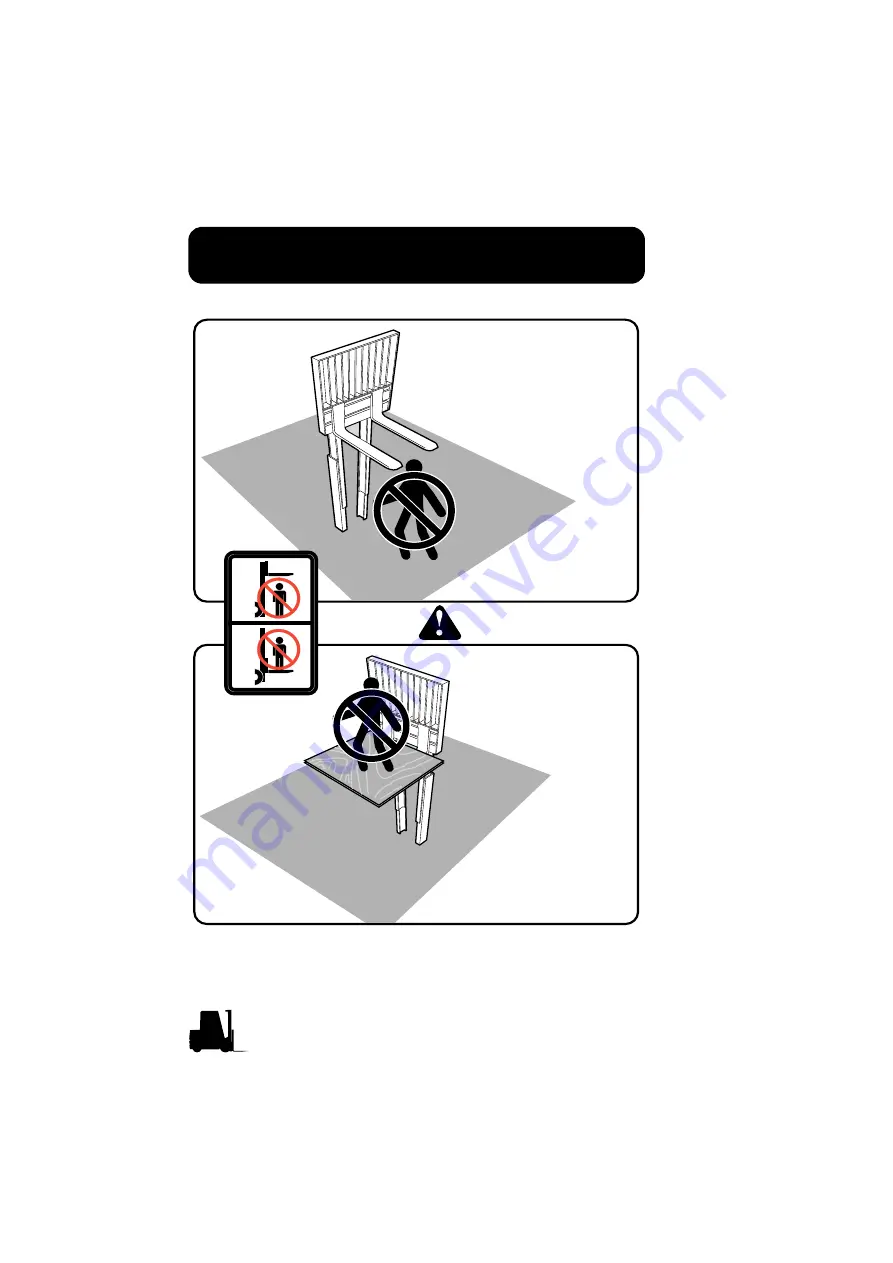
Fork Safety

Fork Safety

Never allow anyone to
walk under raised forks.

There is special 
equipment to raise 
people for overhead 
work. DO NOT USE 
LIFT TRUCKS.

2372604

DANGER

Summary of Contents for GEX 40

Page 1: ...ELECTRIC RIDER LIFT TRUCKS Part No 8106240 OM 899 Rev 1 3 Jun 2019 GEX 40 45 50 Do not remove this manual from the truck...

Page 2: ......

Page 3: ...thers YOU can prevent accidents First Learn safe operating rules and your company rules Next Read your Operator s Manual If you do not understand it ask your supervisor for help Learn about the unit y...

Page 4: ...Operator not experienced with lift truck operation Basic safety rules not followed Lift truck not maintained in safe operating condition For these reasons CLARK wants you to know about the safe opera...

Page 5: ...tandards in safety Remember before you start operating this lift truck be sure you understand all driving procedures It is your responsibility and it is important to you and your family to operate you...

Page 6: ...iv...

Page 7: ...nd Safety Messages x Section 1 General Safety Rules 1 1 Section 2 Operating Hazards 2 1 Section 3 Common Truck 3 1 Section 4 Operator Compartment and Controls 4 1 Section 5 Operatoring Procedures 5 1...

Page 8: ...ck rest parking brake safety restraint system seat belts and horn are standard equipment Safe productive operation of a lift truck requires both skill and knowledge on the part of the operator The ope...

Page 9: ...can be scheduled to meet your particular application and lift truck usage The procedures for a periodic planned maintenance program that covers inspections operational checks cleaning lubrication and...

Page 10: ...n the safe efficient operation of your lift truck Section 6 Operator Maintenance and Care presents details on how to perform the operator s daily safety inspection and refuel the lift truck Section 7...

Page 11: ...topic in the table of contents check the index at the back of the manual We urge you to first carefully read the manual from cover to cover Take time to read and understand the information on general...

Page 12: ...ructions signs and messages Damage to the truck death or serious injury to you or other persons may result if these messages are not followed If warning decals are damaged they must be replaced Contac...

Page 13: ...on ts 1 3 Seat Belts 1 4 No Riders 1 5 Pedestrians 1 6 Operator Protection 1 7 Fork Safety 1 8 Pinch Points 1 9 Travel 1 10 Grades Ramps Slopes and lnclines 1 11 Surface and Capacity 1 12 Tip Over 1 1...

Page 14: ...J KLJKMAF KJASDJK LAKJ LASDJ LKJ L KLJM LAKJSDD JKL JASD K LKH LLKJDF LKJL K LKJASFDJ KLJKMAF KJASDJK LAKJ LASDJ LKJ L KLJM LAKJSDD JKL JASD K LKH LLKJDF LKJL K LKJASFDJ KLJKMAF KJASDJK LAKJ LASDJ LKJ...

Page 15: ...th yourjob Dowatch forpedestrians Don t blocksafetyoremergency equipment Dowearsafetyequipment when required Don t smoke in NOSMOKING areas orwhen refueling XXX If forklift truckistobe operated outdoo...

Page 16: ...1 4 Seat Belts Seat Belts ALWAYS BUCKLE UP Seat beltscan reduce injuries...

Page 17: ...Section 1 General Safety Rules No Riders 1 5 No Riders...

Page 18: ...rsonas en la zona de trabajo aun si el montacargas tiene luces de advertencia o alarmas Las dem s personas pueden no estar atentas a lo que hace Watch where you are going Look in the direction of trav...

Page 19: ...Section 1 General Safety Rules Operator Protection 1 7 Operator Protection Keep under the overhead guard Always keep your body within the confines of the truck...

Page 20: ...1 8 Fork Safety Fork Safety Never allow anyone to walk under raised forks There is special equipment to raise people for overhead work DO NOT USE LIFT TRUCKS 2372604 DANGER...

Page 21: ...Pinch Points 1 9 Pinch Points WARNING Keep hands feet and legs out of the upright WARNING Don t use the upright as a ladder CAUTION Never try to repair the upright carriage chain or attachment yoursel...

Page 22: ...tion When handling bulky loads that restrict your vision operate your truck in reverse to improve visibility Be sure to pivot in the seat to give maximum visibility RIGHT WRONG Unstable loads are a ha...

Page 23: ...ction 1 General Safety Rules Grades Ramps Slopes and lnclines 1 11 Grades Ramps Slopes and lnclines WARNING Never turn on a grade either loaded or unloaded Unloaded Forks Downgrade Loaded Forks Upgrad...

Page 24: ...cause a truck to tip over or lose traction for braking or driving WARNING Know the weight of your truck and load Especially when using elevators Know the capacity of the elevator you intend to use Do...

Page 25: ...f the truck This condition is even more likely with excessive for ward tilt braking in forward travel or accelerating rearward Longitudinal tip over can occur by driving with the load down slope on a...

Page 26: ...tarts to tip over WARNING DO NOT JUMP IMPORTANT Your chances for survival in a tip over are better if you stay with the truck in your seat Brace yourself as illustrated below 1 Make sure your seat bel...

Page 27: ...Rules Parking 1 15 Parking Never park on a grade Always come to a complete stop before leaving truck Be sure travel control is in NEUTRAL Lower forks fully to floor and tilt forward Set parking brake...

Page 28: ...ve the tire and wheel inspected by a person trained and authorized to do tire and wheel mainte nance The tire may require removal and repair Incorrect low tire pressure can reduce the stability of a l...

Page 29: ...nce Fast Turns and High Loads 2 4 Docks Drop Offs 2 5 Right Angle Stacking 2 6 Chain Slack 2 7 Pallets and Skids 2 8 This Section shows some of the hazards that may cause you or someone around you to...

Page 30: ...2 2 Loose Loads Loose Loads WARNING Loose or unbalanced loads are dangerous Observe these precautions Never carry loose or uneven material Center wide loads Stack and band loose material...

Page 31: ...learance A long load reduces the capacity of the truck Know and understand your truck load rating When extra long material makes it necessary to travel with the load elevated do so with extreme care a...

Page 32: ...oad Check your clearances Keep the load low and tilted back WARNING Watch overhead clearance Moving into overhead structures can tip a truck over or spill a load WARNING Slow down before turning The t...

Page 33: ...hazards you must Talk to the truck driver yourself make sure the driver does not move the trailer until you are done Apply trailer brakes Use wheel chocks Use trailer to dock locking system if availab...

Page 34: ...2 6 Right Angle Stacking Right Angle Stacking SLOWLY WARNING When right angle stacking or moving with a raised load to clear low objects avoid sharp turns and move slowly...

Page 35: ...chains mean rail or carriage hang up Raise the forks before you move or broken chains can result WARNING Keep hands feet and legs out of the upright WARNING Don t use the upright as a ladder CAUTION N...

Page 36: ...G Do not move or store materials on damaged pallets or skids Items can fall through them causing severe injury or death Be sure the pallet or skid you are using is in good condition and does not have...

Page 37: ...Section 3 Common Truck Contents 3 1 Common Truck Contents Truck Description 3 2 Operator Controls 3 3...

Page 38: ...2 Overhead Guard 3 Seat and Seat Belt 4 Counterweight 5 Steer Axle Wheels Tires 6 Upright and Carriage 7 Load Backrest 8 Forks 9 Drive Axle Wheels Tires The truck shown above is a typical representat...

Page 39: ...circuits are disconnected shut off and the key can be removed Seat Adjustment The fore and aft adjustment lever is located on the front under the seat To unlock pull the lever to the left and adjust t...

Page 40: ...is located just above the brake pedal as shown To release the parking brake pull toward you WARNING Always apply parking brake before leaving truck WARNING Never operate your lift truck with a defect...

Page 41: ...he steering handwheel Service Brake Your truck has a manual service brake system with a single pedal that actuates the master cylinder Direction Control Lever This lever is typically on the left side...

Page 42: ...the center or neutral positions When the lift control lever is pushed forward the fork carriage is lowered When the lift control lever is pulled back the fork carriage is raised Tilt Control Lever Wit...

Page 43: ...d lifting height data Shows the maximum load capacity of this truck with relation to load centers and fork heights see diagram on plate Personal injury and damage to the truck can occur if these capac...

Page 44: ...ng injury in the event of a tip over or off the dock mishap Lift trucks can be tipped over if operated improperly Analysis of lift truck accidents has shown that the driver cannot react quickly enough...

Page 45: ...tween moving parts of the upright Keep Away from Forks Decal This safety decal is placed on the upright to warn of the danger of injury from forks when they are in the raised position Do not ride on o...

Page 46: ...3 10...

Page 47: ...Section 4 Operator Compartment and Controls Contents 4 1 Operator Compartment and Controls Contents GEX40 50 Operator Compartment 4 2...

Page 48: ...2 13 14 4 1 Steering Handwheel 2 Horn Button 3 Turn Signal Lever 4 Key Switch 5 Brake Pedal 6 Dash Display 7 Accelerator 8 Lift Control Lever 9 Tilt Control Lever 10 Auxiliary Control Lever 11 Forward...

Page 49: ...ents 1 Battery State of Charge indicator 2 Slow Speed Mode indi cator Turtle mark 3 Date and time display 4 Hour meter and speed display 5 Massage area and truck direction indicator 6 Parking brake LE...

Page 50: ...tes 10 charge condition The top 8 LEDs are blue and indicate proper battery running level The bottom two LEDs are red and indicate the need to charge the battery If it is less than 10 1 bar the LEDs w...

Page 51: ...ve to Menu mode This button is used for programming and should be used by a trained technician only Up arrow button Enter button Pressing this button will move to upper menu This button is used for pr...

Page 52: ...inimizing the acceleration function Normal It is normal operating mode with a smooth acceleration rate Power Powerful acceleration is possible and the work ability will be improved Plus button Increas...

Page 53: ...Section 5 Operating Procedures Contents 5 1 Operating Procedures Contents Before Operating the Truck 5 2 Starting from a Safe Condition 5 3...

Page 54: ...ibility of the operator Do not start or operate the truck or any of its functions or attachments from any place other than the designated operator s position CAUTION Inspect your lift truck before ope...

Page 55: ...are fully lowered to the floor or ground 3 You are familiar with how all the controls function and have read the Operator Manual 4 All controls are in neutral or other correct position 5 Truck has re...

Page 56: ...echanism is engaged CAUTION Never adjust the driver s seat while the truck is moving to avoid the possibility of loss of control and of personal injury Buckling Up Buckle up Be sure that you put on th...

Page 57: ...POWER Travel direction When several messages are simultaneously displayed they will be displayed in the order of Alarm Warning and Normal condition If many alarm conditions have simultaneously occurre...

Page 58: ...start after cooling down 066 208 Low battery voltage Replace with charged bat tery 079 Started with wrong sequence Before starting place the Forward Reverse lever to N position Before starting release...

Page 59: ...ck is reduced Some of the other conditions that may affect stability are ground and floor conditions grade speed loading dynamic and static forces and the judgement exercised by the operator Trucks eq...

Page 60: ...their neutral positions and return to the seat before recommencing operations Always operate the control switch from a properly seated position 2 Lift lever Raise and lower the forks for loading Raise...

Page 61: ...ns 4 Attachment lever Operates the attachment Attachment speed can be adjusted by the extent of operating the lever NOTICE After the system has been activated return the acceler ator pedal and all of...

Page 62: ...e accelerator will cause the truck to slow more rapidly IMPORTANT Stop a lift truck as gradually as practical Hard braking and wheel sliding are dangerous and can cause tip over or the truck could los...

Page 63: ...a truck up to anyone standing in front of an object Protect yourself and those around you Operate the truck only from the designated operator s position Stay within the confines of the lift truck pro...

Page 64: ...debris in your path that may cause the truck to swerve or tip If these conditions are unavoidable slow down and carefully drive past them Slow down for wet or slippery surfaces Avoid any sudden movem...

Page 65: ...do not indulge in stunt driving or horseplay Observe traffic rules Watch for people and hazards Slow down Be in full control of your lift truck at all times Follow the instructions in this manual to...

Page 66: ...is listed on the nameplate In areas classified as hazardous use only trucks approved for use in those areas If you are unsure of the classification of the area you wish to enter check before entering...

Page 67: ...ckwards Keep the load back against the carriage Loads placed out on the ends of the forks can make the lift truck less stable and more likely to tip up Lift and lower with the upright must vertical or...

Page 68: ...Steer clear of bumps holes and loose materials or debris on the ground Lift and tilt slowly and smoothly Go slowly when turning Cross railroad tracks slowly at an angle wherever possible Use special...

Page 69: ...oad being moved If the forks are longer than the load move the tips partially under the load without extending beyond the load Raise the load to clear the floor Back out several inches or whatever dis...

Page 70: ...tack The lead ing edge and sides of the load pallet should be lined up exactly with the near edge and side of the load or rack on which you are stacking 4 Stop close to the stack and further lift rais...

Page 71: ...tipping of other adjacent loads or materials behind the load being moved If the forks are longer than the load move the tips partially under the load without extending beyond the load Raise the load t...

Page 72: ...Never park in areas that block emergency routes or equipment access to fire aisles or stairways and fire equipment Before leaving the operator s position 1 Bring truck to complete stop 2 Put the direc...

Page 73: ...s 6 4 Concluding the Inspection 6 5 NOTICE The Occupational Safety and Health Act OSHA requires that truck users examine their trucks before each shift to be sure they are in safe working order Defect...

Page 74: ...unsafe condition remove the key and report the condition to the proper authority If the truck becomes unsafe in any way while you are operating it stop operating the truck report the problem immediate...

Page 75: ...d drive axle 5 Check for hydraulic oil leaks and loose fittings Do not use bare hands 6 Be sure that the driver s overhead guard and any other safety devices are in place undamaged and attached secure...

Page 76: ...uck on check the dash display The display should show the charge remaining on the battery or a fault code If the fault code is not an operator fault code call a service technician 4 Check hydraulic fl...

Page 77: ...ompleted and turn it in to the person responsible for lift truck mainte nance Be sure any unusual noises or problems are investigated immediately Do not operate a lift truck that has a maintenance pro...

Page 78: ...6 6...

Page 79: ...Section 7 Emergency Towing Contents 7 1 Emergency Towing Contents Towing Precautions 7 2 Towing Procedures 7 3...

Page 80: ...and to the care of your lift truck to use the proper equipment and carefully follow these recommendations for safe towing WARNING DO NOT tow a lift truck if there is a problem with the brakes or tires...

Page 81: ...proved solid metal tow bar with towing couplers that connect to the towing pins in the counterweight or that connect to the frame or chassis through the counterweight of each truck 6 Release the parki...

Page 82: ...lever in the NEUTRAL position and turn the key switch to the OFF position Engage the parking brake Remove the key and when necessary block the wheels to prevent the truck from rolling WARNING Always e...

Page 83: ...Section 8 Planned Maintenance Contents 8 1 Planned Maintenance Contents Lift truck Maintenance 8 2...

Page 84: ...ert for any indication that your truck may need service and have it attended to promptly You play an important part in maintenance Only you can make sure that your lift truck regularly receives the ca...

Page 85: ...enance Intervals Typical Operating Conditions Time intervals between maintenances are largely determined by operating conditions For example operation in sandy dusty locations requires shorter mainten...

Page 86: ...Check truck for obvious damage and leaks Check clean battery terminals Check electrolyte level Check capacity warning plates and decals Check condition of tires and wheels remove embedded objects Che...

Page 87: ...ectrolyte level Check battery cables truck receptacle Perform battery load test Check drive motor Check lift motor Check steer motor Test ground Clean drive axle air vent Check drive axle fluid level...

Page 88: ...shall be done in conformance with the manufacturer s recommenda tions 3 A scheduled planned maintenance lubrication and inspection system shall be followed 4 Only trained and authorized personnel sha...

Page 89: ...rol mechanisms warning de vices lights lift overload devices lift and tilt mechanisms articulating axle stops and frame members must be carefully and regularly inspected and maintained in a safe opera...

Page 90: ...of loose or defective parts 19 Modifications and additions that affect capacity and safe truck operation must not be done without the manufacturer s prior written approval Capacity operation and main...

Page 91: ...ndustrial Standards OSHA 2206 OSHA Safety and Health Standards 929 CFR 1910 Subpart N Materials Handling and Storage Section 1910 178 Powered Industrial Trucks For sale by Superintendent of Documents...

Page 92: ...ice Brake Operation d Speed Control a Drive Train Noise b Steering Operation c Service Brake Operation d Speed Control e Drive Train Noise f Steering Operation g Service Brake Operation h Speed Contro...

Page 93: ...oil leaks and loose fittings CAUTION HYDRAULIC FLUID PRESSURE Do not use your hands to check for hydraulic leakage Fluid under pressure can penetrate your skin and cause serious injury 5 Be sure that...

Page 94: ...r to the forks Safe use of your truck with minimum down time depends on the correct care and maintenance of the lift chains Most complaints of unacceptable chain performance are a result of poor maint...

Page 95: ...lacement Criteria 1 NEW CHAIN LENGTH The distance from the first pin counted to the last pin counted in a span while the chains are lifting a small load 2 WORN CHAIN LENGTH The distance from the first...

Page 96: ...rcents the load capacity is reduced and the fork must be replaced Inspect the forks for twists and bends Put a 2 thick metal block at least 4 wide by 24 long on the blade of the fork with the 4 surfac...

Page 97: ...e tire not from the side Use a long handled gauge to keep your body away from the side If tires are low do not operate and do not add air Check with a mechanic The tire may require removal and repair...

Page 98: ...ling of solid resistance when the pedal stops The pedal must feel firm and not move down farther after it stops If the pedal continues to creep downward report the failure immediately Do not operate t...

Page 99: ...ses All movements of the upright fork carriage and lift chains must be even and smooth without binding or jerking Watch for chain wobble or looseness the chains should have equal tension and move smoo...

Page 100: ...ring sytem WARNING Fasten your seat belt before driving the truck Direction Control and Brakes Check and make sure that the travel area is clear in front of the truck Push firmly on the brake pedal Re...

Page 101: ...r pedal and allow the truck to accelerate to the desired travel speed Then move the direction control to the REVERSE position while your foot is still depressing the accelerator pedal The truck should...

Page 102: ...W mark on the dipstick by adding recommended hydraulic fluid only as required Do not overfill IMPORTANT When checking hydraulic oil make sure you use a clean wiper and do not let contaminants get on t...

Page 103: ...t or lint e g cotton fibers paper dust etc in the air or on the floor require more frequent cleaning If air pressure does not remove heavy deposits of grease oil etc it may be necessary to use steam o...

Page 104: ...ndling acid concentrates greater than 50 percent acid above 1 400 specific gravity an eye wash fountain must be provided A conveyor overhead hoist or equivalent material handling equipment must be pro...

Page 105: ...reader bar hooks must be the same as the lifting eyes of the battery to prevent damage to the battery If the spreader bar hooks are movable carefully adjust the position width of the hooks so that the...

Page 106: ...loves 2 Hydrogen emissions from charging batteries are flammable No smoking is allowed in the charging area Do not check the elec trolyte level with an open flame Do not allow open flame sparks or ele...

Page 107: ...he area in good repair and working properly If the battery is to be serviced be sure there are provisions to flush and neutralize spillage and to disperse ventilate fumes from gassing batteries on cha...

Page 108: ...n and protect the truck battery New Truck Batteries Apply a light coat of BATTERY SAVER and CLEANER to entire surface of battery Allow to set for approximately 30 seconds then wipe thoroughly with a w...

Page 109: ...y clean and dry Wash down as needed 8 Keep battery service records Battery Installation 1 Use only a lead acid battery with the voltage and ampere hour rating specified for the truck 2 When changing b...

Page 110: ...uring inspection check the following cable condition Terminal for loosing or corrosion Insulation for hardening and cracking Evidence of over heating Worn or thin insulation Do not repair cable by cut...

Page 111: ...Section 9 Specifications Contents 9 1 Specifications Contents GEX40 50 9 2...

Page 112: ...4 000kg 500mm load center 8 000lbs 24in GEX 45 4 500kg 500mm load center 9 000lbs 24in GEX 50 4 990kg 500mm load center 10 000lbs 24in Gross Vehicle Empty Vehicle Loaded Drive Empty Drive Weight kg l...

Page 113: ...55 Drive Axle Fluid Recommendation MOBIL Fluid 424 CLARK 1809371 Power Steering Fluid Recommendation Uses main hydraulic sump oil supply Brake Reservoir Normal application CLARK Specification SAE J 17...

Page 114: ...9 4...

Page 115: ...ection Control Lever 3 5 Do s and Don ts 1 3 Docks Drop Offs 2 5 E Electric Truck Battery Maintenance 8 22 Operator Compartment 4 2 F Fast Turn and High Loads 2 4 Fastener Checks Critical 8 19 Forks 8...

Page 116: ...t Form 8 10 R Ramps 1 11 Rear Swing 2 3 Right Angle Stacking 2 6 Routine Servicing and Maintenance vi S Safe Maintenance Practices 8 6 Safety Signs and Safety Messages x Seat Adjustment 3 3 Seat Belt...

Page 117: ......

Page 118: ......

Page 119: ......

Page 120: ...CLARK MATERIAL HANDLING COMPANY 700 Enterprise Drive Lexington Kentucky 40510 www clarkmhc com Printed Date Jun 2019 Additional copies of this manual may be purchased from YOUR AUTHORIZED CLARK DEALER...

Reviews: