12
indicating that the plasma cutter is sup-
plied with power.
4. Holding the torch away from yourself and
others in the work area, pull the torch
trigger and verify that the pressure indi-
cated on the pressure gauge is at
approximately 65 psi.
Note:
This Plasma Cutter has an internal
safety feature which prevents accidental
arcs. To light the pilot arc, press the torch
button; release it and press it again within 3
seconds The pilot arc will go out after
approximately 2-3 seconds if cutting has not
begun. To relight the pilot arc, simply repeat
the steps above. Avoid unnecessary lighting
of the pilot arc to prevent consumption of the
electrode and nozzle.
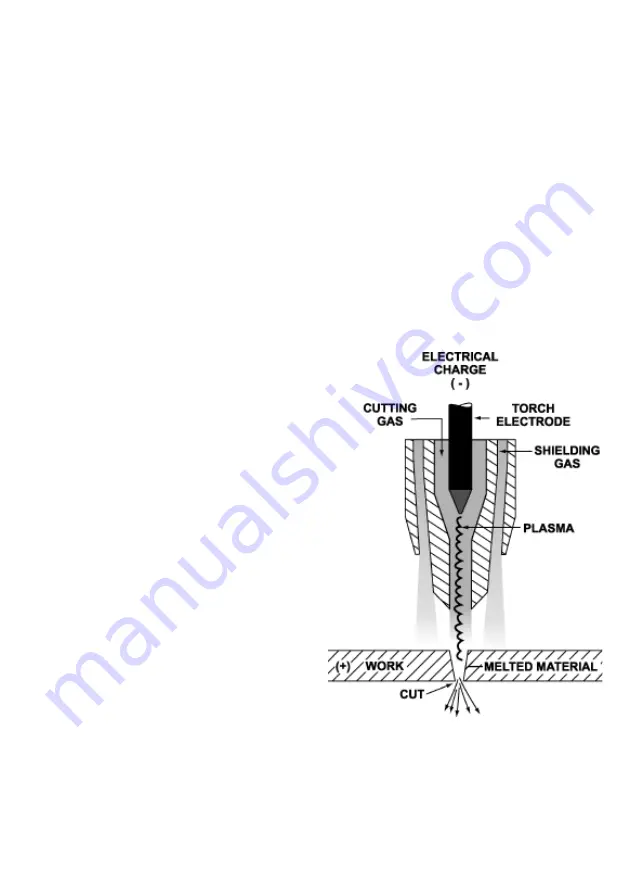
PRINCIPLES OF PLASMA CUTTING
Plasma cutting is a fast, clean and distor-
tion free means of cutting through all types of
metal from mild and stainless steels to alu-
minum, brass and copper.
The process relies upon the chemical
reaction of air when subjected to very high
temperatures. The air is ionized, leaving the
atoms positively charged. In the ionized
state, the air is electrically conductive and
called “plasma.”
A standing electric arc is created to
achieve the very high temperature required
to create plasma. By forcing the plasma
through a small nozzle, the arc is constricted
and its temperature is increased to over
36,000 degrees fahrenheit and concentrated
into a very small area.
When the plasma is directed at a conduc-
tive material (which is connected to the
ground clamp of the plasma cutter) the arc is
transferred through the plasma to the materi-
al. The high energy of the arc melts the
material. The melted metal material is simul-
taneously forced out of the cut area by the
air flow. As this glowing metal is removed
from the path of the plasma arc, the result is
a fast, clean cut.
The standing arc has to be created by
producing an ionized path in the air. This is
achieved by applying a very high voltage, at
high frequency, between the electrode and
the tip/work, causing a high frequency spark.
The main arc will ignite as soon as the tip
and nozzle are ionized.
Whether you have used a plasma cutter
before or not, it is important that you become
familiar with your new plasma cutter. We
strongly recommend that you practice with
your new plasma cutter on scrap metal trying
different base metals, base metal thicknesses,
and cutting positions. By doing this you will
gain a feel for how changes in these variables
affect the cutting process.
Of course, if you have not used a plasma
cutter before, you will need to develop prop-
er cutting skills and techniques as well.
The self-taught operator learns through a
process of trial and error. The best way to
teach yourself how to plasma cut is with
short periods of practice at regular intervals.
All practice cuts should be done on scrap
metal that can be discarded. Do not attempt
to make any cuts on valuable equipment
until you have satisfied yourself that your
practice cuts are of good appearance and
free from major faults.
LEARNING TO PLASMA CUT
Holding the Torch
The best way to hold the cutting torch is the
way that feels most comfortable to you. The
torch can be comfortably held in one hand,
or steadied using two hands. Choose the
Figure 5
. Principles of Plasma Cutting
Summary of Contents for 052249011064
Page 17: ...17 TROUBLESHOOTING...
Page 18: ...18 18 PLASMA CUTTER MODEL WE6493A WIRING DIAGRAM...
Page 19: ...19 19 PLASMA CUTTER MODEL WE6493A PARTS LIST...
Page 20: ...20 PLASMA CUTTER MODEL WE6493A PARTS DIAGRAM...
Page 21: ...21 PLASMA CUTTER MODEL WE6493A TORCH PARTS LIST...
Page 22: ...NOTES...
Page 23: ...NOTES...
Page 24: ...120V PLASMA CUTTER OPERATING MANUAL Model WE6493A WE6493A M001 1204...


