background image

Clarke

®


 American Sanders  Operator's Manual - Sander 1600 120V

                          FORM NO. 70202B - 21 -

FUNCIONAMIENTO DE LA MAQUINA
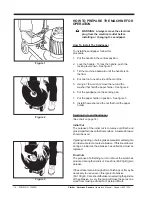
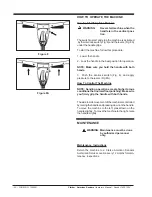
Arranque y parada

AVISO :

Nunca arranque la maquina
cuando la tobera está en posición
vertical.

El interruptor de arranque/parada se opera empujando
el botón de cierre de seguridad (fig. 8) y usando las
palancas (fig. 8A) situadas debajo del mango de
mando.

Para arrancar la máquina, siga este procedimiento :

1.

Baje la tobera.

2.

Bloquee la tobera en la posición de trabajo la
más
confortable para el operador.

NOTA : Siempre tenga el mango con ambas
manos.

3.

Empuje el botón de cierre (fig. 8) y presione
con las manos sobre las palancas (fig. 8A).

DOMINIO DE LA MAQUINA

NOTA : Para realizer las operaciones de
pulimentado es necesario emplear más fuerza
que para realizer las operaciones normales de
abrillantado.  Sujete siempre el mango con las
dos manos.

Para ir de un lado al otro, levante o baje lentamente la
tobera de la máquina.
Para dirigir la máquina hacia la izquierda, presione la
tobera.
Para dirigir la máquina hacia la derecha, levante
despacio la tobera.

MANTENIMIENTO

AVISO : El mantenimiento debe ser

efectuado por untécnico autorizado.

Instrucciones para el mantenimiento
Cada 12 meses, la máquina debe ser mandada a un
centro técnico autorizado Clarke American Sanders
para ser comprobada.

MISE EN SERVICE DE LA MACHINE

Mise en Marche et Arrêt

AVERTISSEMENT: Ne jamais mettre la

machine en marche
lorsque le timon est en
position verticale.

L’interrupteur de marche/arrêt est activé par
pression sur le bouton de verrouillage de sécurité
(fig. 8) et par les leviers (fig. 8A) situés sous la
poignée de commande.

Pour mettre la machine en marche, procéder comme
suit :

1. Abaisser le timon
2. Verrouiller le timon dans la position de travail la

plus confortable pour l’opérateur.

NOTE : Il faut toujours tenir la poignée des deux
mains.
3. Pousser sur le bouton de verrouillage (fig. 8) et

appliquer une pression des mains sur les leviers
(fig. 8A).

MAITRISE DE LA MACHINE

NOTE :Les opérations de ponçage peuvent
générer des mouvements de plus fortes ampli-
tudes que le polissage normal de sol.  Veiller à
tenir la poignée fermement à l'aide des deux
mains.

Pour aller d’un côté à l’autre, lever ou abaisser
lentement le timon de la machine.
Pour faire aller la machine vers la gauche, appliquer
une pression sur le timon.
Pour faire aller la machine vers la droite, relever
légèrement le timon.

ENTRETIEN

AVERTISSEMENT: L’entretien doit toujours

être effectué par un
technicien agréé.

Instructions pour l’entretien
Tous les 12 mois, la machine doit être renvoyée dans
un centre technique agréé Clarke American Sanders ,
pour vérification.

Summary of Contents for 07100A

Page 1: ...an 48906 Fax 517 484 9836 Email CustServe Michco com Web site www Michco Com Parts Web site www FloorMachineParts Com Order Parts on Line at www FloorMachineParts Com Directly to Parts Service By Emai...

Page 2: ...ortootherpersonnel damagetothemachine or to other property could occur as well You must have training in the operation of this machine before using it If your operator cannot read English have this ma...

Page 3: ...es warningsordisclosuresregardingthechemicalsthatareor maybecontainedintheProductsatoraboutsuchworksites Itisthepurchaser sresponsibilitytoknowthecontentof andtocomply with anylawsandregulationsrelati...

Page 4: ...E LIBRO CUIDADO Lea el Libro de Instrucciones antes de usar este aparato Contiene informaci n importante para el uso y funcionamiento correcto y seguro de la m quina Lea este libro completamente antes...

Page 5: ...u lui fournir toutes les explications n cessaires Des versions du manuel existent en d autres langues Toutes les indications de direction figurant dans ce manuel sont visualis es depuis la position du...

Page 6: ...DANGER Dust generated from sanding wood floors can spontaneously ignite or explode Promptly dispose of any sanding dust in a metal container clear of any combustibles Do not dispose in a fire DANGER O...

Page 7: ...ing motion can result in loss of control of the machine which could injure the operator or bystanders Avoid motions that could cause machine to cross from a smooth floor surface to a carpeted or rough...

Page 8: ...arse Para reducir el peligro de explosi n use la m quina s lo en localesperfectamenteventilados CUIDADO El plovo que se crea al pulimentar los suelos de madera puede causar un incendio o una explosi n...

Page 9: ...ancia de seguridad suficiente entre las partes m viles de la m quina y sus manos o sus pies No lleve ropas holgadas AVISO Si no utiliza las ropas de protecci n o el equipamiento adecuado para realizar...

Page 10: ...e d explosion n utiliser la machine que dans des locaux parfaitement ventil s DANGER La poussi re g n r e par le pon age de parquets en bois peut s enflammer ou exploser spontan ment vacuer rapidement...

Page 11: ...ont pas port s durant le pon age Durant une op ration de pon age il faut toujours porter des lunettes de s curit un masque antipoussi res et des v tementsprotecteurs AVERTISSEMENT Pour viter d tre ble...

Page 12: ...50 Weight pounds 111 Modelo Sander 1600 N mero de c digo 07100A Tensi n V 120 Frecuencia Hz 60 Corriente A 14 Potencia hp 1 5 Di metro del disco 15 75 Velocidad de rotation del disco rpm 175 Longitud...

Page 13: ...he sanding pad 7 Put the paper holder in position See figure 3 8 Install the washer and the nut that hold the paper holder Sanding Cuts and Sandpaper See chart on page 14 Initial Cut The purpose of th...

Page 14: ...legir el grosor delpapelabrasivo Unpapeldemasiadofinopodr aobturar los poros de un suelo de madera lo que dificultar a la absorci n de la soluci n colorante PREPARATION DE LA MACHINE AVANT LA MISE EN...

Page 15: ...s 50 grit screen mesh 100grit For final sanding of certain hardwoods and conifers where 100grit a smooth surface is desired screen mesh 120grit For final sanding of certain hardwoods and conifers wher...

Page 16: ...lo parte 945566 25 945567 25 945568 25 945569 50 945570 50 945571 50 945573 50 945574 50 945722 20 945575 50 945723 20 945576 50 945724 20 945725 20 945726 20 945727 20 12 grains Pour supprimer les i...

Page 17: ...ck the brush or pad into position turn the brush or pad driver clockwise 7 Turn the brush or pad counterclockwise to unlock and remove the brush 8 Lift the machine to the vertical position NOTE To pre...

Page 18: ...lados 3 Con el pie baje la palanca de bloqueo 4 Para controlar mejor la m quina tenga el mango cerca del cuerpo mientras trabaja PREPARATION DE LA MACHINE AVANT LA MISE EN SERVICE AVERTISSEMENT D bran...

Page 19: ...avingthesameconfigurationas the plug No adaptor should be used with this product WARNING Topreventpossibleelectricshock protect the machine from rain Keep the machine in a dry building WARNING Topreve...

Page 20: ...unidense para alambre de secci n AVISO Use un a adido de cable de 12 AWG de secci n No use ning n a adido de m s de 50 pies de largo Nunca conecte dos a adidos INSTRUCTIONS POUR LE RACCORDEMENT ELECTR...

Page 21: ...both hands 3 Push the interlock switch Fig 8 and apply pressure to the levers Fig 8A How To Control The Machine NOTE Sanding operations create higher torque conditionsthannormalfloorpolishing Makesure...

Page 22: ...be ser mandada a un centro t cnico autorizado Clarke American Sanders parasercomprobada MISE EN SERVICE DE LA MACHINE Mise en Marche et Arr t AVERTISSEMENT Ne jamais mettre la machine en marche lorsqu...

Page 23: ...22 FORM NO 70202B Clarke American Sanders Operator s Manual Sander 1600 120V NOTES...

Page 24: ...Sanders Operator s Manual Sander 1600 120V FORM NO 70202B 23 Sander 1600 Sander 1600 Sander 1600 Sander 1600 Sander 1600 120V 60Hz 120V 60Hz 120V 60Hz 120V 60Hz 120V 60Hz Section II Parts and Service...

Page 25: ...ts the contacts from being closed If any part of the switchisnotoperating replacethepart Ifanypartofthe electrical system of the machine is not operating or is damaged replace the part Make sure all c...

Page 26: ...asa del sistema de accionamiento 503802 debesercambiadacadaa o Losmodelos 1600 y 1600DC necesitan 236 cm de grasa ENTRETIEN AVERTISSEMENT L entretiendoittoujours tre effectu par un technicien agr PRUD...

Page 27: ...l Sander 1600 120V Sander 1600 Assembly Drawing 3 10 40 42 12 69 13 41 38 55 17 18 42 23 24 25 27 25 68 26 37 26 25 22 28 25 24 23 42 58 53 31 44 33 62 63 61 59 64 70 65 66 56 60 70 57 29 30 34 35 36...

Page 28: ...included w 41 1 41 908275 Cord Assembly includes 40 1 42 85383A Screw 10 32 x 3 4 3 43 930108 Rivet 4 44 70499A Label 1 45 34612A Grip Handle Left 1 46 82100A Lock nut not illustrated 1 47 34613A Grip...

Page 29: ...x 1 6 8 54858A Cover Housing 1 9 902736 Bearing 1 10 58314A Retainer 1 11 442473 Coupling 1 12 58313A Gear Pinion 1 13 902737 Bearing Needle 6 14 N A Cage 1 15 54408A Gear Idler 3 16 58312A Shaft 3 17...

Page 30: ...ring Schematic 6 00 WARNING All electrical repairs must be performed by qualified personnel only Sander 1600 1600DC Motor Schematic 3 00 Clarke American Sanders Operator s Manual Sander 1600 120V FORM...

Page 31: ...NOTES...

Page 32: ......

Page 33: ...A Nilfisk Advance Brand 14600 21st Avenue North Plymouth MN 55447 3408 www clarkeus com Phone 800 253 0367 Fax 800 825 2753 2010 Nilfisk Advance Inc...

Reviews: