background image

5

Parts & Service: 020 8988 7400 / E-mail: Parts@clarkeinternational.com or Service@clarkeinternational.com

ASSEMBLY

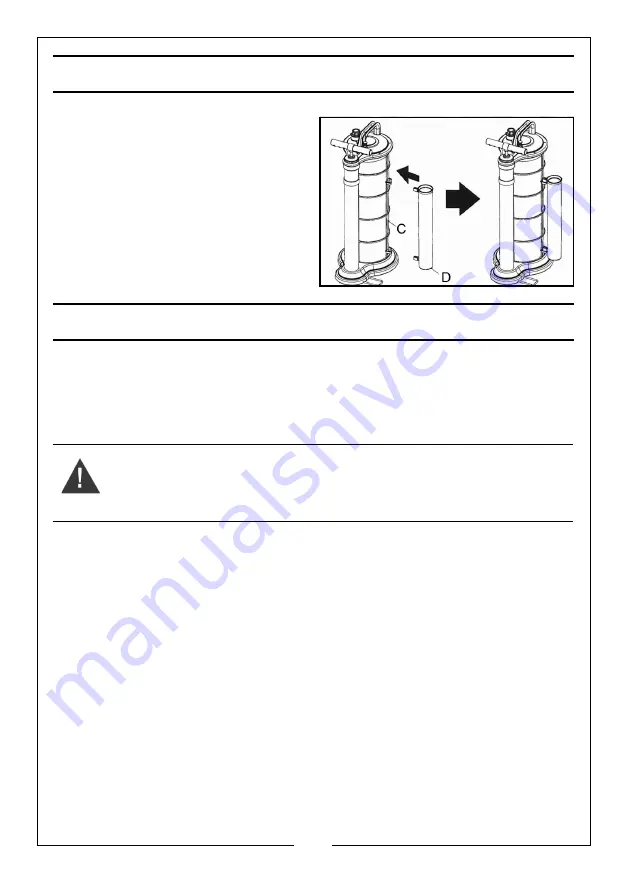
1. Fit the Tube Storage Unit (D) on to 

the hooks of the Tank (C) as 
shown. 

2. Push down until the Tube Storage 

Unit (D) snaps into position.

BEFORE USE

When using the fluid extractor to extract engine oil:

• Make sure the vehicle is level.

• Run the engine for 5 minutes to warm the oil and allow any sludge or 

contamination within the oil to mix.

• Turn off the engine, before using the extractor.

WARNING: MAKE SURE THAT THE OIL TEMPERATURE DOES NOT EXCEED 
70

o

C.

Summary of Contents for 1801928

Page 1: ...OPERATION MAINTENANCE INSTRUCTIONS LS1020 ORIGINAL INSTRUCTIONS 9L OIL FLUID EXTRACTOR MODEL NO CHT928 PART NO 1801928...

Page 2: ...rs around you and you can look forward to your purchase giving you long and satisfactory service GUARANTEE This product is guaranteed against faulty manufacture for a period of 12 months from the date...

Page 3: ...children and unauthorised persons away from the working area 10 Dispose of waste fluids in accordance with local authority regulations DO NOT ALLOW UNCONTROLLED DISCHARGE OF FLUIDS THUS POLLUTING THE...

Page 4: ...keinternational com PART IDENTIFICATION A Housing Cover H Pump Handle B Release Button I Fluid Outlet Housing C Tank J Fluid Inlet Coupler D Tube Storage Unit K Suction Tube with adaptor E Foot rest L...

Page 5: ...wn 2 Push down until the Tube Storage Unit D snaps into position BEFORE USE When using the fluid extractor to extract engine oil Make sure the vehicle is level Run the engine for 5 minutes to warm the...

Page 6: ...be K to the Fluid Inlet Coupler J with the Suction Tube Adapter Connect the other end of the Suction Tube K to the Extraction Tube L with the Extraction Tube Adapter 3 Remove the oil dipstick from the...

Page 7: ...sm operates and the pump handle will lock up To return the handle H to the down position hold down the release valve button B at the top of the pump body and push the handle down 9 Disconnect the Suct...

Page 8: ...akes with this extractor Refer to the vehicle manufacturers instructions before proceeding If no specific instructions exist follow the instructions detailed below 1 Remove the brake fluid reservoir l...

Page 9: ...gularly as required If possible a reservoir top up device should be fitted to the brake fluid reservoir 7 Continue to bleed the system and top up the vehicle reservoir until there are no air bubbles v...

Page 10: ...10 Parts Service 020 8988 7400 E mail Parts clarkeinternational com or Service clarkeinternational com PARTS DIAGRAM...

Page 11: ...14 Spring 15 Bracket Base 16 Arm 17 O Ring 18 Tank 19 Pin 20 Screw 3 8x10mm 21 Float 22 Tube Storage Unit 23 Base 24 Screw 6x15mm 25 Foot rest 26 Fixed Strip 27 Screw 4x10mm 28 Screw M8x16mm 29 Ring S...

Page 12: ......

Reviews: