background image

8

Parts & Service: 020 8988 7400 / E-mail: Parts@clarkeinternational.com or Service@clarkeinternational.com

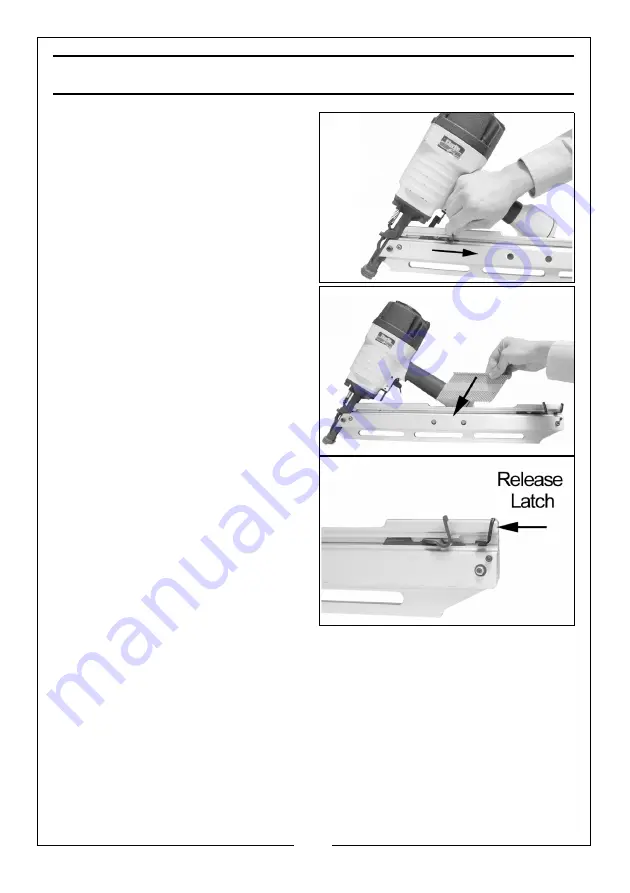
LOADING NAILS

Always disconnect the nailer from the 
air supply before loading nails.

1. Pull the nail pusher back as far as 

possible until the catch clicks into 
place.

2. Slide the nails through the loading 

slot into the magazine as shown.

3. Press the release latch on the rear 

of the magazine and slide the nail 
pusher forward.

Your nailer is now ready to use.

Summary of Contents for 3110397

Page 1: ...OPERATION MAINTENANCE INSTRUCTIONS ORIGINAL INSTRUCTIONS GC1220 REV 1 AIR FRAME NAILER MODEL NO CFN34 PART NO 3110397...

Page 2: ...12 months from the date of purchase Please keep your receipt which will be required as proof of purchase This guarantee is invalid if the product is found to have been abused or tampered with in any...

Page 3: ...e equipment as a hammer applying excessive force of any kind SAFETY AT WORK 1 Never point any operational staple nail gun at yourself any other person or animals 2 Hold the staple nail gun during the...

Page 4: ...e that the safety yoke is not depressed 3 Connect the nail gun to the compressed air supply using suitable hose equipped with quick action connectors 4 Check for proper functioning by applying the muz...

Page 5: ...arkeinternational com or Service clarkeinternational com PRODUCT OVERVIEW The CFN34 is supplied with Safety goggles OIl bottle 4 x hex keys 3 4 5 6 mm moulded carry case Contact your Clarke dealer imm...

Page 6: ...malfunction 2 Place 2 or 3 drops of oil in to the air intake twice a day when the nailer is being used 3 Check all of the nailers screws for tightness CONNECTING THE AIR SUPPLY TO THE NAILER Ensure yo...

Page 7: ...of timber The nailer should not operate If it does the safety mechanism is faulty Do not use the nailer Return it for repair to the place of purchase CHECKING OPERATION OF THE NAILER 1 Press the safet...

Page 8: ...nnect the nailer from the air supply before loading nails 1 Pull the nail pusher back as far as possible until the catch clicks into place 2 Slide the nails through the loading slot into the magazine...

Page 9: ...ise and reduce tool wear If the nail is not driven in sufficiently increase the air pressure in increments of 0 5 bar 7 psi checking the result after each adjustment Avoid triggering the nailer when t...

Page 10: ...until the catch clicks into place 4 Remove the nails from the magazine The jammed nail should then release If the jammed nail does not release proceed as follows 5 Remove the bolt indicated using the...

Page 11: ...IR All repairs must be carried out by a qualified service technician STORAGE When not in use disconnect from air supply clean the nail gun and store in a safe dry childproof location MAINTENANCE CONSI...

Page 12: ...12 Parts Service 020 8988 7400 E mail Parts clarkeinternational com or Service clarkeinternational com DECLARATION OF CONFORMITY...

Page 13: ...13 Parts Service 020 8988 7400 E mail Parts clarkeinternational com or Service clarkeinternational com EXPLODED DIAGRAM...

Page 14: ...7 x 3 45 Safety spacer 13 O ring 56 x 3 1 46 3x16 14 Head valve piston 47 Safety guide 15 Spring seat 48 Pin 3 x 25 16 Compression spring 49 Compression spring 17 Spring washer collar 50 Bolt M5 x 8...

Page 15: ...y pipe 84 Block 70 Safety pipe case 85 Spring 71 Pin case 86 Bolt M5 x 25 72 Spring pin 87 Fixed seat 73 Bolt M6 x 12 88 Nut M6 74 Pusher 89 Nut M5 75 Spring pin 3 x 20 90 Rubber handle case 76 Spring...

Page 16: ......

Reviews: