background image

2

INTRODUCTION

Thank you for purchasing this CLARKE product.

Before attempting to use the tool, please read this manual thoroughly and
follow the instructions carefully. In doing so you will ensure the safety of
yourself and that of others around you, and you can look forward to the tool
giving you long and satisfactory service.

GUARANTEE

This CLARKE product is guaranteed against faulty manufacture for a period of
12 months from the date of purchase. Please keep your receipt as proof of
purchase.

This guarantee is invalid if the product is found to have been abused or
tampered with in any way, or not used for the purpose for which it was
intended.

Faulty goods should be returned to their place of purchase, no product can
be returned to us without prior permission.

This guarantee does not effect your statutory rights.

ENVIRONMENTAL PROTECTION

Do not dispose of this product with general household waste. All tools,
accessories and packaging should be sorted, taken to a recycling
centre and disposed of appropriately.

PARTS & SERVICING

For parts & Servicing, please contact your nearest dealer, or

CLARKE International, on one of the following numbers.

PARTS & SERVICE TEL:  020 8988 7400

PARTS & SERVICE FAX:  020 8558 3622

or    e-mail as follows:

PARTS:   Parts@clarkeinternational.com

SERVICE:    Service@clarkeinternational.com

Summary of Contents for 3120132

Page 1: ...14 PIECE DIE GRINDER KIT Part No 3120132 MODEL No CAT112 OPERATING MAINTENANCE INSTRUCTIONS GC0409 ...

Page 2: ...ave been abused or tampered with in any way or not used for the purpose for which it was intended Faulty goods should be returned to their place of purchase no product can be returned to us without prior permission This guarantee does not effect your statutory rights ENVIRONMENTAL PROTECTION Do not dispose of this product with general household waste All tools accessories and packaging should be s...

Page 3: ... i s n e m i D m m 8 6 x 6 4 x 3 7 1 M P R x a M 0 0 0 2 2 e r u s s e r P r i A g n i k r o W r a b 2 6 i s p 0 9 n o i t p m u s n o C r i A p m o C n i m l 1 5 1 1 m f c 4 d e r i u q e R n o i t c e n n o C P S B 4 1 l e v e l e r u s s e r p d n u o s d e t h g i e w A A B d 8 2 8 l e v e l r e w o p d n u o S A B d 8 3 9 e l d n a h e h t t a n o i t a r b i V s m 9 0 2 Please note that the ...

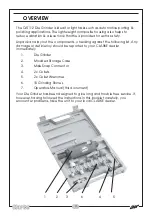
Page 4: ...ainst the following list Any damage or deficiency should be reported to your CLARKE dealer immediately 1 Die Grinder 2 Moulded Storage Case 3 Male Snap Connector 4 2 x Collets 5 2 x Collet Wrenches 6 10 Grinding Stones 7 Operators Manual this document Your Die Grinder has been designed to give long and trouble free service If however having followed the instructions in this booklet carefully you e...

Page 5: ...sing the die grinder eye protection must provide protection from flying particles from the front and the side When grinding always wear an appropriate face mask or respiratory equipment to prevent inhalation of airborne dust Always wear ear protectors when using the die grinder Do not over reach Keep proper footing and balance at all times Never use any type of bottled gas as a source of power for...

Page 6: ...ngling feeling or pain occurs and seek medical advice before resuming use ALWAYS use only the grinding tools supplied with the machine Non standard attachments could become detached during use with serious consequences ALWAYS ensure that any attachments are correctly fastened before connecting the tool to the power supply ALWAYS ensure the workpiece is firmly secured leaving both hands free to con...

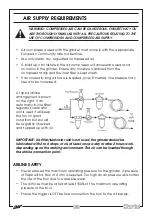
Page 7: ...typical airline arrangement is shown on the right If an automatic in line filter regulator lubricator unit is used it will keep the tool in good condition but should be regularly checked and topped up with oil IMPORTANT If a filter lubricator unit is not used the grinder should be lubricated with 2 to 6 drops of oil at least once a day or after 2 hours work depending upon the working environment T...

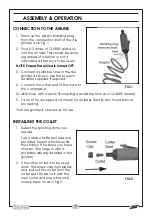
Page 8: ...e hose to the compressor A whip hose with a quick fit coupling is available from your CLARKE dealer 5 Turn on the air supply and check for air leaks Rectify any found before proceding Your die grinder is now ready for use INSTALLING THE COLLET 1 Select the grinding stone you require Two collets of different sizes are provided Select whichever fits the shank of the stone you have chosen The larger ...

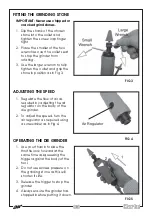
Page 9: ...TANT Never use chipped or cracked grind stones 1 Slip the shank of the chosen stone into the collet and tighten the screw cap finger tight 2 Place the smaller of the two wrenches over the collet seat to stop the grinder from rotating 3 Use the larger wrench to fully tighten the collet and grip the stone in position as in Fig 3 ADJUSTING THE SPEED 1 Regulate the flow of air as required by adjusting...

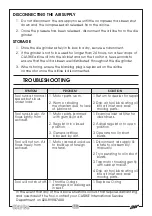
Page 10: ... g n i v o m r i A y l w o l s s n u r l o o T m o r f y l t h g i l s w o l f t s u a h x e d e m m a j s t r a p r o t o M 1 t r i d r o m u g h t i w d e s o l c n i r o t a l u g e R 2 n o i t i s o p w o l f r i a l a r e n e G 3 t r i d y b d e k c o l b r o f r e t l i f r i a t e l n i e n i m a x E 1 s s e n i l n a e l c n e p o o t r o t a l u g e r t s u j d A 2 n o i t i s o p t r o h...

Page 11: ...e use remove the screen filter and flush out the grinder with gum solvent oil or an equal mixture of SAE No10 oil and paraffin Allow to dry before use SERVICE AND REPAIR Major servicing and repair must be carried out by your local CLARKE dealer AIRLINE PERFORMANCE Please note that factors other than the tool may effect its operation and efficiency such as reduced compressor output excessive drain ...

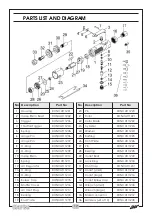
Page 12: ...g n i r a e B 8 2 2 1 1 T A C N O R 0 1 m e t S e v l a V 0 1 2 1 1 T A C N O R 9 2 t a e S t e l l o C 9 2 2 1 1 T A C N O R 1 1 g n i r p S 1 1 2 1 1 T A C N O R 0 3 g n i R k c o L 0 3 2 1 1 T A C N O R 2 1 r o t a l u g e R r i A 2 1 2 1 1 T A C N O R 1 3 p a C t n o r F 1 3 2 1 1 T A C N O R 3 1 g n i R O 3 1 2 1 1 T A C N O R 2 3 l l a m s t e l l o C 2 3 2 1 1 T A C N O R 4 1 g n i R O 4 1 ...

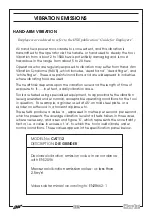
Page 13: ... finger and white finger These are painful conditions and are widespread in industries where vibrating tools are used The health risk depends upon the vibration level and the length of time of exposure to it in effect a daily vibration dose Tools are tested using specialised equipment to approximate the vibration level generated under normal acceptable operating conditions for the tool in question...

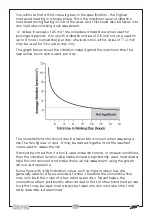
Page 14: ...d per day The uncertainty factor should also be taken into account when assessing a risk The two figures a and K may be added together and the resultant value used to assess the risk It should be noted that if a tool is used under abnormal or unusual conditions then the vibration level could possibly increase significantly Users must always take this into account and make their own risk assessment...

Page 15: ...15 DECLARATION OF CONFORMITY ...

Page 16: ......

Reviews: