


7/2014
A - 9
56091130 - CA30 20B
ENGLISH - A
INSTRUCTIONS FOR USE
IF YOU NEED TO REPLACE THE BATTERIES
Contact your local authorized Clarke distributor for proper batteries.
1.
Set the machine and the on-board charger (if equipped) according to the type of batteries (WET or GEL/AGM). Follow battery installation
2.
instructions as outlined below.
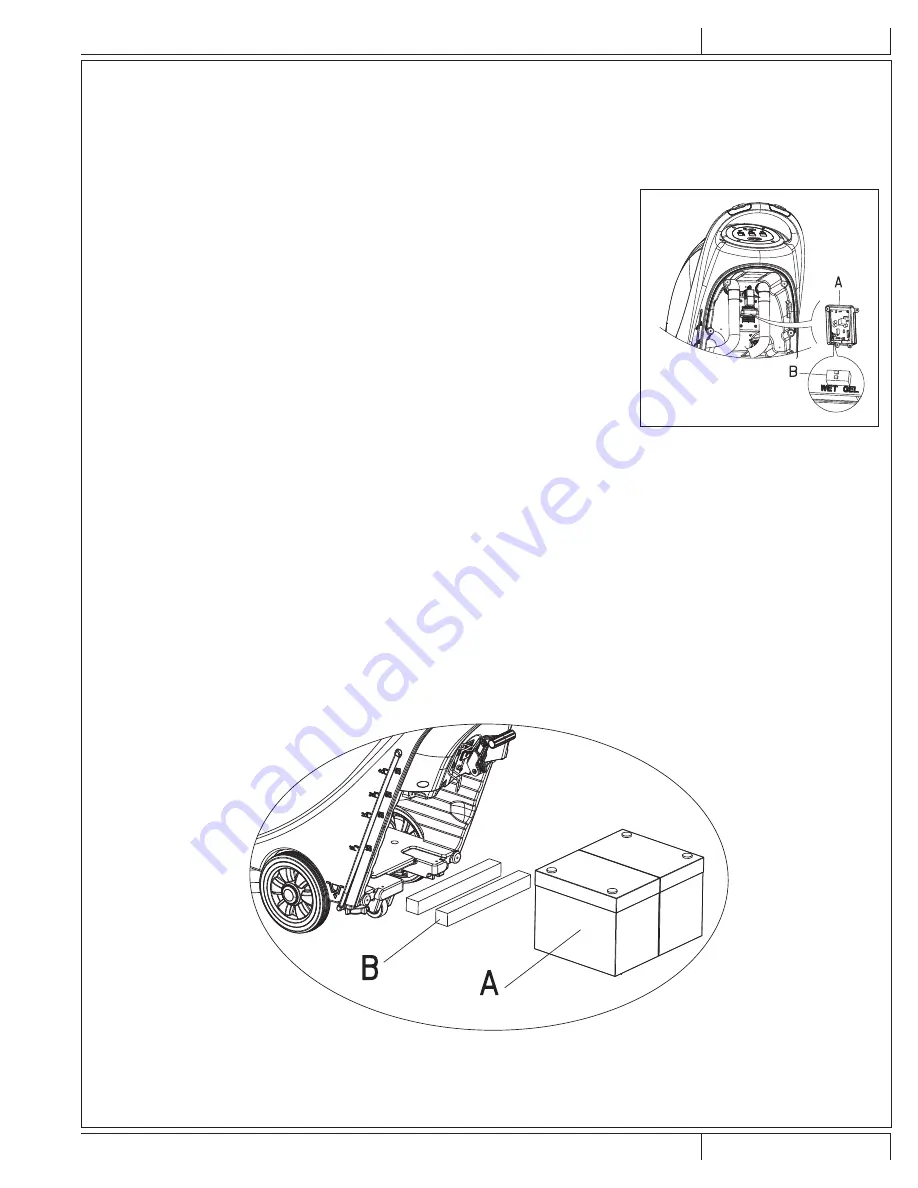
INSTALLING BATTERY AND SETTING BATTERY TYPE (WET OR GEL/AGM)
According to the battery type(WET or GEL/AGM) set the electric circuit board on the on-board charger. The procedures are as follows:
Make sure the battery connector (9) is disconnected. If the machine is based on “AGM” battery
1.
at the factory, go directly to Step 8; otherwise, complete Steps 2, 3, and 4.
Remove drain hose (15)
2.
If equipped with on-board charger, please take off the charge wire from the reel.
3.
Take off the control cover (5), and the battery cover screws (10). Remove the screws on the
4.
PCB stand. The DIP switch (B) for setting the battery model can be seen when
fl
ipping over the
PCB board. (See Figure 5)
Adjust the micro DIP switch (B) to the position of “WET”,
5.
Complete Steps 3, 4 and 5 in reverse order.
6.
INSTALLING BATTERIES
Disconnect the battery connector (9).
7.
Open the recovery tank cover (25) and check if the recovery tank is empty or not; if not, empty
8.
it through drain hose (15).
Unscrew the squeegee mount knob (16), remove the squeegee vacuum hose (11), and then
9.
remove the squeegee.
Unscrew the screws of the battery cover (10) and remove the cover.
10.
Unscrew the squeegee lift cable (12) connecting to the squeegee bracket (19), and place the cable to the side.
11.
Hang drain hose (15) and the vacuum hose (11) upwards.
12.
According to the size of the battery, push the
fi
xation board in the battery box all the way inwards.
13.
NOTE
The dimension of the battery must not exceed: H x W x H: 330mm x 170mm x 260mm.
According to the varying dimensions of batteries, the requirements for the selection of
fi
xed batteries are as follows:
For battery with length below 270mm, use 2 pieces of the
fi
xation board (B, Figure 6) and place them side by side inside the water tank
1)
battery;
For battery with length between 310mm-270mm, use 1 piece of the
fi
xation board (B, Figure 6) and place it in the water tank battery;
2)
For battery with length between 330mm -310mm, there is no need for the
fi
xation board to
fi
x the position.
3)
FIGURE 5
FIGURE 6
Summary of Contents for 510B
Page 7: ...7 2014 A 7 56091130 CA30 20B ENGLISH A INSTRUCTIONS FOR USE 38 39 40 41 42 44 43...
Page 19: ......
Page 25: ...7 2014 B 7 56091130 CA30 20B ESPA OL B INSTRUCCIONES DE USO 38 39 40 41 42 44 43...
Page 37: ......
Page 43: ...7 2014 C 7 56091130 CA30 20B FRAN AIS C MODE D EMPLOI 38 39 40 41 42 44 43...
Page 55: ......
Page 56: ...D 2 CA30 20B 56091130 7 2014 PARTS LIST TANK SYSTEM...
Page 60: ...D 6 CA30 20B 56091130 7 2014 PARTS LIST WHEELS AND SOLUTION SYSTEM...
Page 62: ...D 8 CA30 20B 56091130 7 2014 PARTS LIST BRUSH SYSTEM...
Page 64: ...D 10 CA30 20B 56091130 7 2014 PARTS LIST SQUEEGEE SYSTEM...
Page 67: ......


