15
Parts & Service: 020 8988 7400 / E-mail: Parts@clarkeinternational.com or Service@clarkeinternational.com
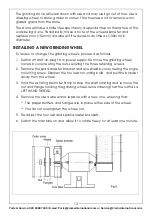
5. Slide the belt off and replace with a new one, ensuring it lies centrally on
the top and bottom rollers
6. Retighten the top roller securing knob till it becomes firm but NOT too tight.
7. Tighten the belt tension adjuster nut until it also becomes firm. DO NOT
overtighten. The belt should now be fairly taught and positioned centrally
on the rollers.
IMPORTANT: The belt needs just enough tension to ensure that it does not
slip on the rollers whilst under load, however too much tension will shorten
the working life of the belt and the machine.
8. Replace the sanding belt cover, then adjust and tighten the work rest.
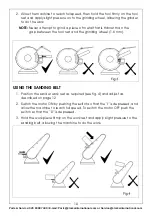
9. Rotate the belt by hand whilst
screwing the Tracking Adjustment
screw in or out to ensure the belt
runs centrally on the rollers. Turn
the screw anticlockwise to move
the belt outwards (towards the
outer cover), or clockwise to
move inwards.
10. When satisfied, plug the machine
into the power supply and switch
ON. Make fine adjustments with
the Tracking Adjustment screw if necessary.
CLEANING & STORAGE
Clean the exterior of the machine if required using a mild detergent or mild
solvent. Never immerse the machine in water. To reduce any fire hazard, keep
any cooling vents clear. If not bolted to a workbench, store the grinder in a
clean, dry location, out of reach of children.
ACCESSORIES
Description
Part No
Grinding Wheel - Fine
6501135
Grinding Wheel - Medium
6501089
Grinding Wheel - Course
6501088
Grinding Wheel Dressing Tool - GWD1
6501120
Sanding Belts - Fine (pack of 5)
6502115
Sanding Belts - Medium (pack of 5)
6502120
Sanding Belts - Course (pack of 5)
6502125
Bench Grinder Stand
6501140
Summary of Contents for 6500032
Page 20: ......


