background image

6

Parts & Service: 020 8988 7400 / E-mail: Parts@clarkeinternational.com or Service@clarkeinternational.com

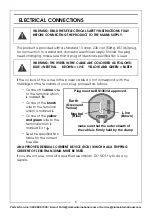
ELECTRICAL CONNECTIONS

This product is provided with a standard 13 amp, 230 volt (50Hz), BS 1363 plug, 
for connection to a standard, domestic electrical supply. Should the plug 
need changing, make sure that a plug of identical specification is used.

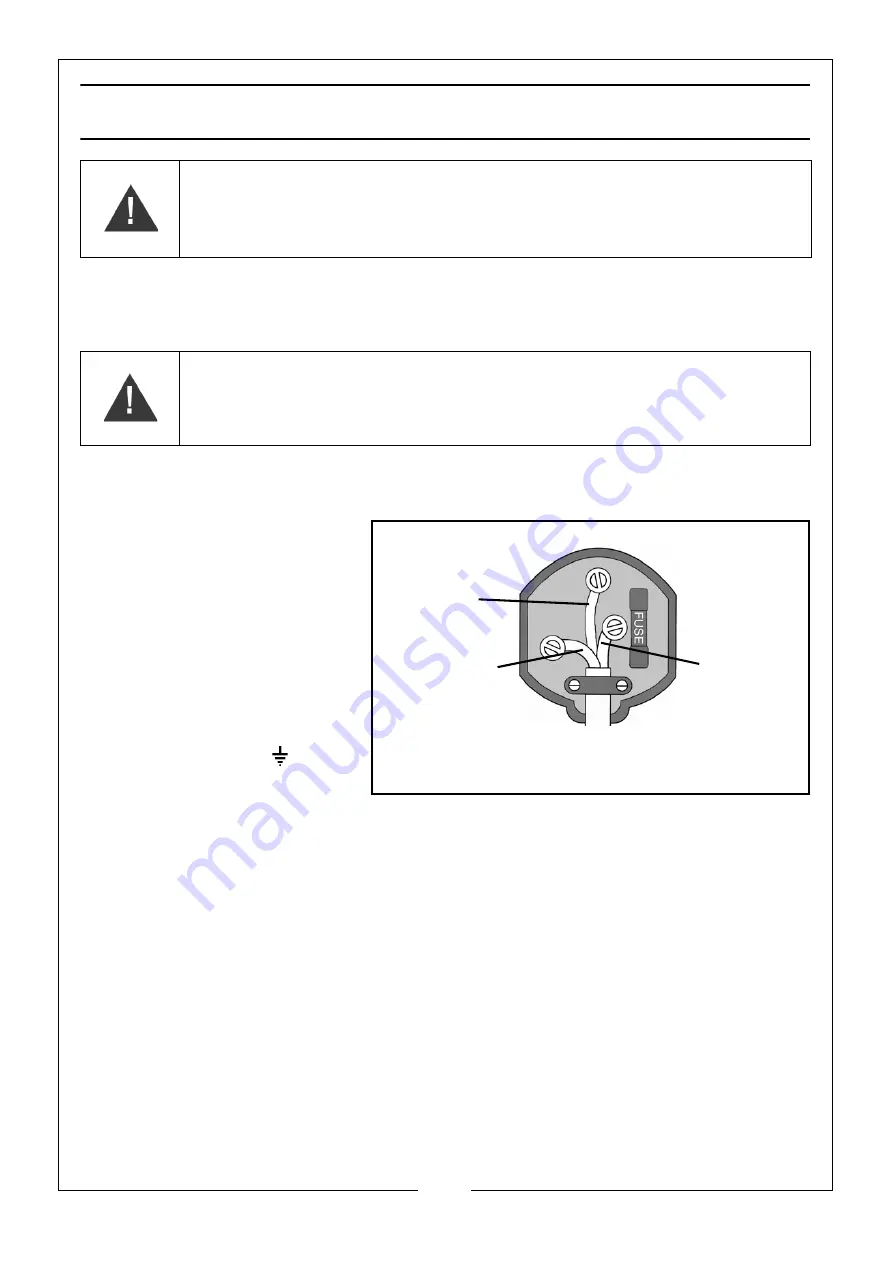
If the colours of the wires in the power cable do not correspond with the 
markings on the terminals of your plug, proceed as follows.

• Connect  the 

blue

 wire 

to the terminal which 
is marked 

N

.

• Connect  the 

brown


wire to the terminal 
which is marked 

L

.

• Connect  the 

yellow 

and green

 wire to the 

terminal which is 
marked E or 

.

• See the specification 

table for the correct 
fuse size.

AN APPROVED RESIDUAL CURRENT DEVICE (RCD) WHICH HAS A TRIPPING 
CURRENT OF LESS THAN 30MA MUST BE USED.

If you are not sure, consult a qualified electrician. DO NOT try to do any 
repairs. 

WARNING: READ THESE ELECTRICAL SAFETY INSTRUCTIONS FULLY 
BEFORE CONNECTING THE PRODUCT TO THE MAINS SUPPLY.

WARNING: THE WIRES IN THE CABLE ARE COLOURED AS FOLLOWS:
BLUE = NEUTRAL      BROWN = LIVE     YELLOW AND GREEN = EARTH

Plug must be BS1363/A approved.

make sure that the outer sheath of 

Neutral

(Blue)

Live

(Brown)

Earth

(Green and 

the cable is firmly held by the clamp

Yellow)

Summary of Contents for 6500485

Page 1: ...OPERATION MAINTENANCE INSTRUCTIONS ORIGINAL INSTRUCTIONS DL10 22 REV 3 BUFFER POLISHER MODEL NO CBB150 PART NO 6500485...

Page 2: ...sed or tampered with in any way or not used for the purpose for which it was intended Faulty goods should be returned to their place of purchase no product can be returned to us without prior permissi...

Page 3: ...plugging the power tool Keep the power cable away from heat oil sharp edges or moving parts Damaged or entangled cables increase the risk of electric shock 4 When operating a power tool outdoors use a...

Page 4: ...measures reduce the risk of starting the power tool accidentally 4 Store idle tools out of the reach of children and do not allow persons unfamiliar with the power tool or these instructions to operat...

Page 5: ...ouch the buffing wheel whilst operating or whilst plugged into the mains power 6 DO NOT leave the buffer polisher running unattended 7 DO NOT operate the buffer polisher when you are tired or under th...

Page 6: ...ed N Connect the brown wire to the terminal which is marked L Connect the yellow and green wire to the terminal which is marked E or See the specification table for the correct fuse size AN APPROVED R...

Page 7: ...d bolts are secure before turning the machine on DO NOT block the ventilation paths through the base FITTING BUFFING POLISHING PADS 1 Place the spacer over the shaft 2 Place the polishing mop between...

Page 8: ...wer supply and clean the machine ready for next use MAINTENANCE 1 Regularly inspect the buffing polishing pad Replace when worn 2 Keep the buffer polisher clean and dry DO NOT use abrasives 3 The moto...

Page 9: ...hilips screw M5x8 4 Spacer bush 21 Switch board 5 Nut M5 22 Base 6 End cap 23 Nut M8 7 Corrugated retainer 24 Capacitor bracket 8 Bearing 6202 25 Capacitor 9 Power cable plug 26 Philips screw washer M...

Page 10: ...10 Parts Service 020 8988 7400 E mail Parts clarkeinternational com or Service clarkeinternational com COMPONENT PARTS...

Page 11: ...11 Parts Service 020 8988 7400 E mail Parts clarkeinternational com or Service clarkeinternational com DECLARATION OF CONFORMITY...

Page 12: ......

Reviews: