
6
Parts & Service: 020 8988 7400 / E-mail: Parts@clarkeinternational.com or Service@clarkeinternational.com
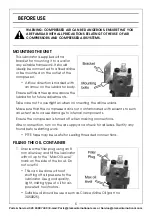
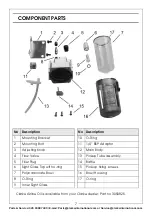
SETTING THE OIL FLOW
1. Adjust the oil delivery rate as
required, by twisting the regulator
knob in the direction shown by the
+/- symbols.
• + and - are marked on the
casting.
2. Adjust the drip rate only when
there is a constant rate of air flow
through the lubricator. Monitor the
drip rate through the sight-glass.
3. Monitor the air tool being lubricated for a few days following the drip rate
adjustment and see how well the device works, then determine whether
the drip rate at the lubricator should be adjusted for more or less oil.
Typically, the lubricator should be adjusted to approx 2 drops per minute.
• If the air tool is excessively lubricated, the reservoir will quickly
become depleted and oil mist may be noticed being expelled from
the air tool exhaust port.
• Never use lubricated compressed air when using a paint spray gun,
since oil mixed with paint will spoil the finish of the work being
sprayed.
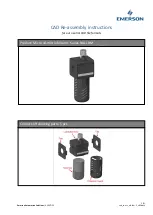
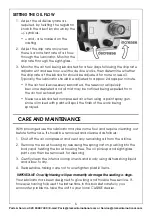
CARE AND MAINTENANCE
With prolonged use the lubricator may become foul and require cleaning out
before further use. It should be removed and cleaned as follows:
1. Shut off the air compressor and vent any remaining air from the airline.
2. Remove the bowl housing by releasing the spring catch, pushing into the
body and twisting the bowl housing free. The oil pick-up and sight-glass
parts can then be removed for cleaning.
3. Gently clean the internal components and body using dishwashing liquid
and allow to dry.
4. Reassemble, taking care not to overtighten plastic items.
IMPORTANT: Over tightening will permanently damage the sealing o-rings.
Your lubricator has been designed to give long and trouble free service. If,
however, having followed the instructions in this booklet carefully, you
encounter problems, take the unit to your local CLARKE dealer.
Summary of Contents for Air CAT162
Page 8: ......