Recovery System
38
Service Manual – Clarke CA30 20B and 17E
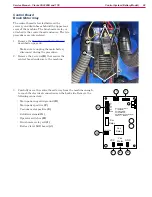
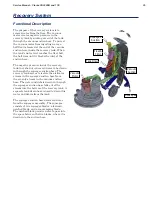
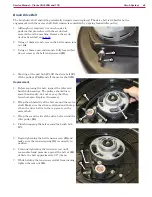
7. Carefully cut the wire tie
(E)
that holds the motor
connector
(H)
to the vacuum hose.
8. Loosen the hose clamp
(D)
and remove the motor
from the vacuum hose.
Replacement Notes
•
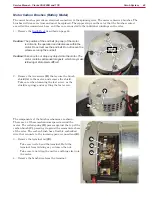
The rotational position of the vacuum hose elbow
(I)
determines the rotational position of the blower’s
exhaust
(J)
, which must line up with the hole in the
vacuum plate. To set this position, leave the hose
clamp
(D)
slightly loose, put the motor in position and
rotate the motor as needed. Then lower the motor to
tighten the hose clamp.
•
The vacuum motor is supported by the lower
gasket
(K)
against the vacuum plate. You
may find it helpful to temporarily hold the
gasket to the motor with a piece of tape while
positioning the vacuum plate. Remove the tape
after the plate is installed.
•
Reinstalling the vacuum plate and motor is
easiest if the rearward mounting screws
(C)
are in position but left loose.
•
Before installing the forward screw
(A)
, make
sure the exhaust
(J)
and motor gasket
(K)
are
centered in their respective holes.
E
H
D
I
B
C
A
K
J

