4
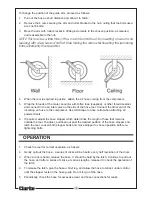
To change the position of the guide arm, proceed as follows:
1.
Pull out the hose a short distance and allow it to ‘latch’.
2.
Remove the 4 nuts securing the arm and roller bracket to the hub, noting that the bolts used
are ‘coach bolts’.
3.
Move the arm with roller bracket in 90deg increments to the chosen position, as required,
and reassemble to the hub.
NOTE: This may be a little tricky if the coach bolts fall out. By inserting one bolt and
securing with a washer and nut first, then turning the drum whilst inserting the remaining
bolts, will simplify the operation.
4.
When the reel is secured in postion, attach the air hose coming from the compressor.
5.
Wrap the threads of the male connector with teflon tape (supplied), or other thread sealant,
and connect to the air inlet valve on the side of the hose reel. Connect the other end of the
incoming air hose to the compressor. Use teflon tape to hose outlet when attaching air
powered tools.
6.
If required, adjust the hose stopper which determines the length of hose that remains
outside the reel. To adjust, pull hose out past the desired position of the hose stopper and
latch the reel. Loosen both stopper bolts and move stopper to chosen position before re-
tightening bolts.
OPERATION
1.
Check the reel for correct operation, as follows:
2.
Gently pull out the hose - a series of clicks will be heard, every half revolution of the drum.
3.
When a click is heard, release the hose. It should be held by the latch. Continue to pull out
the hose, and after a series of clicks, at various lengths, release it to check the operation of
the latch.
4.
To release the latch, give the hose a brief tug, and allow the hose to retract, under control,
until the stopper rests on the hose guide. Do not let go of the hose.
5.
Periodically, check the hose for excessive wear and hose connections for leaks.

