background image

4

Parts & Service: 020 8988 7400 / E-mail: Parts@clarkeinternational.com or Service@clarkeinternational.com

18. Never put any tools or other objects in or around the drum while it is 

rotating.

19. Never wear jewellery or loose clothing that could be snagged by any part 

of the rotating drum.

20. Never load the drum when the machine is switched off. Always switch on 

and ensure the drum is rotating before loading.

21. Do not operate this machine on a gradient. Always stand the mixer on firm, 

level ground where it cannot tip over.

22. Always switch off and disconnect from the power supply before moving 

the machine around the work site.

23. Never use the mixer if the power cable or other important parts of the 

machine are damaged.

24. If an extension cable is used, the cable and plug must be of watertight 

construction. Inadequate extension cables can be dangerous.

SAFETY SYMBOLS

T

he following symbols are shown on the product or it’s packaging.

Read instruction 
manual before use

CE Mark

Sound Power Rating 
label

Falls within Waste 
Electrical Equipment 
(WEEE) Directive

Wear Gloves

Wear eye protection

Wear protective 
footwear

Wear protective head 
wear

Class II product not 
requiring an earth 
connection.

Summary of Contents for CCM110

Page 1: ...OPERATION MAINTENANCE INSTRUCTIONS GC01 16 CEMENT MIXER MODEL NO CCM110 PART NO 3400855 ...

Page 2: ...of 12 months from the date of purchase Please keep your receipt which will be required as proof of purchase This guarantee is invalid if the product is found to have been abused or tampered with in any way or not used for the purpose for which it was intended Faulty goods should be returned to their place of purchase no product can be returned to us without prior permission This guarantee does not...

Page 3: ...children 8 Always read and become familiar with the entire operating manual 9 Never allow persons unfamiliar with this manual to operate this machine 10 Always maintain the machine with care and keep it clean for best safest performance 11 Never use this machine if any part is damaged Have it inspected and repaired by a competent technician 12 Never modify this machine in any way Use it only for t...

Page 4: ...where it cannot tip over 22 Always switch off and disconnect from the power supply before moving the machine around the work site 23 Never use the mixer if the power cable or other important parts of the machine are damaged 24 If an extension cable is used the cable and plug must be of watertight construction Inadequate extension cables can be dangerous SAFETY SYMBOLS The following symbols are sho...

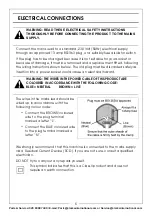
Page 5: ...res in the mains lead should be wired up in accordance with the following colour code Connect the BROWN coloured wire to the plug terminal marked a letter L Connect the BLUE coloured wire to the plug terminal marked a letter N We strongly recommend that this machine is connected to the mains supply via a Residual Current Device RCD If you are not sure consult a qualified electrician DO NOT try to ...

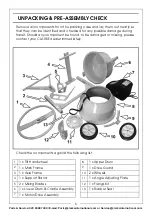
Page 6: ... possible damage during transit Should any component be found to be damaged or missing please contact your CLARKE dealer immediately Check the components against the following list 1 1 x Tilt Handwheel 8 1 x Upper Drum 2 1 x Main Frame 9 1 x Drive Guard 3 1 x Axle Frame 10 2 x Wheels 4 1 x Support Stand 11 1 x Angle Adjusting Plate 5 2 x Mixing Blades 12 1 x Fixings Kit 6 1 x Lower Drum Cradle Ass...

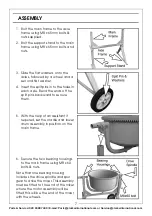
Page 7: ... washer 4 Insert the split pins in to the holes in each axle Bend the ends of the split pins backward to secure them 5 With the help of an assistant if required set the cradle and lower drum assembly in position on the main frame 6 Secure the two bearing housings to the main frame using M8 x 60 bolts nuts Note that one bearing housing includes the drive spindle and spur gear to drive the mixer Thi...

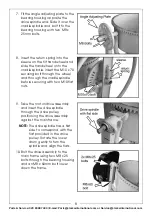
Page 8: ...cradle spindle Insert the M10 x 70 securing bolt through the wheel and through the cradle spindle before securing with two M10 flat nuts 9 Take the motor drive assembly and insert the drive spindle through the drive pulley positioning the drive assembly against the main frame NOTE The drive spindle has a flat side to correspond with the flat provided in the drive pulley Rotate the lower drum gentl...

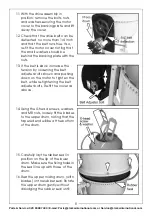
Page 9: ...the nuts 13 If the belt is slack increase the tension by loosening the belt adjuster bolts shown and pushing down on the motor to tighten the belt while re tightening the belt adjuster bolts Re fit the cover as above 14 Using the X head screws washers and M8 nuts loosely fit the blades to the upper drum noting that the tapered end will be at the bottom of the drum 15 Carefully lay the rubber seal ...

Page 10: ...nto the bottom of the mixing drum using M8 x 20 bolts and nuts 19 Tighten all fixings and check that all components are secure OPERATION 1 Switch the mixer on by pressing the green I switch on the motor Stop by pressing the red O switch 2 Introduce water first to prevent the mixer from clogging 3 Add cement as required 4 Add aggregate etc Do not load the drum when the machine is switched off Alway...

Page 11: ...y use CARE AND MAINTENANCE BEFORE STARTING WORK Inspect the power cable and ensure it is free from damage and is not in danger of being damaged by vehicles equipment or other operations taking place on the work site AFTER USE It is essential that the machine is hosed down thoroughly with clean water being sure to remove all traces of cement mix especially from around the mixing blades Take care to...

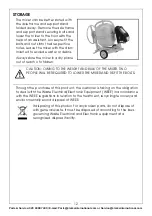
Page 12: ...the mixer in a dry place out of reach of children Through the purchase of this product the customer is taking on the obligation to deal with the Waste Electrical Electronic Equipment WEEE in accordance with the WEEE regulations in relation to the treatment recycling recovery and environmentally sound disposal of WEEE If disposing of this product or any broken parts do not dispose of with general w...

Page 13: ...13 Parts Service 020 8988 7400 E mail Parts clarkeinternational com or Service clarkeinternational com DECLARATION OF CONFORMITY ...

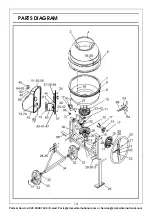
Page 14: ...14 Parts Service 020 8988 7400 E mail Parts clarkeinternational com or Service clarkeinternational com PARTS DIAGRAM ...

Page 15: ...over 36 Circlip 15 dia 62 Screw M4 x 12 11 Bearing 6206 37 Driven Pulley 63 Washer 4 dia 12 Lower Bearing Cover 38 Nylon Washer 64 Nut M4 13 Bearing 6002 39 Circlip 30 dia 65 Spring Washer 5 dia 14 Washer 15 dia 40 Motor Mounting 66 Bolt M8 x 60 15 Bearing Housing 41 Flat Washer 67 Support Shaft 16 Washer 38 dia 42 Washer 8 dia 68 Screw M5 for 69 17 Circlip 38 dia 43 Motor Cover 69 Drive Guard Pla...

Page 16: ......

Reviews: