background image

17

SPECIFICATIONS

Accuracy is specified for a period of one year after calibration at 64 F to 82 F (18 C to 28C).
Circumstance Temperature: 23±5°C Relative Humidity: < 75%.

GENERAL SPECIFICATIONS

Environment conditions:

600V CAT. III
Pollution degree: 2
Altitude < 2000m

Operating temperature: 32°F~122°F (0~40°C) (<80% RH, <10°C non-condensing)
Storage temperature: 14°F ~122°F (10~50°C) (<70% RH, battery removed)

Summary of Contents for CDM80

Page 1: ...CDM80 PEN PROBE DIGITAL MULTIMETER OPERATING MANUAL Model CDM80 Part No 4500085...

Page 2: ...r giving you long and satisfactory service GUARANTEE This product is guaranteed against faulty manufacture for a period of 12 months from the date of purchase Please keep your receipt which will be re...

Page 3: ...aintenance procedures parts list and diagrams Keep your invoice with these instructions Write the invoice number on the inside of rear cover Keep the instructions and invoice in a safe dry place for f...

Page 4: ...Value Measuring Hold 27 Switching Functions 28 Switching Auto Manual Range 28 Auto Power Off 29 Taking Measurements 30 Measuring DC Voltage 30 Measuring AC Voltage 34 Measuring Resistance 37 Diode Tes...

Page 5: ...y rules in this manual and the normal safety precautions used in working with electrical circuits Do not service this device if you are not qualified to do so All repairs should be performed by an aut...

Page 6: ...ng condition With proper use and care the digital meter will give you years of excellent service Measurement category III is for measurements performed in building installation Examples are measuremen...

Page 7: ...lead or test clip must be in good condition Before using verify that the insulation on test lead or test clip is not damaged and or the lead wires are not exposed 4 Full compliance with safety standar...

Page 8: ...60V DC or 30V AC rms Always keep fingers behind the probe barrier while measuring 11 Never connect the meter leads across a voltage source while the Mode Selector is in the resistance diode or continu...

Page 9: ...have the meter serviced by a qualified technician immediately 16 Never use the meter unless the outer casing is in place and fully fastened 17 Do not store or use meter in areas exposed to direct sunl...

Page 10: ...Protection class II CAT III Overvoltage Installation category III Pollution Degree 2 per IEC10101 refers to the level of Impulse Withstand Voltage protection provided Conforms to European union direct...

Page 11: ...11 AC or DC alternating current or direct current Diode Continuity buzzer M H The maximum value is being held DH This indicates that the display data is being held AUTO Auto range Low battery...

Page 12: ...eter and the probe of the test lead or test clip from all tested circuits 3 To avoid the wrong reading when the meter displays the battery power is low and the battery should be changed immediately 4...

Page 13: ...ode selector makes measurement convenient Includes overload protection and low battery indicator This meter is ideal for use in the field workshop school hobby and home applications Your CDM80 feature...

Page 14: ...14 OVERVIEW 1 Probe 2 Rotating Probe Socket 3 LED Indicator 4 Probe Barrier 5 Mode Selector 6 DATAHOLD Button 7 RANGE Button 8 MAX HOLD Button 9 FUNC Button 10 Panel 11 LCD Dispay 12 COM Jack...

Page 15: ...M e g n a R o t u A n e e w t e b s e h c t i w S H X A M n o i t i s o p h c t i w s y n A e u l a v m u m i x a m e h t d l o h d n a e r u s a e m o t d e s U C N U F V c i g o L A m e g a t l o v...

Page 16: ...f the meter LED Indicator Indicates high level and Low level at Logic test range Probe Barrier Helps to keep hands away from the probe Mode Selector This switch is used to select functions and desired...

Page 17: ...o 82 F 18 C to 28C Circumstance Temperature 23 5 C Relative Humidity 75 GENERAL SPECIFICATIONS Environment conditions 600V CAT III Pollution degree 2 Altitude 2000m Operating temperature 32 F 122 F 0...

Page 18: ...1 2 Polarity Indication indicates negative polarity Range Overload Indication Display OL Sampling Time approx 0 4 second Display Function and electrical capacity Low Battery Indicator displayed Auto...

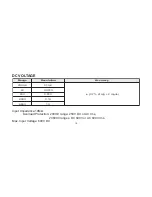
Page 19: ...tection 200mV range 250V DC or AC rms 2V600V ranges DC 600V or AC 600V rms Max Input Voltage 600V DC e g n a R n o i t u l o s e R y c a r u c c A V m 0 0 2 V m 1 0 V 2 V 1 0 0 0 V 0 2 V 1 0 0 s t i g...

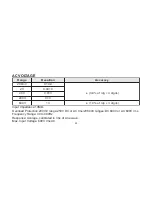
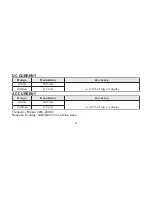
Page 20: ...C 600V or AC 600V rms Frequency Range 40 to 400Hz Response Average calibrated in rms of sine wave Max Input Voltage 600V rms AC e g n a R n o i t l o s e R y c a r u c c A V m 0 0 2 V m 1 0 V 2 V 1 0...

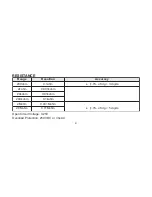
Page 21: ...DC or rms AC e g n a R n o i t l o s e R y c a r u c c A m h o 0 0 2 m h o 1 0 s t i g i d 3 g d r f o 0 1 m h o k 2 m h o k 1 0 0 0 m h o k 0 2 m h o k 1 0 0 m h o k 0 0 2 m h o k 1 0 m h o M 2 m h...

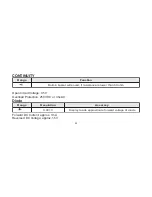
Page 22: ...x 1mA Reversed DC Voltage approx 1 5V e g n a R n o i t c n u F m h o 0 5 n a h t r e w o l s i e c n a t s i s e r f i d n u o s l l i w r e z z u b n i t l i u B e g n a R n o i t u l o s e R y c a...

Page 23: ...Average calibrated in rms of sine wave e g n a R n o i t u l o s e R y c a r u c c A A m 0 2 A m 1 0 0 A m 0 0 2 A m 1 0 s t i g i d 3 g d r f o 5 1 e g n a R n o i t u l o s e R y c a r u c c A A m...

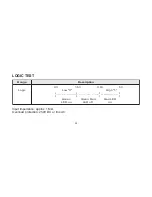
Page 24: ...load protection 250V DC or rms AC e g n a R n o i t p i r c s e D c i g o L V 5 V 5 3 V 5 1 V 0 1 h g i H 0 w o L I _ _ _ _ _ _ _ _ I _ _ _ _ _ _ _ _ _ I _ _ _ _ _ _ _ _ I I I I I D E L d e R d e R n...

Page 25: ...he DATA H button and it will hold the reading Push the button again to turn data hold off MAXIMUM VALUE MEASURING AND HOLD When Mode Selector is set to Voltage you can push the MAX H button and it wil...

Page 26: ...the Mode Selector is set to Voltage or Resistance mode AUTO RANGE is the default setting for the tool Push the RANGE button if you want to switch to MANUAL RANGE Each time you push the RANGE button t...

Page 27: ...ute warning that the unit is about to power off if not used The unit will sound a long beep when it is automatically powering off After auto power off if the Mode Selector is turned or any buttons are...

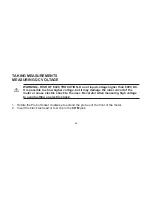
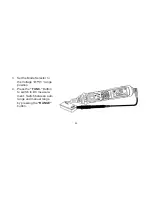
Page 28: ...ble to show higher voltage but it may damage the inner circuit of the meter or cause electric shock to the user Be careful when measurng high voltage to avoid getting an electric shock 1 Rotate the Pr...

Page 29: ...29 3 Set the Mode Selector to the Voltage V range position 4 Press the FUNC Button to switch to DC measure ment Switch between auto range and manual range by pressing the RANGE button...

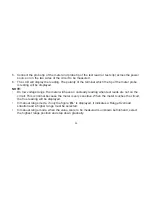
Page 30: ...On low voltage range the meter will have an unsteady reading when test leads are not on the circuit This is normal because the meter is very sensitive When the meter touches the circuit the true readi...

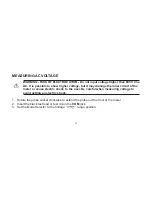
Page 31: ...may damage the inner circuit of the meter or cause electric shock to the user Be careful when measuring voltage to avoid getting an electric shock 1 Rotate the probe socket clockwise to extend the pr...

Page 32: ...necessary you can switch between Auto Range and Manual Range by pushing the RANGE button 5 Connect the probe tip of the meter to one side of the test circuit and the probe tip of the test lead or test...

Page 33: ...e low voltage range the meter will have an unsteady reading when the test leads are not touching the circuit This is normal because the meter is very sensitive When the test leads touch the circuit th...

Page 34: ...F and that all capactors have been fully discharged 1 Rotate the probe socket clockwise to extend the probe out the front of the meter 2 Insert the black test lead or test clip in the COM jack 3 Set t...

Page 35: ...35 4 Connect the probe tip of the meter to one side of the test circuit and the probe tip of the test lead or test clip to the other side 5 The LCD will display the readng...

Page 36: ...d situation for the range you are working in a higher range must be selected For measuring resistance above 1MW the meter may take a few seconds to get a stable reading When the input is not connected...

Page 37: ...has all power turned OFF and that all capactors have been fully discharged 1 Rotate the probe socket clockwise to extend the probe out the front of the meter 2 Insert the black test lead or test clip...

Page 38: ...he cathode of the diode 6 The LCD will display the reading NOTE The meter will show the approxi mate forward voltage drop of the diode If the meter and the lead connec tion are reversed only the figur...

Page 39: ...it has been shut down and that a capactors have been fully discharged 1 Rotate the probe socket clockwise to extend the probe out the front of the meter 2 Insert the black test lead or test clip in th...

Page 40: ...nd the probe tip of the test lead or test clip to the other side 6 If continuity exists i e resistance is less than about 50 the built in buzzer will sound NOTE If the input open circuit or the circui...

Page 41: ...than 250V Never attempt to measure current greater than 200mA 1 Rotate the probe socket clockwise to extend the probe out the front of the meter 2 Insert the black test lead or test clip in the COM j...

Page 42: ...rrent is to be measured 6 The LCD will display the reading The polarity of the tested terminal which the tip of the meter probe is connected to will be indicated NOTE In the manual range mode if only...

Page 43: ...than 250V Never attempt to measure current greater than 200mA 1 Rotate the probe socket clockwise to extend the probe out the front of the meter 2 Insert the black test lead or test clip in the COM j...

Page 44: ...or test clip in series with the load in which the current is to be measured 6 The LCD will display the reading NOTE In the manual range mode if only the figure OL is displayed it indicates an overload...

Page 45: ...e electrical shock to the user Be careful when testing Logic level to avoid electrc shock 1 Rotate the probe socket clockwise to extend the probe out the front of the meter 2 Insert the black test cli...

Page 46: ...light indicates high level logic 1 and green LED light indicates low level logic 0 6 The display may also show the sign r or s r expresses high level logic 1 and s expresses low level logic 0 NOTE If...

Page 47: ...and the test lead or test clip have been disconnected from the measurement circuit to avoid electric shock hazard 1 If the sign appears on the LCD display the battery power is low Replace battery imme...

Page 48: ...h the same model or same electrical ratings Electric ratngs of the test leads 600 V 10A Before using this tool verify that the insulation on test lead or test clip is not damaged and or the lead wires...

Page 49: ...Test Clip Electric Ratings 600V 10A 1 3 Battery 1 5V AAA 2 4 Instruction Manual 1 5 Carry Case 1 WARNING RISK OF ELECTROCUTION Using this meter in an environment with a strong radiated radio frequency...

Page 50: ...arest dealer or CLARKE International on the following number PARTS SERVICE TEL Tel 020 8988 7400 FAX 020 8558 3622 or Email Parts clarkeinternational com or Service clarkeinternational com Clarke Inte...

Page 51: ...51 NOTES...

Page 52: ......

Reviews: