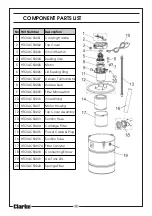
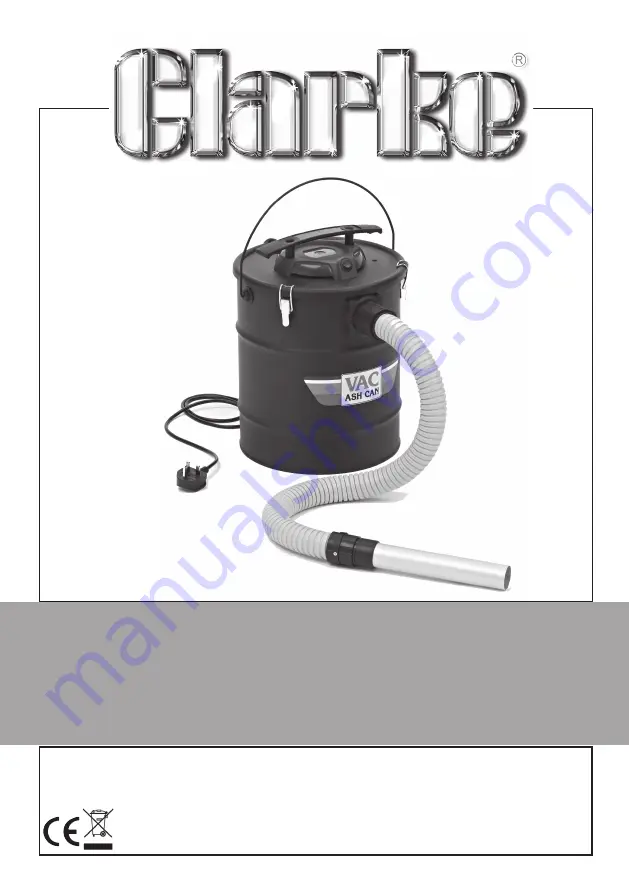
background image

OPERATING & MAINTENANCE

INSTRUCTIONS

GC0614

ELECTRIC ASH CAN

Model: CVACASH500

Part No: 6471132

Summary of Contents for CVACASH500

Page 1: ...OPERATING MAINTENANCE INSTRUCTIONS GC0614 ELECTRIC ASH CAN Model CVACASH500 Part No 6471132 ...

Page 2: ...any way or not used for its intended purpose Faulty goods should be returned to their place of purchase no product can be returned to us without prior permission This guarantee does not effect your statutory rights ENVIRONMENTAL RECYCLING POLICY Through purchase of this product the customer is taking on the obligation to deal with the WEEE in accordance with the WEEE regulations in relation to the...

Page 3: ... M t h g i e W y t p m e g k 3 3 t h g i e H x a i D s n o i s n e m i D m m 0 0 4 x 0 0 3 y t i c a p a C m u r D g n i k r o w L 6 1 s e r t i L 2 2 m u u c a v x a M a P k 1 1 e l c y C y t u D s u o u n i t n o c 1 S g n i t a R e s u F A 5 y l p p u S r e w o P h p 1 z H 0 5 V 0 3 2 g n i t a R r e w o P r o t o M W 0 0 5 g n i t a R P I 0 2 l e v e L r e w o P d n u o S A w L B d 4 9 l e v e...

Page 4: ...he plug from the socket or lift the ashcan by the power cable Take care not to close doors on the cable or allow it to become snagged under furniture objects with sharp edges Keep away from heat or oil 5 Only use extension leads that are of an appropriate power rating and suitable for the work environment Extension leads must have an earth connection Inspect the extension lead regularly and replac...

Page 5: ...old plug must be disposed of safely as insertion into a mains socket could cause an electrical hazard WARNING The wires in the power cable of this product are coloured in accordance with the following code Blue Neutral Brown Live If the colours of the wires in the power cable of this product do not correspond with the terminal markings of your plug proceed as follows The wire which is coloured Blu...

Page 6: ... e D o N n o i t p i r c s e D 1 k n a T 5 r e v o C k n a T 2 p i l C g n i r u c e S 6 r e t l i F e g n o p S 3 e b u T n o i t c u S 7 r e t l i F e g d i r t r a C 4 e s o H n o i t c u S 8 r e t s i n n a C h s e M 1 2 3 4 5 6 8 7 ...

Page 7: ...he three retaining tabs shown in figure 2 into the fixing on the tank cover and twisting the cannister clockwise Note The motor will not run without the filter correctly in position 4 Fit the tank cover to the tank securing in place with three clips 5 Insert the suction tube 3 into one end of the suction hose 4 as shown in fig 3 Note that the two ends of the suction hose are different The end with...

Page 8: ...extinguish fires in fireplaces or stoves with water in order to achieve cool ash The construction material in the fireplace or stove may not withstand any sudden variations in temperature and suffer permanent damage 4 Continuously check the tube and ash can for excess temperature during use If you notice a significant temperature rise switch off immediately and disconnect the ash can from the powe...

Page 9: ...hen you have finished with the ash can ensure the electric cable is stowed away by winding it around the handle and not left as a hazard for others to trip over 3 Do not change filters or carry out any cleaning or servicing without first disconnecting the ash can from the power supply 4 Keep the external surfaces clean Avoid impact damage do not allow the ash can to come into contact with abrasive...

Page 10: ...0 5 C A V C h c t i w s o r c i M r e t l i F 0 1 T H 0 1 0 0 5 C A V C g n i r i W r e n n I 1 1 T H 1 1 0 0 5 C A V C g n i s u o H r o t o M 2 1 T H 2 1 0 0 5 C A V C y l b m e s s A r e v o C p o T 3 1 T H 3 1 0 0 5 C A V C e s o H n o i t c u S 4 1 T H 4 1 0 0 5 C A V C r e t l i F e g d i r t r a C 5 1 T H 5 1 0 0 5 C A V C g u l P e l b a C r e w o P 6 1 T H 6 1 0 0 5 C A V C e b u T n o i ...

Page 11: ...11 DECLARATION OF CONFORMITY ...

Page 12: ......

Reviews: