background image

4

Parts & Service: 020 8988 7400 / E-mail: Parts@clarkeinternational.com or Service@clarkeinternational.com

4) POWER TOOL USE AND CARE

1.

Do not force the power tool. 

Use the correct accessories for your application. The 

correct power tool will do the job better and safer at the rate which it was designed.

2.

Do not use the power tool if the switch does not turn it on and off. 

Any power tool that 

cannot be controlled with the switch is dangerous and must be repaired.

3.

Disconnect the plug from the power source before changing accessories, or storing 
power tools.

 Such preventive safety measures reduce the risk of starting the power 

tool accidentally.

4.

Store idle tools out of the reach of children and do not allow persons unfamiliar with 
the power tool or these instructions to operate it. 

Power tools are dangerous in the 

hands of untrained users.

5.

Maintain power tools

. Check for misalignment or binding of moving parts, breakage 

of parts and any other condition that may affect the power tool’s operation. If 
damaged, have the power tool repaired before use. Many accidents are caused 
by poorly maintained power tools.

6.

Use the power tool and accessories in accordance with these instructions and in the 
manner intended, taking into account the working conditions and the work to be 
performed

. Use of the power tool for operations different from intended could result 

in a hazardous situation.

7. The performance of this tool may vary, depending upon variations in line voltage. 

Extension cable usage may also affect performance.

5) SERVICE

1.

Have your power tool serviced by qualified service personnel using only identical 
replacement parts.


This will ensure that the safety of the power tool is maintained.

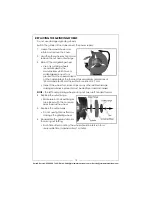
BENCH GRINDER SAFETY WARNINGS

1. Hold the hand tool or blade being sharpened firmly to prevent loss of control.
2. NEVER install a abrasive flap wheel or sanding disc on this grinder.
3. Always replace a cracked grinding wheel immediately.
4. Never use damaged or incorrect grindstones. The stone and retaining bolt were 

specially designed for your grinder, for optimum performance and safety of 
operation. Inspect the condition of the grinding stone before use and do not use if 
any damage is noticed.

5. Do not use aluminium oxide wheels when grinding non-ferrous metals such as 

aluminium or brass. Use silicon carbide wheels (not included) for grinding non-ferrous 
metals.

6. Always use the tool rests  to steady the workpiece. If the tool attachments are not 

used, the torque of the spinning grinding/polishing wheel may pull the workpiece 
from your hands.

7. Never leave the grinder unattended when it is connected to an electrical power 

supply. Switch off the machine and unplug it before leaving.

Summary of Contents for Metalworker CBG6250L

Page 1: ...OPERATION MAINTENANCE INSTRUCTIONS LS0811 BENCH GRINDER WITH LIGHT AND WHEEL DRESSER MODEL NO CBG6250L PART NO 6500524...

Page 2: ...nths from the date of purchase Please keep your receipt which will be required as proof of purchase This guarantee is invalid if the product is found to have been abused or tampered with in any way or...

Page 3: ...for outdoor use Use of a cable suitable for outdoor use reduces the risk of electric shock 5 If operating the power tool in a damp location is unavoidable use a residual current device RCD protected...

Page 4: ...orking conditions and the work to be performed Use of the power tool for operations different from intended could result in a hazardous situation 7 The performance of this tool may vary depending upon...

Page 5: ...ire or serious injury 9 Gloves manufactured to the current European safety standards should be worn when operating grinding equipment 10 Eye protection manufactured to the current European safety stan...

Page 6: ...zard If the colours of the wires in the power cable of this product do not correspond with the markings on the terminals of your plug proceed as follows The wire which is coloured Blue must be connect...

Page 7: ...Clarke dealer where you purchased the bench grinder PART IDENTIFICATION 1 x Bench Grinder Assembly 2 grinding wheels attached 2 x Eye Shields 1 with Built in Magnifying Lens 2 x Eye Shield Arms with...

Page 8: ...mount the bench grinder on a vibration absorbing mat INSTALLING THE TOOL RESTS 1 Fix the tool rests to the bench grinder with the screw and hand knob as shown The tool rests are adjustable and should...

Page 9: ...shown 3 Repeat for right side eye shield NOTE Adjust the eye shields to an appropriate distance from the tool rests avoiding interference during operation SHARPENING TIPS SCISSORS If possible take the...

Page 10: ...ly against the tool rest Hold very small pieces with pliers or other suitable clamps 3 Feed the work piece smoothly and evenly against the grinding wheel 4 When grinding always keep the work piece mov...

Page 11: ...asive wheels start to become clogged with debris use the dresser tool supplied to clean dress them 1 Start the bench grinder running 2 Place the dresser tool on the tool rest with the dresser wheels f...

Page 12: ...r than the speed marked on the nameplate of the tool and have maximum dimensions of 150 mm diameter 20 mm thick with a bore size of 12 7 mm Inspect the wheel for cracks chips or any other visible dama...

Page 13: ...13 Parts Service 020 8988 7400 E mail Parts clarkeinternational com or Service clarkeinternational com PARTS DIAGRAM...

Page 14: ...shield WACBG6250L30 31 Work Rest Lock knob WACBG6250L31 32 Standard Washer WACBG6250L32 33 Flat Washer WACBG6250L33 34 I type Hex Nut WACBG6250L34 35 Nut WACBG6250L35 36 Wheel 60 WACBG6250L36 37 Locke...

Page 15: ...15 Parts Service 020 8988 7400 E mail Parts clarkeinternational com or Service clarkeinternational com DECLARATION OF CONFORMITY...

Page 16: ......

Reviews: