background image

3

GENERAL SAFETY RULES

WARNING: Do not use in mobile homes. This stove must be
connected to a suitable flue outlet.  Due to high temperature this
stove should be located well away from furniture and curtains.
Children and adults should be alerted to the hazards of high
surface temperatures. Young children should be carefully
supervised when they are in the same room with the stove. Do not
place clothing or other flammable material on or near the stove.
Keep the stove area clear of combustable materials, flammable
liquids or vapours.

1.

ALWAYS 

ensure that the stove is correctly installed and positioned as described under

PLACEMENT AND INSTALLATION on page 5, and that the immediate area is kept clear.

2

ALWAYS 

check for damage before using the stove. Check for breakage of parts and any

other condition that may affect the stoves performance.  Any damage should be properly
repaired or the part replaced. If in doubt, 

DO NOT

 use the stove. Consult your local dealer.

3.

ALWAYS 

keep children away and keep visitors at a safe distance from the stove.

4.

NEVER 

direct water, or any other liquid on to the stove, particularly when it is hot.

5.

NEVER 

use gasolene or other flammable liquids.

6.

NEVER 

use the stove to incinerate materials other than the recommended fuels.

7.

The installation of the stove and chimney 

MUST 

comply with all national, european and local

building regulations. It is the responsibility of the owner and the installer to ensure that the
installation complies.

8.

NEVER 

carry out any modifications to this unit. If experiencing difficulty of any kind consult

your local dealer.

CONTENTS

IMPORTANT

Before commencing please check contents and advise immediately of any shortages.

1 x Free-standing multi-fuel stove

4 x Legs c/w 4 hex headed bolts, 4 x large washers & 4 nuts, 3 countersunk screws

1 x 150mm flue blanking plate

1 x 150mm round flue exit withfireproof gasket c/w 3 x countersunk machine screws

1 x Deflector plate

1 x Grate

1 x Ash pan

1 x Handle for pan

Summary of Contents for RICHMOND

Page 1: ...USER GUIDE RICHMOND PART NO 6910125 06 08 Classic Cast Iron Stove ...

Page 2: ...aulty manufacture for a period of 12 months from the date of purchase Please keep your receipt which will be required as proof of purchase This guarantee is invalid if the product is found to have been abused or tampered with in any way or not used for the purpose for which it was intended Faulty goods should be returned to their place of purchase no product can be returned to us without prior per...

Page 3: ... the part replaced If in doubt DO NOT use the stove Consult your local dealer 3 ALWAYS keep children away and keep visitors at a safe distance from the stove 4 NEVER direct water or any other liquid on to the stove particularly when it is hot 5 NEVER use gasolene or other flammable liquids 6 NEVER use the stove to incinerate materials other than the recommended fuels 7 The installation of the stov...

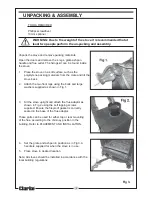
Page 4: ...e back 2 Attach the two front legs using the bolts and large washers supplied as shown in Fig 1 3 Sit the stove upright and attach the flue adaptor as shown in Fig 2 using the self tapping screws supplied Ensure the fireproof gasket is correctly seated in the base of the flue adaptor These parts can be used for either top or rear mounting of the flue according to the chimney position in the buildi...

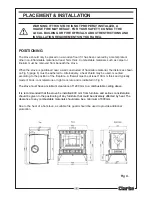
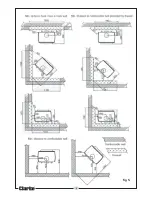
Page 5: ...terial the distances shown on Fig 5 page 6 must be adhered to Alternatively a heat shield may be used mounted according to the position of the fireplace A firewall must be at least 100 mm thick and typically made of brick concrete stone or light concrete and is indicated in Fig 5 The stove must have a minimum clearance of 1200 mm to a combustable ceiling above It is recommended that the stove be i...

Page 6: ...6 fig 5 ...

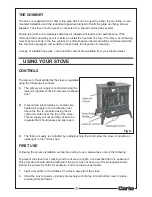
Page 7: ...ontrols A The primary air supply is controlled using the lower air regulator built into the lower ashpan door B A second air inlet provides a constant pre heated air supply to the combustion just above the fire is controlled using the air control mounted near the top of the stove This air supply will not normally need to be regulated but should always be kept open C The third air supply is control...

Page 8: ...rning strongly add further logs of a diameter up to 10cm 5 When the stove is very hot close the lower control as required 6 The burning rate can be reduced by moving the upper air control to a smaller air inlet Ensure there are lasting flames untill the wood becomes charcoal FIRE LIGHTING WITH SOLID FUEL 1 Slide the top air control to open Open the lower control 2 Lay firelighters or rolled up new...

Page 9: ...split ASH REMOVAL Keep the grate free from a heavy buildup of ashes The Richmond stove is equipped with a grate riddling device which is used to shake ashes off the grate into the ashpan If the stove is burning without life and the lower controls are open use the riddling lever to clear the grate of ash Empty the pan once a day or whenever full of ashes and take care not to allow ash to come into ...

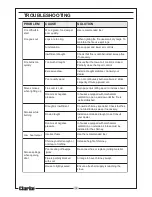
Page 10: ... a s i m o o R e r u s s e r p l a c i n a h c e m h t i w d e p p i u q e s e s u o h n I s i e r i f e h t l l i t n u w o d n i w a n e p o n o i t a l i t n e v d e h s i l b a t s e l l e w e l i h w s e k o m S g n i n r u b t n e i c i f f u s n i s i t h g u a r D e u l f t a h t k c e h C t s i l a i c e p s y e n m i h c a t l u s n o C y r a s s e c e n f i p e e w s d e t c u r t s b o...

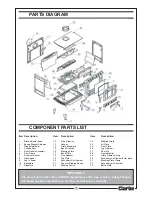
Page 11: ...juster 13 Ashpan 24 Air Plate 3 Draught Adjuster 14 Grate baseplate 25 Front Plate 4 Ashpan Door 15 Back Firebrick 26 Log Retainer 5 Door Handle Assembly 16 Blacking Plate 27 Door Pin 6 Door Frame 17 Back Plate 28 Operating Arm 7 Fireproof Gasket 18 Flue Adaptor 29 Grate Frame holding 8 Glass panel 19 Top Plate 30 Secondary Air Side deflector plate 9 Leg 4 items 20 Secondary Air Chamber 31 Blankin...

Page 12: ......

Reviews: