background image

4

GENERAL SAFETY RULES 

There is a serious risk of personal injury if you do not follow all instructions laid 
down in this guide.

1. This hoist is designed to be used by an able bodied, competent adult who 

has read and understood these instructions. 

2. This hoist is designed for indoor, non-industrial use.

3. Keep children, animals and bystanders away from the work area. 

4. Never use this hoist if you are ill, feeling tired, or under the influence of 

alcohol or drugs.

5. Before use, always inspect the machine and its mountings to ensure they 

are in good condition. If any damaged or broken parts are found, the hoist 
should be removed from service and the parts renewed or repaired before 
further use.

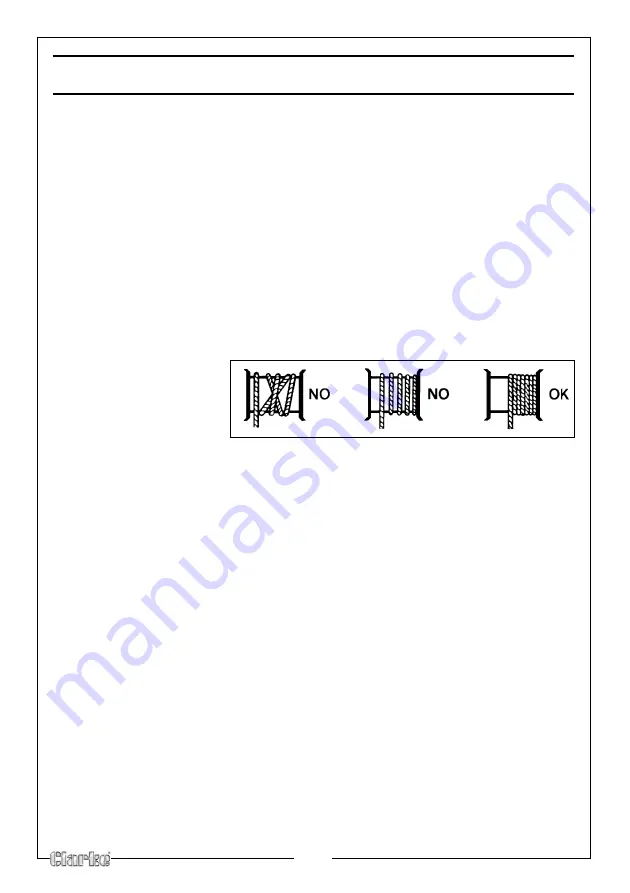
6. Before operating it is 

important to ensure 
that the steel cable 
is correctly wound 
around the drum

7. Wear practical, protective clothing, gloves, footwear and a protective 

hard hat. Avoid loose garments and jewellery that could catch in moving 
parts, tie back long hair

8. Protect the machine from extreme weather conditions, i.e. frost and/or 

high temperatures.

9. The machine is equipped with a thermal cut-out. If the load exceeds the 

capacity of the machine this will cause the motor to overheat and the 
thermal cutout to activate, Let the hoist cool down before using it again.

10. Make sure the load is balanced, stable and that personnel stand clear of 

the raised load.

11. Contact your CLARKE dealer or the CLARKE Interational Service 

Department for any spare parts relating to this product.

12. Ensure that the switches are kept in good condition.

13. Use this hoist for vertical lifts only. The hoist must only be fixed to a horizontal 

beam/box section able to take the combined weight of the load and the 
hoist.

Summary of Contents for Strong-Arm CH2500B

Page 1: ...OPERATION MAINTENANCE INSTRUCTIONS LS1010 ELECTRIC HOIST MODEL NO CH2500B CH4000B PART NO 7630386 7630391...

Page 2: ...isfactory service GUARANTEE This product is guaranteed against faulty manufacture for a period of 12 months from the date of purchase Please keep your receipt which will be required as proof of purcha...

Page 3: ...s 3 General safety rules 4 Electrical connections 5 Unpacking and assembly 6 Installation 6 Operation 7 Maintenance 8 Troubleshooting 9 Parts and servicing 9 Specifications 10 Exploded diagram parts l...

Page 4: ...el cable is correctly wound around the drum 7 Wear practical protective clothing gloves footwear and a protective hard hat Avoid loose garments and jewellery that could catch in moving parts tie back...

Page 5: ...CK If this appliance is fitted with a plug which is moulded onto the electric cable i e non rewireable please note 1 The plug must be thrown away if it is cut from the electric cable There is a danger...

Page 6: ...ckets 1 x Fixings pack 1 x Instruction manual this book INSTALLATION The hoist is provided with specially designed brackets allowing it to be attached to box sections or rectangular beams Beam dimensi...

Page 7: ...YOUR HOIST Before use check to ensure the emergency stop switch and the raise lower buttons are in good condition 1 Play out the cable Keep the cable under tension so that the coils on the drum remain...

Page 8: ...g 200 Kg for the CH4000B It is possible to double the capacity to 250 Kg 400 Kg for the CH4000B To do this 1 Loop the cable around the pulley supplied 2 Attach the hook to the hoist casing as shown MA...

Page 9: ...a few times to free brake Brake does not operate and load slips Brake is worn out Renew brake Discontinue use and contact your CLARKE dealer for advice Cable twisted frayed or kinked Incorrectly wound...

Page 10: ...Height Single Cable 12 m 12 m Load Capacity Double Cable 250 kg 400 kg Lifting Speed Double Cable 5 m min 5 m min Lifting Height Double Cable 6 m 6 m Cable Length 12 m 12 m Cable Diameter 3 mm 3 8 mm...

Page 11: ...11 EXPLODED DIAGRAM PARTS LIST...

Page 12: ...Spring 44 Brake Disc 45 After Closure 46 Fan Blade 47 Fan Cover 48 Spring Washer 49 Flat Washer 50 Hexagon Bolt 51 Junction Box 52 Terminal 53 Cover 54 Holding Fixture 55 Holding Fixture 56 Safety Sw...

Page 13: ...13 DECLARATION OF CONFORMITY...

Page 14: ...14 NOTES...

Page 15: ...15 NOTES...

Page 16: ......

Reviews: