HOLE CUTTING
(Model TCM430 only)
NOTE:
When cutting thicker tiles It may be necessary to set the
cutter higher to begin with, to avoid the possibility of the
cutter digging into the tile too fiercly.
Cutting through the tile will take a little time and considerable
dust will be generated. Pouring water in the groove produced
will prevent this, and help to keep the tip cool.
If the cutter does not break through the tile, readjust the
column position by unlocking the adjuster nuts, then turn
the lower adjuster nut anticlockwise one turn. Remember
to lock the adjuster nuts once again before proceeding to
turn the operating handle.
REMEMBER, if the column is positioned too low, the cutter,
under spring pressure, will break through the tile forcefully
and create a jagged back edge to the hole. This may or
may not be a problem, depending upon requirements, as
the front edge of the hole will be clean.
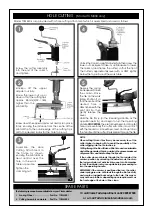
Model TCM430 is also provided with a hole cutting attachment which is assembled and used as follows:
2
Slacken off the upper
adjuster nut fully.
Screw the lower nut up or
down so that the cutting tip is
approx. 2.5mm (3/32 - 1/8in)
3
Assemble the Hole
Cutting Attachment to
the frame as shown,
ensuring the pilot drill is as
near central over the
hole in the work
table as possible.
Tighten the
clamping nut.
SPARE PARTS
The following spare parts are available from your Clarke dealer.
1. Scoring Wheel .......................... Part No. TCM43001
2. Cutting Assembly complete ... Part No. TCM43002
Or call Clarke Parts department on 020 8988 7500
or e-mail Parts@clarkeinternational.com
Screw the cutter assembly
into the end of the column,
and tighten.
1
4
Unlock the Column Height Adjuster Nuts then screw the
lower nut clockwise to raise, or anticlockwise to lower,
the column, (and hence the cutter), so that the tip of
the Cutter is approximately level with, or VERY slightly
below, the top surface of the work table.
higher than the
pilot drill tip.
Screw down the upper adjuster nut and lock in place
firmly, ensuring the distance from the centre of the
pilot drill tip to the outside edge of the cutting tip is
set to the desired radius for the hole to be cut.
Depress the spring
loaded Lever, to raise
the column. Place
the tile on the work
table. Position it so
that the centre of the
desired hole is
directly beneath the
pilot drill tip, then
gently release the
Lever.
5
Hold the tile firmly, (or the Steadying Handle, as the
operation permits), and begin to turn the Operating
Handle
CLOCKWISE
. The pilot drill will begin to drill a pilot
hole, and eventually the cutter will come into contact
with the tile and a circle will be scored. Continue to turn
the handle until the cutter finally breaks through the tile.


