E
n
g
lis
h
GREAT BRITAIN
For consumer contact, please visit www.clasohlson.co.uk and click on customer service.
Ver
. 201101
Wireless Keyboard
Art.no. 18-1220
Model FK-760
38-3466
FK-760
Please read the entire instruction manual before use and save it for future
reference. We reserve the right for any errors in text or images and for making any
necessary technical changes to this document. If you should have any questions
concerning technical problems please contact our Customer Services.
1. Product description
•
Wireless mini keyboard
•
Range up to 10 metres
•
Integrated optical trackball
•
Compatible with Windows 2000, XP and Vista
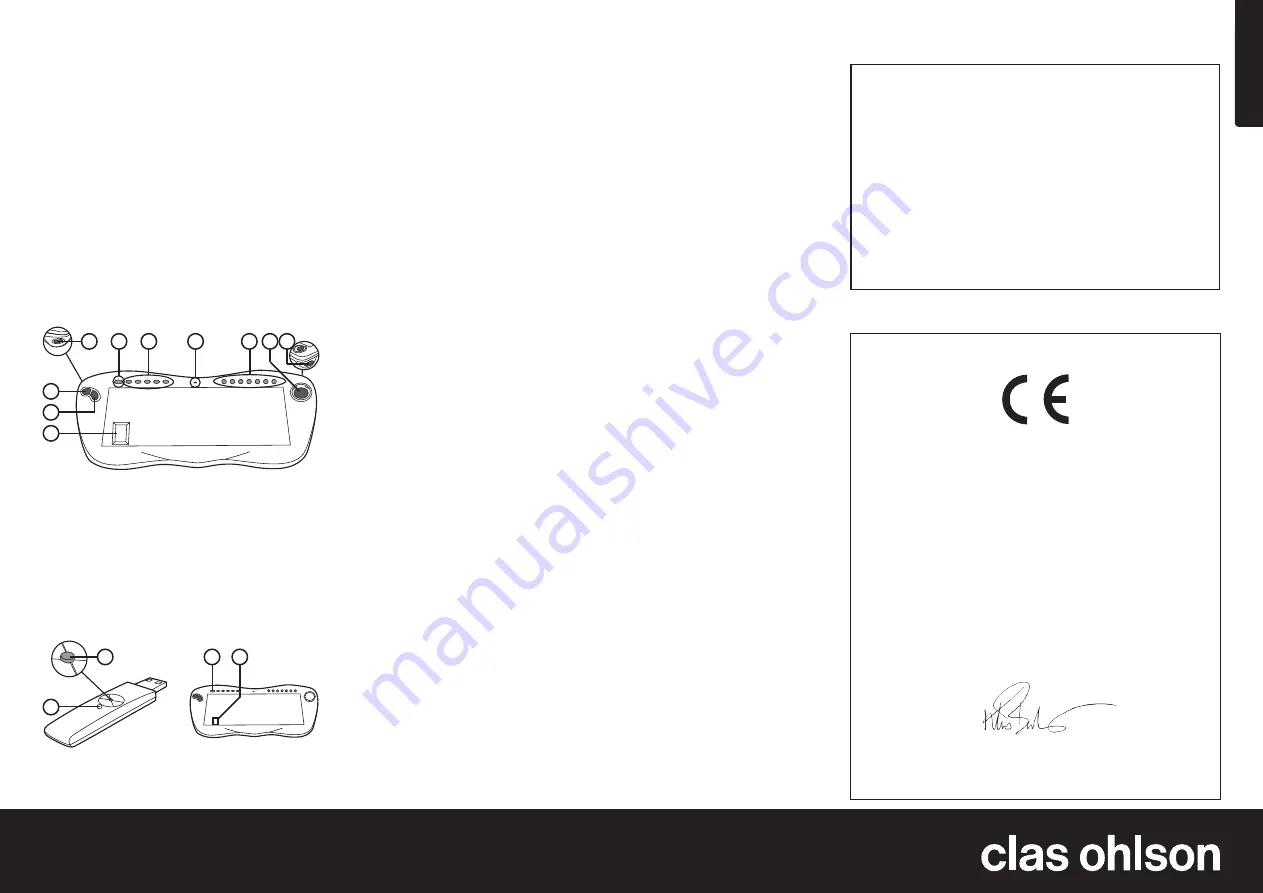
2. Buttons and functions
3. Installation
1. Open the battery cover on the bottom of the keyboard and insert four
AA/LR6 batteries according to the markings in the battery compartment.
Replace the battery cover.
2. Turn on the computer.
3. Connect the RF receiver to an available USB port on your computer.
4. ID settings:
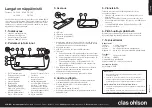
A. Press and hold the receiver’s ID button (B) for a few seconds until
the LED (A) begins to flash.
B. Press the receiver’s ID button (B) once again. The LED should
begin flashing.
C. Press [Fn] and [ID] on the keyboard (C) (D) simultaneously then release.
The receiver should now stop flashing.
5. When the keyboard and receiver are functioning and are synchronised to
each other, the LED on the receiver will respond every time you press a key
on the keyboard.
6. Reinstall whenever you need to change batteries.
4. Care and maintenance
•
Protect the keyboard from extreme heat/cold, strong magnetic fields
and moisture.
•
Do not disassemble the keyboard. It contains no self-serviceable or
adjustable parts.
•
Protect the keyboard from blows and vibrations.
•
Do not use strong cleaning agents or solvents to clean the keyboard.
5. Troubleshooting
Check these areas if the keyboard does not function after installation:
•
Make sure that the receiver is correctly connected to a USB port on
your computer.
•
Make sure that the 4 batteries are correctly inserted.
•
Move the keyboard closer to the computer if it is out of range.
•
If you are using more than 2 devices and there is interference present,
reset the “ID”.
6. Consider the environment
Follow local ordinances when disposing of this product. If you are unsure of how
to dispose of this product, please contact your municipality.
7. Specifications
Keyboard
Frequency: 2.4 GHz with 8 channels
Range:
Up to 10 metres
Batteries:
AA LR6 (4x) (use only alkaline batteries)
Keys:
88/89 and 12 Internet/multimedia hotkeys
Trackball
Type:
Optical trackball
Resolution: 800 DPI
2 mouse buttons and scroll wheel
Compatible with Windows 2000, XP and Vista
Receiver (dongle)
Interface:
USB
1. [Fn] Function button. Press
to switch function of the keys
marked with blue.
2. Right mouse button.
3. Left mouse button.
4. Scroll wheel.
5. [ID] ID button for wireless
connection to the receiver
(in conjunction with the
[Fn] button).
6. Internet hot keys: Left, right,
Internet Explorer, Outlook and
My Computer.
7. Low battery indicator.
8. Multimedia hot keys: Previous,
Next, Stop, Play/pause,
Mute, Decrease Volume and
Increase Volume.
9. Optical trackball.
10. Left mouse button.
Declaration of Conformity
Hereby, Clas Ohlson AB, declares that this wireless keyboard,
18-1220 / 38-3466
FK-760
is in compliance with the essential requirements and other relevant provisions
of Directive 1999/5/EC.
Article 3.1a (Safety): EN 60950-1
EMF/SAR 99/519/EC Council
Recommendation
Article 3.1b (EMC): EN 301489-1
EN 301489-3
Article 3.2 (Radio): EN 300440-2
Insjön, Sweden, January 2011
Klas Balkow
President
Clas Ohlson, 793 85 Insjön, Sweden
A. LED
B. ID button (receiver)
C. ID button (keyboard)
D. Fn button
Points worth bearing in mind!
•
Other wireless equipment operating on the same frequency band may
reduce the range of the product.
•
The range of all wireless equipment is affected by obstacles between
the transmitter and the receiver (a concrete wall reduces the signal far
more than a plasterboard partition, for example).
If you are having problems with the operation of the
system, try the following solutions
•
Switch off any other wireless equipment to check whether it could be
causing the problem.
•
Move the wireless equipment and/or reduce the distance, and reduce
the number of obstacles (walls, furniture, etc.) between the transmitter
and the receiver.
Fn
Fn
1
2
3
4
5
6
7
8
9 10
A
B
C
D


