background image

5

E

n

g

li

s

h

Use

Before initial use

Boil clean cold water in the kettle two times in order to rinse it out.

Boiling water

1.  Place the base on a stable and level surface. 
2.  Fill the kettle with cold water only. Do not overfill. The water level should be 

between the min and max marks on the water level gauge.

3.  Close the lid.
4.  Place the kettle on its base.
5.  Connect the plug to an earthed power point (220–240 V AC) which is protected 

by at least a 10 A fuse.

6.  Turn the kettle on. The indicator lamp lights when the water is being heated.
7.  The kettle shuts off automatically when the water has finished boiling.
8.  Pull out the plug, or use a time switch between the plug and the power point. 
9.  Do not open the lid whilst pouring. Let it remain closed to avoid scalding.

Care and maintenance

•  Unplug the lead from power point and let the kettle cool down 

properly before cleaning.

•  Never submerge the kettle in water.
•  Wipe with a soft cloth moistened with water and possibly a little washing-up liquid.
•  Avoid using solvents and abrasive cleaning agents. Dry carefully after cleaning.
•  Clean the filter located in the spout of the kettle regularly. The filter is removed from 

the inside and should be rinsed under running water and then left to dry.

Descaling

Because of the natural occurrence of lime in water, lime scale may form in the kettle 
after some use. For descaling, use a mixture of water and white vinegar (acetic acid) or 
a special descaling agent that can be purchased at most supermarkets. 
1.  Mix 1 dl of white vinegar (not regular vinegar) with 3 dl cold water or follow the 

directions included with the descaling agent.

2.  Pour the mixture in the kettle and turn it on. Boil up the mixture 2 times, and 

then pour it out.

3.  In order to remove the last remnants of limescale and descaling agent, the kettle 

should be filled to the max mark with fresh water. Turn the kettle on and let it boil.

4.  Pour out the water and repeat this process 3 times. The kettle is now ready to 

use again.

The kettle should be descaled after every 2–3 months of daily use. Do not descale too 
often since this can damage the heating coil.

Summary of Contents for 18-4329

Page 1: ...E ngl i sh Sve n ska Norsk Suomi Kettle Vattenkokare Vannkoker Vedenkeitin Art no Model 18 4329 HB 3262 UK 34 4092 HB 3262 Ver 201008...

Page 2: ...2...

Page 3: ...t knocks or high temperatures Never use another base than the one included Do not pull or carry the kettle by the mains lead Do not use the lead as a handle and do not run the lead through door jambs...

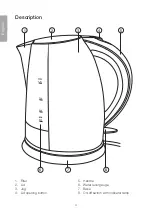
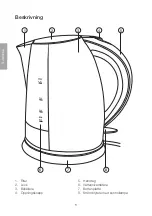
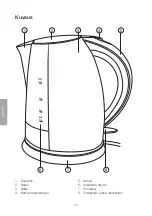
Page 4: ...4 E ng l i sh 1 2 3 4 5 6 7 8 Description 1 Filter 2 Lid 3 Jug 4 Lid opening button 5 Handle 6 Water level gauge 7 Base 8 On off switch with indicator lamp...

Page 5: ...and possibly a little washing up liquid Avoid using solvents and abrasive cleaning agents Dry carefully after cleaning Clean the filter located in the spout of the kettle regularly The filter is remo...

Page 6: ...ollow local ordinances when disposing of this product If you are unsure of how to dispose of this product please contact your local authority Specifications Rated voltage 220 240 V 50 60 Hz Power 1850...

Page 7: ...slag st tar eller h ga temperaturer Anv nd aldrig en annan bottenplatta n medf ljande Dra eller b r inte vattenkokaren i n tsladden Anv nd inte heller sladden som ett hand tag och kl m den inte i n go...

Page 8: ...8 Sve n ska 1 2 3 4 5 6 7 8 Beskrivning 1 Filter 2 Lock 3 Beh llare 4 ppningsknapp 5 Handtag 6 Vattenniv m tare 7 Bottenplatta 8 Str mbrytare med kontrollampa...

Page 9: ...trasa fuktad med vatten och ev lite diskmedel Undvik l sningsmedel eller slipande reng ringsmedel Torka noga efter reng ring G r med j mna mellanrum rent filtret som sitter i vattenkokarens h llpip F...

Page 10: ...ing N r du ska g ra dig av med produkten ska detta ske enligt lokala f reskrifter r du os ker p hur du ska g tillv ga kontakta din kommun Specifikationer M rksp nning 220 240 V 50 60 Hz Effekt 1850 22...

Page 11: ...Bruk aldri en annen bunnplate enn den som f lger med Vannkokeren m ikke b res etter ledningen Trekk heller ikke i ledningen for ta ut st pselet fra vegguttaket Bruk ikke ledningen som et h ndtak og l...

Page 12: ...12 Norsk 1 2 3 4 5 6 7 8 Beskrivelse 1 Filter 2 Lokk 3 Beholder 4 L sesperre for lokk 5 H ndtak 6 Vanniv m ler 7 Bunnplate 8 Str mbryter med kontrollampe...

Page 13: ...litt oppvaskmiddel Unng slipende rengj ringsmidler og l semidler T rk n ye etter rengj ring Rengj r filteret i vannkokerens tut med jevne mellomrom Filteret tas ut innenfra og gj res rent under rennen...

Page 14: ...sh ndtering N r produktet skal kasseres m det skje i henhold til lokale forskrifter Ved usikkerhet ta kontakt med lokale myndigheter Spesifikasjoner Spenning 220 240 V 50 60 Hz Effekt 1850 2200 W Vann...

Page 15: ...koske pohjalevyyn tai virtajohtoon jos k tesi ovat m r t l altista vedenkeitint iskuille t r hdyksille tai korkeille l mp tiloille K yt ainoastaan mukana tullutta pohjalevy l ved l k kanna laitetta v...

Page 16: ...16 Suomi 1 2 3 4 5 6 7 8 Kuvaus 1 Suodatin 2 Kansi 3 S ili 4 Kannen avausnappi 5 Kahva 6 Vesitason n ytt 7 Pohjalevy 8 Virtakytkin jossa merkkivalo...

Page 17: ...la ja pehme ll liinalla k yt tarvittaessa hieman tiskiainetta l k yt liuottimia tai hankaavia puhdistusaineita Pyyhi huolellisesti puhdistamisen j lkeen Puhdista kaatonokan suodatin s nn llisin v liaj...

Page 18: ...err tys Kierr t tuote asianmukaisesti kun poistat sen k yt st Tarkempia kierr tysohjeita saat kuntasi j teneuvonnasta Tekniset tiedot Nimellisj nnite 220 240 V 50 60 Hz Teho 1850 2200 W Tilavuus vesi...

Page 19: ...19...

Page 20: ...0 E post kundesenter clasohlson no Internett www clasohlson no Post Clas Ohlson AS Postboks 485 Sentrum 0105 OSLO Suomi Asiakaspalvelu Puh 020 111 2222 S hk posti info clasohlson fi Internet www claso...

Reviews: