background image

6

E

n

g

li

s

h

5.2 Encryption

NOTE:

 The buttons are deactivated in standby mode.

A. Using [ SETUP ]

1.  Hold down [ SETUP ] for 10–20 seconds. You can release the button when 

all the LEDs go out and the unit restarts. The original encryption setting of 
the network adaptor is cleared.

2.  Repeat step 1 to clear the original encryption setting of the other device.
3.  Press [ SETUP ] at the same time on both devices for 1 to 3 seconds. 

The “POWER” LED starts to blink on both devices. The two devices start to 
communicate and create their own encryption for their own network. 
The new encryption settings are complete after about 10 seconds. 
The LEDs go out on both devices and they restart. 

NOTE:

 If the settings are not complete after about 2 minutes, the network 

adaptors return to standby mode.

4.  If the devices fail to establish contact with each other, repeat steps 1 to 3.

B. Adding a new device to an existing private network

1.  Plug the new device into a wall socket. Hold down [ SETUP ] for 10 to 20 seconds 

to clear the existing encryption of the network adaptor.

2.  Press [ SETUP ] for 1 to 3 seconds. The “POWER” LED starts to blink. 
3.  Choose any device from the existing network. Press [ SETUP ] on that device for 

1 to 3 seconds. The “POWER” LED starts to blink.

4.  The new device starts to communicate with the chosen device on the network and 

attempts to connect to the network. The new encryption settings are complete 
after about 10 seconds. The LEDs on the new device go out and it restarts when 
the settings are complete. The “POWER” LED on the already connected device 
shows a steady light.

5.  If the new device fails to establish contact with the network, repeat steps 1 to 4.

C. Leaving a private network

Hold down [ SETUP ] for 10 to 20 seconds to clear the existing encryption of 
the device. The network adaptor has now left the private network.

5.3 Resetting

To reset the device to factory default settings:
Hold down [RESET] on the network adaptor for 1 to 3 seconds. The LEDs on 
the network adaptor go out and it restarts with the factory default settings.

Summary of Contents for 38-4374

Page 1: ...E ngl i sh Sve n ska Norsk Suomi Homeplug network adaptor Homeplug n tverksadapter Homeplug nettverksadapter Homeplug verkkosovitin Art no Model 38 4374 G200 Ver 201104...

Page 2: ...2...

Page 3: ...ns impacts humidity or moisture Do not place the product where it may fall into water or some other liquid Do not place objects containing liquid such as a flower vase or a drink on the product Make s...

Page 4: ...dby mode LINK and ETHERNET are not lit Not lit No power at the wall socket LINK Lit green There is a network connection but no traffic Blinking Green The connection quality is good Orange The connecti...

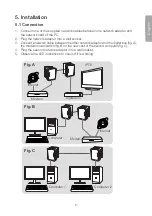
Page 5: ...and the digital box fig A the modem router switch fig B or the new card of the second computer fig C 4 Plug the second network adaptor into a wall socket 5 Observe the LED indications to check if it i...

Page 6: ...ug the new device into a wall socket Hold down SETUP for 10 to 20 seconds to clear the existing encryption of the network adaptor 2 Press SETUP for 1 to 3 seconds The POWER LED starts to blink 3 Choos...

Page 7: ...tions PHY RATE 200 Mbps Effective transmission speed TCP Up to 65 Mbps actual transmission speed UDP Up to 85 Mbps actual transmission speed Standard IEEE 802 3 IEEE 802 3U HomePlug AV1 1 Compatible o...

Page 8: ...r v ta Placera inte produkten s att den kan falla ner i vatten eller annan v tska St ll inte heller n gra f rem l som inneh ller v tska p produkten t ex en blomvas eller dryck Se till att de anslutna...

Page 9: ...yl ge r LINK och ETHERNET sl ckta Lyser inte Ingen str m i eluttaget LINK Lyser gr n N tverksanslutning finns men ingen trafik p g r Blinkar Gr n Bra kvalitet p anslutningen Orange Medelgod kvalitet p...

Page 10: ...erksadaptern och digitalbox bild A modem router switch bild B eller den andra datorns n tverkskort bild C 4 Anslut den andra n tverksadaptern till ett eluttag 5 Kontrollera funktionen med lysdiodernas...

Page 11: ...slut den nya enheten till ett eluttag H ll in SETUP i 10 20 sekunder f r att radera den f rprogrammerade krypteringen f r n tverksadaptern 2 Tryck in SETUP i 1 till 3 sekunder Lysdioden POWER b rjar b...

Page 12: ...ioner PHY RATE 200 Mbps Effektiv verf ringshastighet TCP Upp till 65 Mbps verklig verf ringshastighet UDP Upp till 85 Mbps verklig verf ringshastighet Standard IEEE 802 3 IEEE 802 3U HomePlug AV1 1 Ko...

Page 13: ...joner eller st t Plasser ikke produktet slik at det kan komme i kontakt med vann eller annen v ske Plasser aldri produktet n r gjenstander som kan f re til at v ske skylles over produktet P se at tilk...

Page 14: ...us er LINK og ETHERNET slukket Lyser ikke Ingen str m i uttaket LINK Lyser gr nt Nettverkstilkoblingen er ok men det er ingen trafikk Blinker Gr nn Bra kvalitet p tilkoblingen Oransje Middels kvalitet...

Page 15: ...igitalboks bilde A Modem Router Switch bilde B eller den andre datamaskinens nettverkskort bilde C 4 Koble den andre nettverksadapterens st psel i et str muttak 5 Kontroller funksjonene med hjelp av l...

Page 16: ...heten kobles til et str muttak Hold SETUP inne i 10 20 sekunder for slette den forprogrammerte krypteringen til nettverksadapteren 2 Hold SETUP inne i 1 3 sekunder Lysdioden POWER begynner blinke 3 Ve...

Page 17: ...fektiv overf ringshastighet TCP Inntil 65 Mbps reell overf ringshastighet UDP Inntil 85 Mbps reell overf ringshastighet Standard IEEE 802 3 IEEE 802 3U HomePlug AV1 1 Kompatible operativsystemer Windo...

Page 18: ...loille p lylle t rin lle iskuille kosteudelle tai vedelle l sijoita laitetta sellaiseen paikkaan josta se voi tippua veteen tai muuhun nesteeseen l pane laitteen p lle nesteit sis lt vi esineit kuten...

Page 19: ...imii Vilkkuu Valmiustila valmiustilassa LINK ja ETHERNET eiv t pala Ei pala Pistorasiassa ei virtaa LINK Palaa vihre n Verkkoyhteys on muodostettu mutta liikennett ei ole Vilkkuu Vihre Eritt in hyv li...

Page 20: ...n kuva A modeemiin reitittimeen kytkimeen kuva B tai toisen tietokoneen verkkokorttiin kuva C 4 Liit toinen verkkosovitin pistorasiaan 5 Tarkasta toiminta merkkivalojen avulla POWER LINK ETHERNET POWE...

Page 21: ...un l hiverkkoon 1 Liit uusi laite s hk pistorasiaan Poista verkkosovittimen esiohjelmoitu salaus painamalla SETUP 10 20 sekunnin ajan 2 Paina SETUP 1 3 sekunnin ajan POWER merkkivalo alkaa vilkkua 3 V...

Page 22: ...0 Mbps Tehollinen tiedonsiirtonopeus TCP Todellinen tiedonsiirtonopeus jopa 65 Mbps UDP Todellinen tiedonsiirtonopeus jopa 85 Mbps Standardi IEEE 802 3 IEEE 802 3U HomePlug AV1 1 Yhteensopivat k ytt j...

Page 23: ...23...

Page 24: ...0 E post kundesenter clasohlson no Internett www clasohlson no Post Clas Ohlson AS Postboks 485 Sentrum 0105 OSLO Suomi Asiakaspalvelu Puh 020 111 2222 S hk posti info clasohlson fi Internet www claso...

Reviews: