background image

6

English

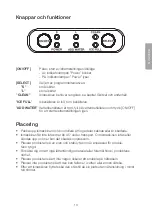
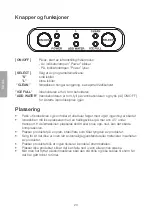
Buttons and functions

[ ON/OFF ]


Pressing this button selects either ice making mode or standby mode 


- When in OFF or standby mode, the “Power” indicator light will flash 


- When in ON or ice making mode, the “Power” indicator light  


   shines steadily

[ SELECT ]


Pressing this button selects the mode: 


“S”


small ice cubes 


“L”


large ice cubes

 “CLEAN”


When this light comes on, the ice maker needs to be cleaned, 


refer to the 

Care and maintenance

 section

“ICE FULL”


When this light comes on, the ice basket is full

“ADD WATER”

  When this light comes on the water tank is empty. 


Fill the water tank and press [ ON/OFF ] to start making ice again.

Placement

• 

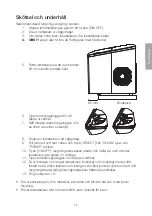
Unpack the box and check that none of the parts is missing or damaged.

• 

The ice maker must not be tilted more than 45° during transport. Tilting the ice 
maker too much or turning it upside down could damage the compressor.

• 

The ice maker should be placed on a firm, level surface capable of supporting its 
weight.

• 

Make sure that the ice maker is not placed near any flammable materials or objects.

• 

Place the ice maker where there is no risk of people tripping over its mains lead.

• 

Do not place the ice maker where it could fall into water or other liquid.

• 

Once it has been moved to a new location, the ice maker should be left unplugged 
for at least two hours.

Summary of Contents for 44-3994

Page 1: ...ICE MAKER Ismaskin Isbitmaskin J palakone Eisw rfelmaschine Art no 44 3994 Ver 20191205...

Page 2: ...2...

Page 3: ...e product unattended while it is switched on Do not use any accessories other than those provided with the product Never use the product in conjunction with a timer or other timer controlled equipment...

Page 4: ...n under supervision when the product is being used Cleaning and user maintenance may be carried out by children with adult supervision Disconnect the product from the power supply by unplugging it fro...

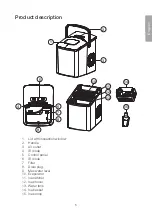
Page 5: ...14 15 9 Product description 1 Lid with inspection window 2 Handle 3 Air outlet 4 IR diode 5 Control panel 6 IR diode 7 Filter 8 Drain plug 9 Max water level 10 Evaporator 11 Ice catcher 12 Ice shovel...

Page 6: ...tank is empty Fill the water tank and press ON OFF to start making ice again Placement Unpack the box and check that none of the parts is missing or damaged The ice maker must not be tilted more than...

Page 7: ...efore using the machine Only use normal clean drinking water with a temperature of 8 25 C in the ice maker 1 Plug the ice maker into a wall socket 2 Open the lid remove the ice basket and fill the wat...

Page 8: ...lug the ice maker into a wall socket 9 Fill the water tank with clean water and press SELECT until the CLEAN light comes on and the POWER light flashes 10 Press ON OFF The cleaning process will start...

Page 9: ...water 8 C Responsible disposal This symbol indicates that the product should not be disposed of with general household waste This applies throughout the entire EU In order to prevent any harm to the e...

Page 10: ...en Produkten f r aldrig anslutas via en timer eller annan form av tidsstyrning Anv nd inte produkten om den p n got s tt r skadad Undvik att anv nda skarvsladd till produkten Men om det inte finns and...

Page 11: ...ens n rvaro Bryt str mmen till produkten genom att dra ut stickproppen ur v gguttaget Stickproppen m ste vara l tt tkomlig Hantera aldrig n tkabeln n r du r bl t eller fuktig om h nderna F rs k aldrig...

Page 12: ...12 8 13 14 15 9 Produktbeskrivning 1 Lucka med f nster 2 Handtag 3 Luftutlopp 4 IR diod 5 Kontrollpanel 6 IR diod 7 Filter 8 Dr neringsplugg 9 Max vattenniv 10 F r ngare 11 Isbeh llare 12 Isskopa 13 V...

Page 13: ...lningen igen Placering Packa upp ismaskinen och kontrollera att inga delar saknas eller r skadade Ismaskinen f r inte lutas mer n 45 under transport Om ismaskinen lutas eller v ndas upp och ner kan de...

Page 14: ...innan anv ndning Anv nd endast vanligt rent dricksvatten till ismaskinen med en temperatur mellan 8 C 25 C 1 Koppla in ismaskinen i ett v gguttag 2 ppna luckan ta ur iskorgen och fyll p vattenbeh llar...

Page 15: ...ordentligt 8 Koppla in ismaskinen i ett v gguttag 9 Fyll p med nytt rent vatten och tryck SELECT tills CLEAN lyser och POWER blinkar 10 Tryck ON OFF reng ringsprocessen startar och h ller p ca 6 minut...

Page 16: ...vatten 8 C Avfallshantering Denna symbol inneb r att produkten inte f r kastas tillsammans med annat hush llsavfall Detta g ller inom hela EU F r att f rebygga even tuell skada p milj och h lsa orsaka...

Page 17: ...Ikke bruk annet tilbeh r enn det som f lger med produktet Produktet m aldri kobles til via timer tidsur eller annen form for tidsstyring Bruk ikke batterieliminatoren hvis den er skadet Unng bruke sk...

Page 18: ...ing og vedlikehold skal ikke utf res av barn uten tilsyn av voksne Bryt str mtilf rselen til produktet ved trekke st pselet ut av str muttaket Produktets st psel m v re lett tilgjengelig H ndt r ikke...

Page 19: ...7 12 8 13 14 15 9 Produktbeskrivelse 1 Lokk med vindu 2 H ndtak 3 Luftutl p 4 IR diode 5 Kontrollpanel 6 IR diode 7 Filter 8 Dreneringsplugg 9 Maks vanniv 10 Fordamper 11 Isbeholder 12 Is se 13 Vannb...

Page 20: ...en og kontroller at alle deler f lger med og at ingenting er skadet Ismaskinen m ikke plasseres med en hellingsvinkel p mer enn 45 under transport Hvis ismaskinen plasseres skr tt eller snus opp ned k...

Page 21: ...lig f r bruk Bruk kun vanlig rent drikkevann i maskinen Temperaturen p vannet b r v re mellom 8 C 25 C 1 Koble st pselet til et str muttak 2 pne lokket ta ut iskurven og fyll vannbeholderen med nsket...

Page 22: ...lig 8 Koble st pselet p isbitmaskinen til et str muttak 9 Fyll opp med nytt rent vann og trykk SELECT til CLEAN lyser og POWER blinker 10 Trykk ON OFF og rengj ringsprosessen starter og p g r i ca 6 m...

Page 23: ...olderen med kaldt vann 8 C Avfallsh ndtering Dette symbolet betyr at produktet ikke m kastes sammen med vrig husholdningsavfall Dette gjelder i hele E S For forebygge eventuelle skader p helse og milj...

Page 24: ...mukana tulevia tarvikkeita Laitetta ei saa liitt ajastimeen tai muuhun aikaohjaimeen l k yt tuotetta jos se on vioittunut V lt laitteen k ytt mist jatkojohdon kanssa Jos muita vaihtoehtoja ei kuitenka...

Page 25: ...itetta ilman aikuisen valvontaa Katkaise virta irrottamalla pistoke pistorasiasta Pistokkeen tulee olla sellaisessa paikassa johon on helppo p st l k sittele virtajohtoa kosteilla tai m rill k sill l...

Page 26: ...8 13 14 15 9 Tuotekuvaus 1 Ikkunallinen luukku 2 Kahva 3 Ilman ulostuloaukko 4 IR diodi 5 Ohjauspaneeli 6 IR diodi 7 Suodatin 8 Poistotulppa 9 Veden enimm ism r 10 H yrystin 11 J astia 12 J kauha 13...

Page 27: ...oittaminen Poista j palakone pakkauksesta ja varmista ett kaikki osat ovat mukana ja ett osat ovat ehji J palakonetta saa kallistaa enint n 45 kuljetuksen aikana Jos j palakonetta kallistetaan enemm n...

Page 28: ...tt poistotulppa on kunnolla kiinni K yt j palakoneessa vain tavallista puhdasta juomavett Veden l mp tilan tulee olla 8 25 C 1 Liit j palakone pistorasiaan 2 Avaa luukku poista j kori ja t yt vesis il...

Page 29: ...rasiaan 9 T yt j palakoneeseen puhdasta vett ja paina SELECT kunnes CLEAN palaa ja POWER vilkkuu 10 Paina ON OFF jolloin koneen puhdistus alkaa Puhdistus kest noin 6 minuuttia Puhdistuksen j lkeen j p...

Page 30: ...viile mp n paikkaan ja t yt vesis ili kylm ll vedell 8 C Kierr tt minen T m kuvake tarkoittaa ett tuotetta ei saa h vitt kotitalousj tteen seassa T m koskee koko EU aluetta Virheellisest h vitt mises...

Page 31: ...cht ord nungsgem funktionieren Das Ger t im Betrieb nie unbeaufsichtigt lassen Ausschlie lich das mitgelieferte Zubeh r verwenden Das Ger t nie an eine Zeitschaltuhr oder andere Art von Zeit steuerung...

Page 32: ...hen Kein Kinderspielzeug W hrend des Betriebs Kinder st ndig beaufsichtigen Reinigung und Wartung darf von Kindern unter Aufsicht eines Erwachsenen durchgef hrt werden Die Stromzufuhr zum Ger t wird e...

Page 33: ...15 9 Produktbeschreibung 1 Luke mit Sichtfenster 2 Griff 3 Luftauslass 4 Infrarotdiode 5 Bedienfeld 6 Infrarotdiode 7 Filter 8 Ablaufstutzen 9 Max Wasserstand 10 Verdampfer 11 Eisbeh lter 12 Eisschauf...

Page 34: ...en dass alle Teile enthalten und unbe sch digt sind Das Ger t darf w hrend des Transports nicht mehr als 45 geneigt werden Wird das Produkt zu stark geneigt oder auf den Kopf gestellt kann dies den Ko...

Page 35: ...t ist Nur sauberes normales Leitungswasser mit einer Temperatut zwischen 8 C und 25 C f r die Eismaschine verwenden 1 Das Produkt an eine Steckdose anschlie en 2 Die Luke ffnen den Eiskorb herausnehme...

Page 36: ...dukt an eine Steckdose anschlie en 9 Neues Wasser nachf llen und auf SELECT dr cken bis CLEAN leuchtet und POWER blinkt 10 Auf ON OFF dr cken der Reinigungsprozess startet und dauert ca 6 min Die Eism...

Page 37: ...t aufstellen und den Wasserbeh lter mit 8 C kaltem Wasser f llen Hinweise zur Entsorgung Dieses Symbol zeigt an dass das Produkt nicht gemeinsam mit dem Hausm ll entsorgt werden darf Dies gilt in der...

Page 38: ...38...
Page 39: ...lvelu clasohlson fi Internet www clasohlson fi Osoite Clas Ohlson Oy Kaivokatu 10 B 00100 HELSINKI United Kingdom Customer Service Contact number 020 8247 9300 E mail customerservice clasohlson co uk...

Reviews: