background image

6

English

•  The device 

MUST

 be attached to the edge of the cooking vessel using the clamp (2).  

Make sure that the device stands upright. It must 

NOT

 be loose in the cooking vessel.

•  Never immerse the upper body of the product in water or other liquid.
•  Certain parts of the device become hot during use. Take care and only touch the upper body.
•  The circulating water becomes hot when the product is in use. Ensure that you have a 

suitable trivet under the cooking vessel. Use tongs or other appropriate utensil if you need to 
remove the foodstuffs from the hot water. Be very careful when moving the cooking vessel if 
it contains hot water.

•  The water in the cooking vessel must never be higher than the MAX marking on the product.


1.  Use a cooking vessel with a depth of at least 11 cm (4.25"). Place the cooking vessel 

on a stable and heat-resistant surface such as a trivet.

2.  Clamp the device onto the wall of the cooking vessel in such a way that the display is 

turned towards you. 

3.  Fill the cooking vessel with cold water until the water level is between the MIN and MAX 

markings. Bear in mind that the water level will rise when you place the vacuum bag in 
the water so don’t pour in too much water.

4.  Plug the device into a wall socket, an audible signal will be emitted, the display will light 

up for an instant and the on/off button [ ] (10) will come on.

5.  Turn on the device by pressing [ ]. 
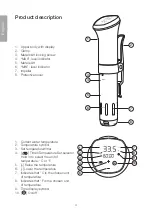
6.  The current water temperature (1), desired temperature (default factory setting 50.0 °C) 

(3) and [ ] will flash.

7.  Press [+/-] to set the desired temperature. Press [

] (4) if you want to change the unit 

of temperature.

8.  Press [

] to change to the timer setting.

9.  Press [+/-] to set the desired cooking time.
10. Press [ ] to start cooking. The circulation pump starts working and the water starts to 

heat up. When the set temperature has been reached the device emits a sound and the 
display changes from showing the set temperature to show the set time while the timer 
starts to count down.

11. Place the vacuum bag/bags containing the foodstuffs into the water. Ensure that each 

bag is fully submerged under the water and that the water can circulate freely around 
the bag/bags. Wait until the timer has finished counting down. Once the timer has 
reached zero, the device will emit a sound, it will turn off and the cooking is done. 
The temperature and the cooking time can be changed anytime during the warming 
up process by pressing [

]. Once the timer has started counting down the device 

must be placed in standby mode in order for changes to be made. The device can be 
switched off at any time by holding in [ ].

12. Unplug the device from the wall socket and remove the foodstuffs from the cooking 

vessel. 

13. Let the device and the water cool down.
14. Remove the device from the cooking vessel and pour out the water.  

Always use fresh water for each cooking session, never the same water twice.

Summary of Contents for 44-4253

Page 1: ...Art no 44 4253 Ver 20200706 Cooks food at an even temperature adjustable between 0 95 C IMMERSION CIRCULATOR Sous VIDE...

Page 2: ...d super vised by an adult Keep the product and its mains lead out of reach of children under the age of 8 The product may be used by persons with reduced physical sensory or mental capabilities or per...

Page 3: ...hey are in close proximity to the product while it is in use Never use an extension lead with the product Do not allow the product to come into contact with foodstuffs Ensure that all foodstuffs are p...

Page 4: ...vel indicator 7 Impeller 8 Protective cover 1 Current water temperature 2 Temperature symbol 3 Set temperature timer 4 Timer Temperature Set selector Hold in to select the unit of temperature C or F 5...

Page 5: ...nt types of food The below table provides suggestions of temperature and cooking times for different foods The time indications in the table may need to be adjusted if you choose a thicker thinner pie...

Page 6: ...e on off button 10 will come on 5 Turn on the device by pressing 6 The current water temperature 1 desired temperature default factory setting 50 0 C 3 and will flash 7 Press to set the desired temper...

Page 7: ...culate for 10 minutes after the set temperature has been reached 5 Turn off the device unplug the lead from the wall socket and let the device cool down to room temperature 6 When the device has coole...

Page 8: ...ck in and switch the device on The device emits a signal and ER2 is shown on the display The device has overheated Turn off the device and unplug it from the wall socket Add more water if necessary Le...

Page 9: ...ing brist p erfarenhet eller kunskap som skulle kunna ventyra s kerheten om de har f tt instruktioner om hur produkten p ett s kert s tt ska anv ndas och f rst r faror och risker som kan uppkomma L t...

Page 10: ...g en skarvkabel till produkten Produkten f r inte komma i kontakt med matvaror Se till att alla matvaror r f rpackade i vakuump sar av god kvalitet Produkten f r endast anv ndas i vatten Produkten f r...

Page 11: ...st ll in timer eller temperatur H ll in f r att v lja temperaturenhet C eller F 5 H j temperaturen 6 S nk temperaturen 7 Visar att C r valt som tem peraturenhet 8 Visar att F r valt som tem peraturen...

Page 12: ...tillagningstid f r olika r varor Tidsangivelserna i tabellen kommer att beh va ndras om du t ex v ljer en tjockare tunnare k ttbit n vad som anges i tabellen Kom ih g att tabellen r ett f rslag och de...

Page 13: ...ast sken 5 Sl p enheten med 6 Vattnets aktuella temperatur 1 nskad temperatur 50 0 C f rinst llt fr n fabrik 3 och blinkar i displayen 7 Tryck f r att st lla in nskad temperatur H ll in 4 om du vill n...

Page 14: ...er att inst lld temperatur uppn tts 5 Sl av enheten dra ut stickproppen ur v gguttaget och l t enheten svalna till rumstemperatur 6 N r enheten svalnat sk lj med rent vatten och torka helt torrt f re...

Page 15: ...vger en ljudsignal och ER2 visas i displayen Enheten r verhettad Sl av enheten och dra ut stickproppen ur v gguttaget Det kan vara n dv ndigt att tills tta mer vatten L t enheten svalna i n gra minu t...

Page 16: ...edsatt funksjonse vne manglende erfaring eller kunnskap som kan p virke sik kerheten dersom de har f tt instruks om hvordan produktet p en sikker m te skal brukes og forst r de farer og risikoer som k...

Page 17: ...sne Bruk aldri skj teledning til produktet Produktet m ikke komme i kontakt med matvarer S rg for at matvarene er pakket i vakuumposer av god kvalitet Produktet m kun brukes i vann Produktet skal kun...

Page 18: ...l 6 MIN niv merking 7 Impeller 8 Beskyttelsesdeksel 1 Aktuell vanntemperatur 2 Temperaturikon 3 Innstilt temperatur timer 4 Indikator for timer temperatur innstilling Hold inne for velge temperaturenh...

Page 19: ...der for forskjellige r varer Tidene i tabellen m endres hvis du f eks velger et tykkere tynnere kj ttstykke en det som er oppgitt i tabellen Husk at tabellen er veiledende og du m selv pr ve deg fram...

Page 20: ...skinn 5 Sl p enheten med 6 Vannets aktuelle temperatur 1 nsket temperatur 50 0 C forh ndsinnstilt fra fabrikk 3 og blinker i displayet 7 Trykk p for stille inn nsket temperatur Hold 4 inne hvis du vi...

Page 21: ...innstilt temperatur er oppn dd 5 Sl av enheten trekk st pselet ut av str muttaket og avkj l enheten ned til romtemperatur 6 N r enheten er blitt avkj lt skylles det med rent vann T rk godt f r enhete...

Page 22: ...muttak og skru p enheten Enheten avgir et lydsignal og ER2 vises i displayet Enheten er overopphetet Skru av enheten og trekk st pselet ut av str muttaket Det kan bli n dvendig tilsette mer vann Avkj...

Page 23: ...syykkisi rajoitteita tai henkil t joilla ei ole riitt v sti laitteen turvalliseen k ytt n tarvittavaa taitoa tai kokemusta saavat k ytt laitetta jos heit on ohjeistettu sen turvallisesta k yt st ja k...

Page 24: ...syyteen k yt n aikana l k yt laitetta jatkojohdon kanssa Laite ei saa joutua kosketuksiin ruoka aineiden kanssa Var mista ett kaikki ruoka aineet on pakattu laadukkaisiin vakuu mipusseihin Laitetta sa...

Page 25: ...mp tilan kuvake 3 Asetettu l mp tila ajastin 4 Valitse ajastimen tai l mp tilan asettaminen Valitse l mp tilayksikk C tai F painamalla painiketta pitk n 5 L mp tilan nostaminen 6 L mp tilan alentamine...

Page 26: ...n l mp tiloille ja valmistu sajoille Taulukon valmistusaikoihin vaikuttaa esimerkiksi se jos valitset paksumman ohuemman pihvin kuin taulukossa mainittu Muista ett taulukon ajat ovat ehdotuksia joten...

Page 27: ...ll valolla 5 K ynnist laite painikkeella 6 Veden l mp tila 1 haluttu l mp tila 50 0 C tehdasasetuksena 3 ja vilkkuvat n yt ll 7 Paina jotta saat asetettua halutun l mp tilan Paina pitk n 4 jos tahdot...

Page 28: ...y huoneenl mp iseksi 6 Kun laite on j htynyt huuhtele se puhtaalla vedell ja kuivaa huolellisesti ennen s ilytyst Jos ruoka ainetta on vahingossa p tynyt veteen vakuumipussi on rikkoutunut tai irtonai...

Page 29: ...istoke pistorasiaan ja k ynnist laite Laitteesta kuuluu merkki ni ja n yt ll lukee ER2 Laite on ylikuumentunut Sammuta laite ja irrota pistoke pistorasiasta Voi olla tarpeen lis t vett Anna laitteen j...

Page 30: ...Kindern unter 8 Jahren halten Das Ger t ist f r Personen mit eingeschr nkten physischen sensorischen oder geistigen F higkeiten bzw mangelnder Erfahrung mangelndem Wissen nur dann geeignet wenn diese...

Page 31: ...e in der N he des Ger tes befinden Das Produkt niemals mit einem Verl ngerungskabel betreiben Das Produkt darf niemals in direkten Kontakt mit Lebensmitteln kommen Sicherstellen dass alle Lebensmittel...

Page 32: ...rkierung 7 Impeller 8 Schutzhaube 1 Aktuelle Wassertemperatur 2 Temperatursymbol 3 Eingestellte Temperatur Timer 4 Wechsel zwischen Einstellung von Temperatur oder Timer Gedr ckt halten um die Tempera...

Page 33: ...r Lebensmittel Die Tabelle unten zeigt die empfohlenen Temperaturen und Zubereitungszeiten f r verschiedene Rohwaren an Die Zeiten in der Tabelle m ssen angepasst werden wenn beispielsweise ein dicker...

Page 34: ...auf und 10 leuchtet permanent 5 Das Ger t mit einschalten 6 Die aktuelle Temperatur des Wassers 1 die gew nschte Temperatur 50 0 C Werkseinstellung 3 und blinken auf dem Display 7 Mit der Taste die g...

Page 35: ...lten Temperatur 10 Minuten lang zirkulieren lassen 5 Das Ger t ausschalten den Netzstecker ziehen und das Ger t auf Zimmertemperatur abk hlen lassen 6 Wenn das Ger t abgek hlt ist mit sauberem Wasser...

Page 36: ...lten Das Ger t sendet ein akus tisches Signal und im Display erscheint ER2 Das Ger t ist berhitzt Das Ger t abschalten und den Netzstecker aus der Steckdose ziehen M gli cherweise muss mehr Wasser hin...

Page 37: ...37...

Page 38: ...38...

Page 39: ...39...

Page 40: ...lvelu clasohlson fi Internet www clasohlson fi Osoite Clas Ohlson Oy Kaivokatu 10 B 00100 HELSINKI United Kingdom Customer Service Contact number 020 8247 9300 E mail customerservice clasohlson co uk...

Reviews: