background image

5

English

3-5 mm

3-5 mm

3-5 mm

3-5 mm

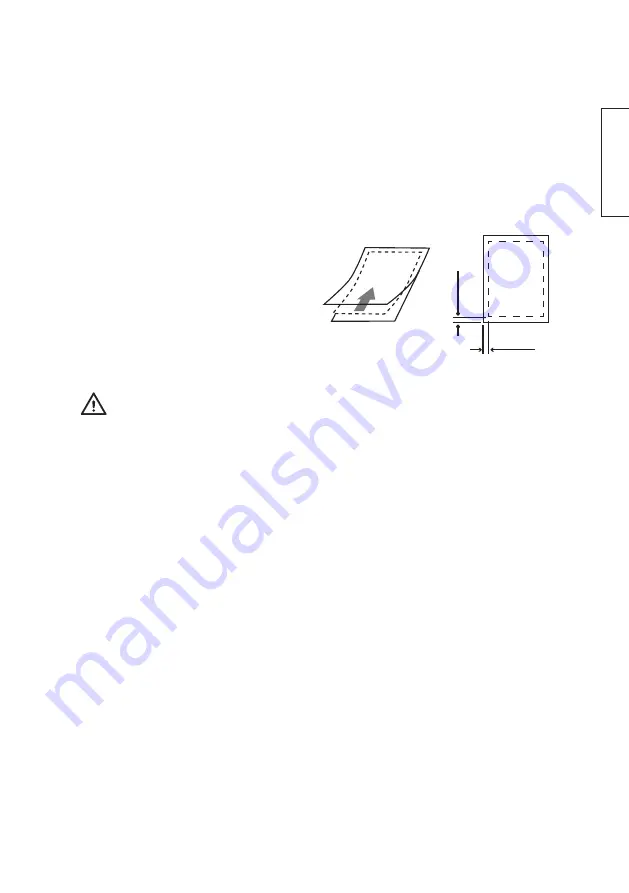
3.  Lift up one corner of the lamination 

film and place the paper to be 
laminated between the two sheets 
of film. Leave at least 3–5 mm of 
space at the edges when positioning 
the paper. Make sure the paper is not 
crooked.

4.  Feed the sealed end of the lamination film pocket into the film feed slot first.  

 This is very important; otherwise, the lamination film can become caught  


in the rollers. 

5.  Let the entire lamination exit freely. Do not pull it out with force. Let it cool before 

handling it. Place a flat heavy object like a book onto the laminate while it is cooling 
if you want it to ensure that it will be flat and smooth.

6.  When finished, set the power switch to the 

0

 position and unplug the machine.

Cold laminating

•  If the machine has been used for hot laminating it must be left to cool for at least 

two hours before it can be used for cold laminating. 

•  Only use laminating film designed for Cold Laminating. 

1.  Plug the laminator in to a wall socket and set the power switch to 

COLD

.  

The laminator is ready for use as soon as the red indicator light shines. 

2.  If the laminating film is covered in protective foil, remove it. 
3.  Follow steps 3–6 above in the 

Hot laminating

 section.

•  Select the correct size of lamination film so that it fits the object to be laminated.
•  Avoid placing multiple pieces of paper into a single lamination pouch.
•  Make sure that the total thickness of the laminate must not exceed 0.5 mm.
•  Do not feed in empty lamination film.
•  Do not cut the lamination film into smaller pieces before feeding it through the machine.
•  Do not feed the film into the machine at an angle. Doing so may cause it to become 

caught in the machine during the lamination process.

Instructions for use

Hot laminating

1.  Plug the laminator into a wall socket and set the laminate thickness selector to 

the correct setting (80–125 microns) for the laminating film you will be using.  
The red indicator light will illuminate while the machine warms up. 

2.  After about 5–7 minutes, when the green indicator light shines 

steadily 

(it starts 

to flash while the laminator is heating up), the machine has warmed up and is 
ready for use. Make sure that there is sufficient room behind the machine to allow 
the lamination to exit the machine freely.

Summary of Contents for 44-4480

Page 1: ...Laminator SE Lamineringsmaskin NO Lamineringsmaskin FI Laminointikone Art no Model 44 4480 L407 B 44 4481 L307 B Ver 20220128 English Sve nska Norsk Suom i...

Page 2: ...2...

Page 3: ...mell may be emitted as residue from the manufacturing process is being burnt off this is completely normal Place the product on a dry and level surface The product must be freely accessible from all s...

Page 4: ...y that there is no risk of anyone tripping over it Inspect the mains lead regularly for signs of damage Never use the product if the mains lead or plug is damaged Never use the product if it is defect...

Page 5: ...minator is ready for use as soon as the red indicator light shines 2 If the laminating film is covered in protective foil remove it 3 Follow steps 3 6 above in the Hot laminating section Select the co...

Page 6: ...oist cloth Use only mild cleaning agents never solvents or corrosive chemicals Responsible disposal This symbol indicates that the product should not be disposed of with general household waste This a...

Page 7: ...acera produkten fritt p en plan och torr yta Den m ste var tkomlig fr n alla sidor Produkten r inte avsedd f r kontinuerlig drift i kommersiellt syfte Den r endast avsedd f r normalt bruk i hemmet Anv...

Page 8: ...egelbundet kontrolleras Anv nd aldrig produkten om n tkabeln eller stickproppen r skadade Anv nd den heller aldrig om den p n got s tt fungerar onormalt har tappats skadats eller utsatts f r vatten el...

Page 9: ...S tt i stickproppen i ett v gguttag och st ll str mbrytaren i l ge COLD Lamineringen kan p b rjas n r den r da indikatorn lyser 2 Ta bort ev skyddspapper fr n lamineringsfilmen 3 F lj punkt 3 6 ovan o...

Page 10: ...en l tt fuktad trasa Anv nd ett milt reng ringsmedel aldrig l sningsmedel eller fr tande kemikalier Avfallshantering Denna symbol inneb r att produkten inte f r kastas tillsammans med annat hush llsav...

Page 11: ...opp og er helt normalt Plasser produktet fritt p et jevnt plant og t rt underlag Det m v re fri tilgang fra alle sider Produktet er ikke beregnet for kontinuerlig kommersiell bruk Det er kun beregnet...

Page 12: ...er den s nn at det ikke er fare for at fremmedelementer kan falle ned p maskinen Str mledningen b r kontrolleres regelmessig Bruk ikke produktet dersom str m ledning eller st psel er skadet Det m hell...

Page 13: ...st pselet i en kontakt og still str mbryteren p COLD Lamineringsprosessen kan starte n r den r de indikatoren lyser 2 Fjern ev beskyttelsespapir fra lamineringsfilmen 3 F lg punktene 3 6 ovenfor ved L...

Page 14: ...t rengj ringsmiddel aldri l semidler eller etsende kjemikalier Avfallsh ndtering Dette symbolet betyr at produktet ikke m kastes sammen med vrig husholdningsavfall Dette gjelder i hele E S For forebyg...

Page 15: ...pois T m on t ysin normaalia Sijoita laite tasaiselle ja kuivalle pinnalle niin ett sen ymp rill on vapaata tilaa Laitteeseen on p st v k siksi joka sivulta Laite ei sovellu jatkuvaan k ytt n kaupall...

Page 16: ...t se ei aiheuta kompastumisvaaraa Tarkista virtajohdon kunto s nn llisesti l k yt laitetta jos sen virtajohto tai pistoke on vioittunut l k yt laitetta my sk n jos se ei toimi normaalisti on pudonnut...

Page 17: ...pistorasiaan ja aseta virtakytkin asentoon COLD Voit aloittaa laminoinnin kun punainen merkkivalo syttyy 2 Poista laminointitaskusta mahdollinen suojapaperi 3 Noudata yll olevia Kuumalaminoinnin kohti...

Page 18: ...ulla liinalla K yt mietoa puhdistusainetta l k yt liuottimia tai sy vytt vi kemikaaleja Kierr tt minen T m kuvake tarkoittaa ett tuotetta ei saa h vitt kotitalousj tteen seassa T m koskee koko EU alue...

Page 19: ...19...

Page 20: ...desenter tlf 23 21 40 00 e post kundesenter clasohlson no Internett www clasohlson no Post Clas Ohlson AS Postboks 485 Sentrum 0105 OSLO Suomi Asiakaspalvelu puh 020 111 2222 s hk posti asiakaspalvelu...

Reviews: