English
GREAT BRITAIN •
customer service
tel:
020 8247 9300
customerservice@clasohlson.co.uk
internet
www.clasohlson.co.uk
postal
10 – 13 Market Place, Kingston Upon Thames, Surrey, KT1 1JZ
5
6
7
2
3
4
1
Ver
. 20170731
LED Projector
Art.no 18-1442 Model XYPJ-003A
36-6857
XYPJ-003A
Please read the entire instruction manual before using the product and
then save it for future reference. We reserve the right for any errors in
text or images and any necessary changes made to technical data.
In the event of technical problems or other queries, please contact our
Customer Services.
Safety
• Never subject the product to knocks or blows.
• Do not place the product where there is a risk of it falling
into water or other liquid.
• Never let children play with the product.
• Never try to dismantle or repair the product yourself.
• Do not use the projector for longer than 6 hours at a time.
Product information
Assembly
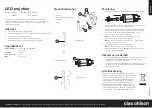
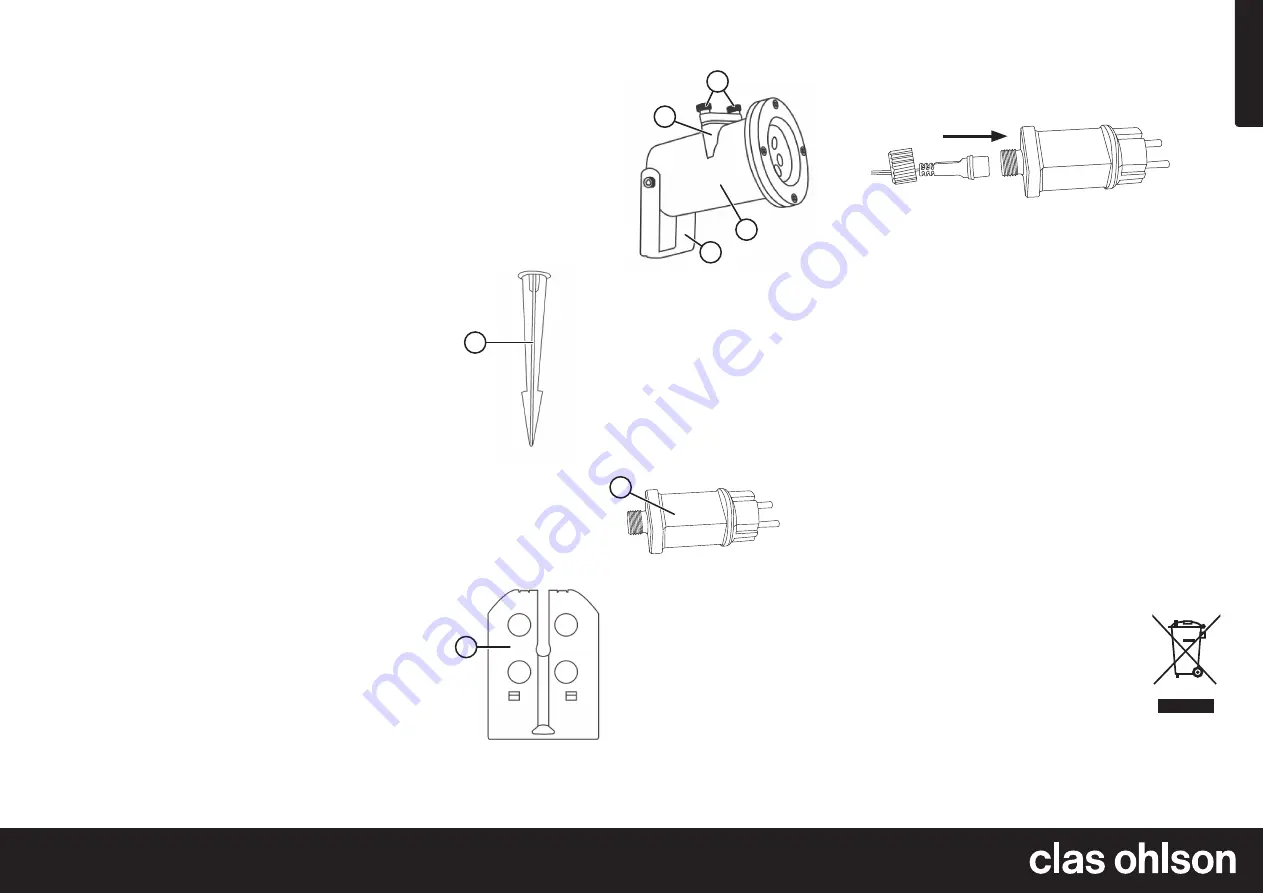
1. Attach the ground spike (5) to the U-bracket (4) on the projector
using the screws.
1. Card holder
2. Card holder screws
3. Projector
4. U-bracket
5. Ground spike
6. Mains adaptor
7. Pattern cards × 4
2. Connect the projector cable to the mains adaptor (6) (it only fits one
way) and tighten the connection by screwing on the lock nut.
3. Stick the ground spike into the ground and aim the projector
at a wall. Adjust the size of the projected image by changing
the distance between the projector and the wall, max 5 m.
4. Undo the screws (2) and remove the card holder.
Note:
Treat the gasket between the card holder and card slot with care.
5. Carefully slide the pattern card of your choice (7) into the card slot.
Note:
The card only fits one way, no great force is required to push
the card in.
6. Refit the card holder and tighten the screws.
Note:
Take care not to crush the gasket.
7. Plug the mains adaptor into a wall socket. The projector will now
project a Christmas-themed light pattern on the wall.
Care and maintenance
• Disconnect the mains adaptor from the wall socket before cleaning
the projector with a damp cloth. Use only mild cleaning agents,
never solvents or corrosive chemicals.
• If it is not to be used for a long time, the projector should be
disconnected from the wall socket and stored in a dry, dust-free
environment, out of children’s reach.
Responsible disposal
This symbol indicates that this product should not
be disposed of with general household waste. This
applies throughout the entire EU. In order to prevent any
harm to the environment or health hazards caused by
incorrect waste disposal, the product must be handed
in for recycling so that the material can be disposed of
in a responsible manner. When recycling your product,
take it to your local collection facility or contact the place
of purchase. They will ensure that the product is
disposed of in an environmentally sound manner.
Specifications
Adaptor
Input: 220–240 V AC 50/60 Hz
Output:12 V, 6 W
Light source
4 W LED
IP rating
IP44
Size
32 × 12 cm


