background image

OE 1319

ELECTRIC ORBITAL SANDER 5mm Ø150mm

SPECIFICATIONS

OPERATING INSTRUCTIONS

Models

OE 1318 / OE 1319

Sander Type

Central Vacuum

Orbit (mm)

2.5 (OE 1318)/ 5 (OE 1319)

Ø Pad (mm)

150

Free speed (tr/min)

2000 - 10000

Motor Hp (W)

350 max.

Mains Voltage

220V

Measurement

251x150x94

Weight (Kg)

0.9

Hose connection

Ø 26.5

IMPORTANT NOTE : 

The noise and vibration values in the table are based on laboratory tests in accordance with 

established codes and standards and do not constitute a sufficient risk assessment for all exposure 

scenarios. The actual exposure values and the magnitude of the risk or damage suffered is unique 

to each situation and depends on the environment, how each job is performed, the material being 

worked on, the design of the workstation, and the physical condition of the user. We cannot be held 

responsible for any differences between reported and actual values.

BEFORE USE

1. the tool is intended to be used as a hand tool. It is recommended that operators stand on a stable 

floor, in a safe position, with a good grip on the tool.

Be aware that the sander generates a rotational force.

2. This tool is designed for fine finishing work, do not force the sander like conventional electric 

sanding machines or pneumatic sanding machines. Light sanding is the right way to use it; it can be 

more effective than intensive sanding.

Summary of Contents for OE 1318

Page 1: ...clas com PONCEUSE ELECTRIQUE ORBITALE 2 5mm Ø150mm ELECTRIC ORBITAL SANDER 2 5mm Ø150mm OE 1318 PONCEUSE ELECTRIQUE ORBITALE 5mm Ø150mm ELECTRIC ORBITAL SANDER 5mm Ø150mm OE 1319 ...

Page 2: ...tement sur notre site clas com Si vous avez changé d avis concernant votre achat veuillez retourner ce produit avant d essayer de l installer Before returning this product for any reason installation problem instructions for use breakdown manufacturing problem please contact us Contact You can reach us by mail sav clas com or by phone 33 0 4 79 72 69 18 or go directly to our website clas com If yo...

Page 3: ...ns d utilisation dangereuse Ne pas utiliser l outil dans l eau ou en conditions d utilisation trop humides Ne pas utiliser de disque à grains dont les tours par minute ou OPM maximaux sont inférieurs à ceux de l outil Ne jamais utiliser de disques à grains dont le poids et la taille ne sont pas prévus spécialement pour cet outil AVERTISSEMENT Indique une situation potentiellement dangereuse qui si...

Page 4: ...ée Ne jamais modifier la fiche de quelque façon que ce soit Ne jamais utiliser d adaptateurs de fiche avec des outils électriques raccordés à la terre Les fiches et prises non modifiées réduisent le risque d électrocution b Éviter tout contact du corps avec des surfaces raccordées à la terre telles que tuyaux radiateurs cuisinières et réfrigérateurs Le risque d électrocution est accru lorsque le c...

Page 5: ...vail à accomplir L outil électrique approprié permettra d effectuer le travail de meilleure façon et de manière plus sûre s il est utilisé dans les limites prévues b Ne pas utiliser l outil si le commutateur ne permet pas de le mettre en marche ou de l arrêter Tout outil électrique qui ne peut pas être contrôlé par son commutateur présente un danger et doit être réparé c Débrancher l outil et ou r...

Page 6: ...eillons Pour réduire les risques liés aux vibrations En cas de douleurs aux mains ou aux poignets pendant l utilisation de l outil tout activité doit être arrêtée le plus rapidement possible et un docteur doit être consulté Les blessures aux mains poignets et aux bras peuvent être dues à un travail ou à un mouvement répétitif et à une surexposition aux vibrations Pour réduire les risques liés au b...

Page 7: ... autorisez pas non plus à ce qu il soit démarré par inadvertance Ne dirigez jamais ce produit vers vous ou vers une autre personne et ne le démarrez jamais par inadvertance Ne serrez jamais trop les attaches des accessoires RENSEIGNEMENTS SUR LA SANTÉ ET LA SÉCURITÉ Conforme RoHS Ce produit et les composants sont RoHs et ne contiennent pas de substances dépassant les valeurs maximales imposées par...

Page 8: ...OE 1318 PONCEUSE ELECTRIQUE ORBITALE 2 5mm Ø150mm VUE DÉTAILLÉE Cordon d alimentation Voyant marche Tr min Tr min Raccordement du tuyau poussière Plateau Gâchette Prise cordon alimentation ...

Page 9: ...s subis est unique à chaque situation et dépend de l environnement de la façon dont chacun travail la matière sur laquelle on intervient la conception de la station de travail ainsi que l état physique de l utilisateur Nous ne pouvons être tenus responsables pour les différences éventuelles entre valeurs communiquées et réelles AVANT UTILISATION 1 l outil est destiné à être utilisé comme un outil ...

Page 10: ... LED qui s allume en alternance Vert Rouge Veuillez vous référer aux instructions de dépannage pour résoudre le problème REGLAGE VITESSE Cette ponceuse orbitale électrique a neuf vitesses préréglées 2 000 à 10 000 tr min La vitesse de démarrage d origine n est pas la vitesse maximale lorsque l outil a été livré La vitesse peut être modifiée à tout moment pendant que la ponceuse est en marche ou lo...

Page 11: ...il lorsque la température atteint des niveaux dommageables Pendant les périodes où la température interne est élevée la ponceuse s arrête si la température atteint un niveau nuisible La ponceuse ne pourra pas être redémarrée tant que la température interne n aura pas refroidi à un niveau sûr pour les systèmes électroniques Le temps de refroidissement dépend des conditions locales Une période d att...

Page 12: ...1 long 2 courts Problème alimentation moteur Contacter SAV 1 long 3 courts Surchauffe du circuit imprimé Arrêter et laissez refroidir l appareil Si le problème persiste contacter SAV 1 long 4 courts Problème phase moteur Redémarrez la ponceuse Si le problème persiste contacter SAV 1 long 5 courts Tension trop faible Vérifier la tension d alimentation 1 long 6 courts Tension trop haute Vérifier la ...

Page 13: ...nant le et l outil passe en mode reset 3 Assurez vous de relâcher le levier Figure 3 et le bouton Attendre que la LED clignote deux fois en rouge Figure 4 4 Appuyez fermement sur le levier de vitesse Figure 5 et attendez que la LED clignote rapidement en rouge Figure 6 puis relâchez immédiatement le levier d accélérateur Figure 7 Attendez que le voyant rouge s éteigne Figure 8 La procédure de réin...

Page 14: ...OE 1318 PONCEUSE ELECTRIQUE ORBITALE 2 5mm Ø150mm VUE ÉCLATÉE ...

Page 15: ...water or in an excessively wet application Do not use disc pads that have a Max RPM or Max OPM less than the tool Max RPM or Max OPM rating Never use disc pads that have a weight and or size different from what the tool was specifically designed for WARNING Indicates a potentially hazardous situation which if not avoided may result in death or serious injury and or property damage CAUTION Indicate...

Page 16: ...y the plug in any way Do not use any adapter plugs with earthed grounded power tools Unmodified plugs and matching outlets will reduce risk of electric shock b Avoid body contact with earthed or grounded surfaces such as pipes radiators ranges and refrigerators There is an increased risk of electric shock if your body is earthed or grounded c Do not expose power tools to rain or wet conditions Wat...

Page 17: ...ontrolled with the switch is dangerous and must be repaired c Disconnect the plug from the power source and or the battery pack form the power tool before making any adjustments changing accessories or storing power tools Such preventive safety measures reduce the risk of starting the power tool accidentally d Store idle power tools out of reach of children and do not allow persons unfamiliar with...

Page 18: ...d promptly to seek medical attention Hand wrist and arm injury may result from repetitive work motion and overexposure to vibration To reduce the risks associated with loud noise Always wear hearing protection while operating this tool Follow your employer s safety policy or local national standards for personal protective equipment requirements To reduce the risks associated with fire or explosio...

Page 19: ... tool before use Never free spin the tool or otherwise allow it to be started unintentionally Never point this product in the direction of yourself or another person or start tool unintentionally Never over tighten accessory fasteners HEALTH AND SAFETY INFORMATION RoHS compliant This product and the components are RoHs and do not contain substances exceeding the maximum values imposed by EU Direct...

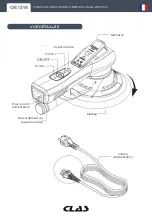
Page 20: ...OE 1318 ELECTRIC ORBITAL SANDER 2 5mm Ø150mm DETAILED VIEW ...

Page 21: ...nitude of the risk or damage suffered is unique to each situation and depends on the environment how each job is performed the material being worked on the design of the workstation and the physical condition of the user We cannot be held responsible for any differences between reported and actual values BEFORE USE 1 the tool is intended to be used as a hand tool It is recommended that operators s...

Page 22: ...arted ANOMALIES An anomaly is indicated by the LED which lights up alternately Green Red Please refer to the troubleshooting instructions to solve the problem SPEED ADJUSTMENT This electric orbital sander has nine preset speeds 2 000 to 10 000 rpm The original starting speed is not the maximum speed when the tool was delivered The speed can be changed at any time while the sander is running or whe...

Page 23: ...nal electronic systems and can stop the tool when the temperature reaches harmful levels During periods of high internal temperature the sander stops if the temperature reaches a harmful level The sander cannot be restarted until the internal temperature has cooled to a safe level for electronic systems The cooling time depends on local conditions An initial waiting period of 5 minutes is recommen...

Page 24: ...ntact after sales service 1 long 3 short Overheating of the printed circuit board Stop and let the unit cool down If the problem persists contact after sales service 1 long 4 short Engine phase problem Restart the sander If the problem persists contact after sales service 1 long 5 short Voltage too low Check the supply voltage 1 long 6 short Voltage too high Check the supply voltage 1 long 7 short...

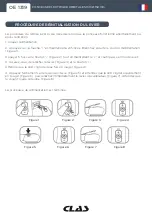
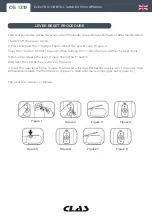
Page 25: ... 2 while holding the and the tool switches to reset mode 3 Be sure to release the lever Figure 3 and the button Wait until the LED flashes red twice Figure 4 4 Press the gear lever firmly Figure 5 and wait until the LED flashes quickly red Figure 6 then immediately release the throttle lever Figure 7 Wait until the red light goes out Figure 8 The reset procedure is complete LEVER RESET PROCEDURE F...

Page 26: ...OE 1318 ELECTRIC ORBITAL SANDER 2 5mm Ø150mm EXPLOSED VIEW ...

Page 27: ......

Page 28: ...or parts please contact the reseller In case of problems please contact your authorized technician CLAS Equipements 83 chemin de la CROUZA 73800 CHIGNIN FRANCE Tél 33 0 4 79 72 62 22 Fax 33 0 4 79 72 52 86 PONCEUSE ELECTRIQUE ORBITALE 2 5mm Ø150mm ELECTRIC ORBITAL SANDER 2 5mm Ø150mm OE 1318 PONCEUSE ELECTRIQUE ORBITALE 5mm Ø150mm ELECTRIC ORBITAL SANDER 5mm Ø150mm OE 1319 ...

Reviews: