11
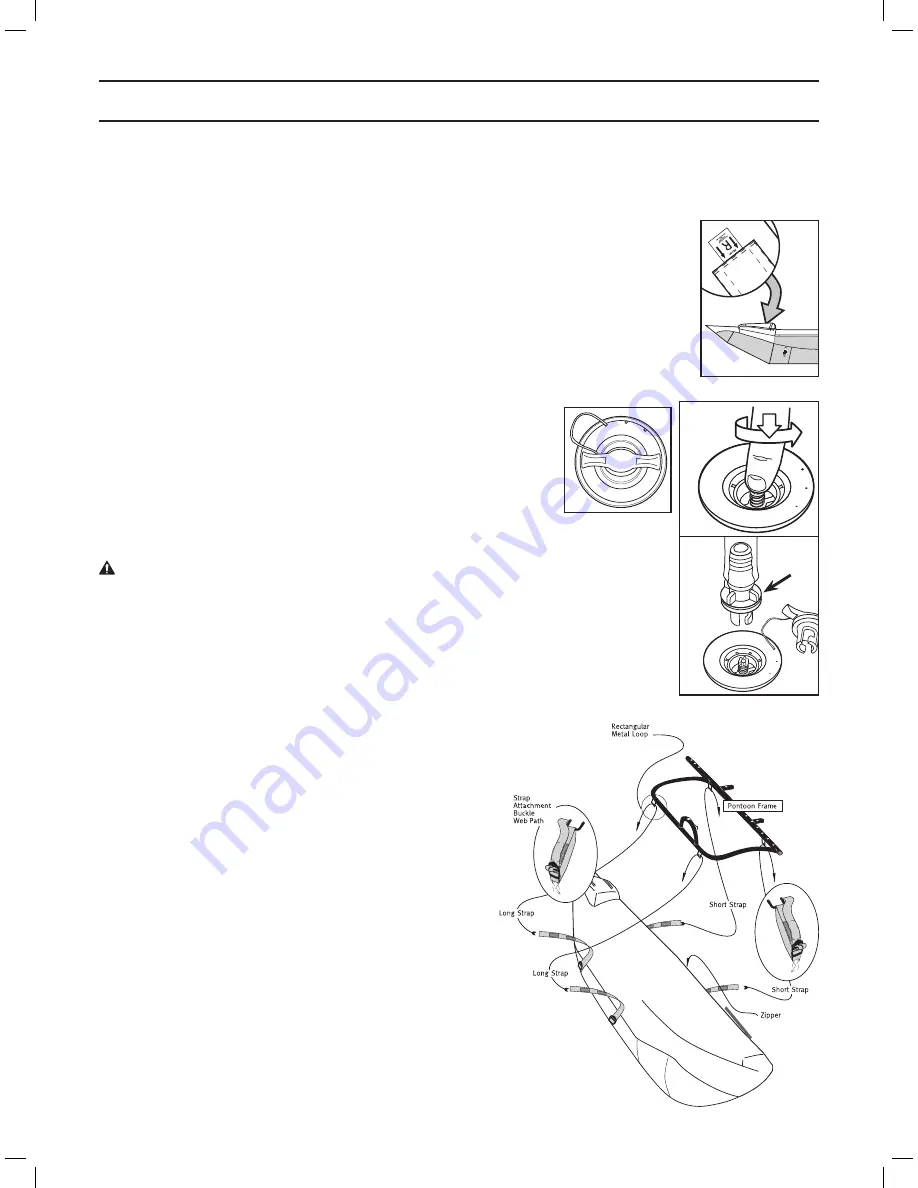
3. Partially inflate the air bladders.
The valve is located on the top and toward the front half of the pontoon.
The valve has a center button that opens and closes the valve by simply
pushing down, and turning a quarter turn.
THE VALVE IS OPEN WHEN THE
CENTER BUTTON IS DOWN, AND CLOSED WHEN IT IS UP.
BEFORE INFLATING,
MAKE SURE THE VALVE IS IN THE CLOSED POSITION.
Unscrew the valve cap, make sure the valve is closed and insert the inflation
adapter into the valve and twist to secure. Inflate using a foot pump or air
compressor with a cone-type nozzle fitting.
Inflate the pontoon to about 3/4 full. Do not inflate beyond 3/4 full because it will make the
next step very difficult—attaching the pontoons to the frame.
Repeat this step with the other pontoon.
1. Confirm that all the parts are present.
(See the parts list on page 10).
2. Identify the right and left pontoons.
You can identify the right and left pontoons by the “R” (right) and “L” (left) labels sewn on the inside
of the rear pocket on top of each.
Press and
turn on
center
button
Inflation
adapter
Insert
into
valve
and
twist to
inflate
A S S E M B LY A N D U S E
Inflation Valve
4. Attach the pontoons to the frames.
Each pontoon attaches to a metal pontoon frame with four
webbing attachment straps.
Locate the left and right pontoon frames.
On the front of each pontoon frame (where the front of the
boat will be) there is a “L” (left) or “R” (right) label indicating
left or right.
Place a right pontoon frame on top of the
right pontoon as shown. There is a “L” (left) or “R” (right) label
inside the pocket of each pontoon). The longest straight tube of
each frame should be on the same side of the pontoon as the
pontoon zipper.
Right hand
pontoon and
frame
FRONT
C O L O R A D O X T P O N T O O N B O A T O W N E R ’ S M A N U A L
Meijer.com


