background image

14

C O L O R A D O   X T S   P O N T O O N   B O A T   O W N E R ’ S   M A N U A L

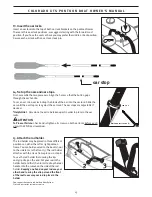
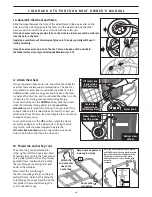
Thread the tabs 

through the loops.

Wrap the strip around 

the oarlock upright

A

B

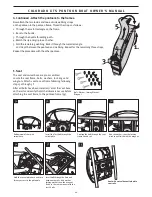
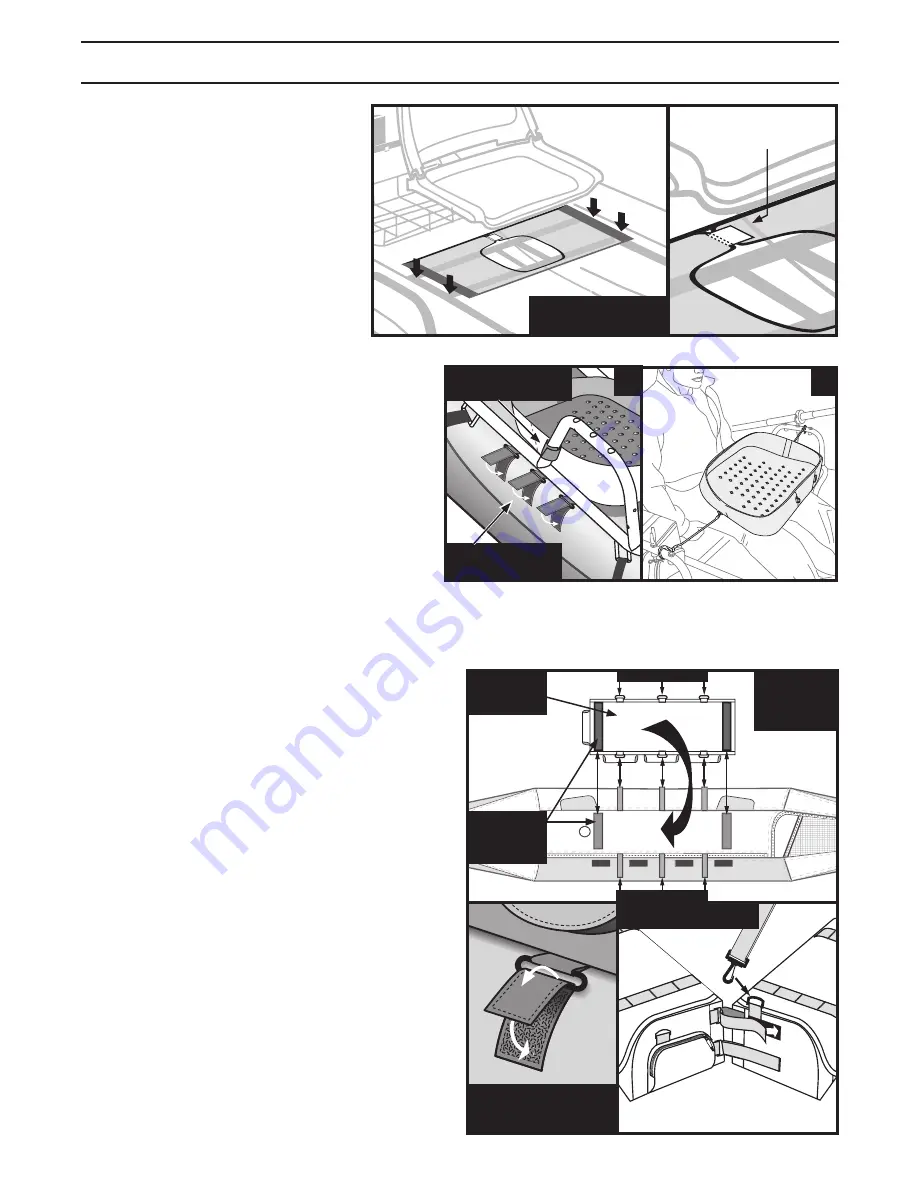
10. Attach the under seat apron.

The under seat apron has a rip-and-grip 

tab opening on one side. This allows for 

installation. Install with this tab facing up and 

to the rear of the boat.
Start by opening the tab and slipping the 

apron under the seat and around the seat 

mounting bolts. Reattach the tab once it's in 

position.
Next, attach the sides of the apron to the 

sides of each pontoon, matching up the 

corresponding rip-and-grip sections. 

Attach rip-and-grip tab 

to close the opening

Attach rip-and-grip 

edges to the sides 

of the pontoons

Seat shown lifted off 

seat frame for clarity

11. Mount the stripping basket.

The stripping basket is a sturdy and efficient way of 

containing your fishing line while fly casting. Mount it to 

the top of either pontoon float, or across your lap.

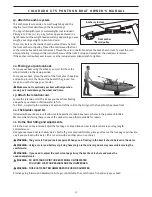
OPTION A:

 To attach, orient the basket so the long side 

of the basket with the three loops sewn into its bottom 

faces outboard, or away from the seat. Next, find the 

three rip-and-grip tabs sewn to the outboard side of the 

pontoon. Thread these through the corresponding loops 

on the bottom of the basket.
Finish by attaching the rip-and-grip strap on the outboard 

top edge of the basket to an upright of the oarlock 

12. Attach the center storage bags.

To mount the bags to the pontoon float first find the three 

sets of plastic loops sewn into each long side of the bag 

bottom. These mate up with rip-and-grip straps along the 

tops of both pontoons.
Orient the storage bag on either pontoon so that the flap 

of the top bag pocket, when open, folds away from the 

operator. Match up rip-and-grip tape on the bottom of the 

bag to the rip-and-grip strips on the top of the pontoon float 

and press together. Then thread the rip-and-grip straps 

through the hoops on the bottom of the bag to fully secure.
You can use both the bags on the boat at the same time or 

only use one when using the stripping basket mounted to 

the top of the pontoon. You can secure the other half of the 

bag in the wire cargo deck, using the wire basket attachment 

straps.
To use the bag as a shoulder tote, match up the sections of 

rip-and-grip tape sewn on the back of each bag. Next, find 

the rip-and-grip straps on the end of one bag and thread 

through the corresponding loops on the end of the other 

bag. Repeat with the other end. Finish by attaching the 

shoulder strap to both ends of the completed bag.

Note: Boat 

shown without 

frame for clarity

Match up rip-

and-grip strips 

to attach

Bottom of 

the bag shown

Loop the rip-and-grip straps 

through hoops to make the two 

storage bags into a shoulder tote

Close up view - loop the 

rip-and-grip straps through 

hoops to attach to pontoon

Hoops along both sides

Loop straps through hoops

To make the shoulder tote

bracket. See drawing A a right.

OPTION B:

 Place your stripping basket across your lap by using the 2 bungee hooks to the sides of the basket and 

attaching to the pontoon frame. See drawing B at right.

Summary of Contents for Colorado XTS

Page 1: ...do XTS The Pontoon Boat O W N E R S M A N U A L CLASSIC ACCESSORIES INC KENT WA USA 98032 2011 c l a s s i c a c ce s s o r i e s c o m Colorado XTS Le Bateau ponton M A N U E L D E L U T I L I S A T...

Page 2: ...S INTRODUCTION 3 PRODUCT SPECIFICATIONS CAPACITY 4 SAFETY INFORMATION AND SYMBOLS 5 RESPONSIBILITIES OF THE OPERATOR S 6 CERTIFICATE OF ORIGIN AND HIN NUMBERS 7 INFLATION 8 ELECTRIC MOTOR AND BATTERY...

Page 3: ...in handling and operating experience before serious use Doing so will assure many years of trouble free use and enjoyment PLEASE KEEP THESE INSTRUCTIONS IN A SECURE PLACE AND TRANSFER THEM TO THE NEW...

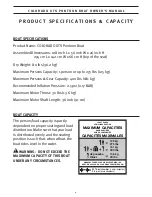
Page 4: ...ions 108 inch L x 56 inch W x 26 inch H 274 cm L x 142 cm W x 66 cm H top of the seat Dry Weight 80 lbs 36 2 kg Maximum Persons Capacity 1 person or up to 275 lbs 125 kg Maximum Persons Gear Capacity...

Page 5: ...tentially hazardous situation which if not avoided could result in death or serious injury CAUTION Indicates a potentially hazardous situation which if not avoided may result in minor or moderate inju...

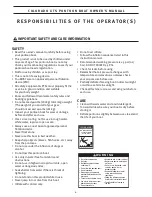
Page 6: ...tides Seek shelter from water if there is threat of lightning Do not stand on this product while in use Never jump into or dive from this boat Inflate with cold air only Do not over inflate Follow the...

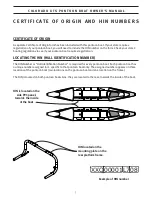
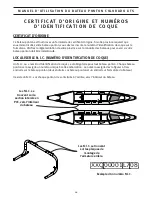
Page 7: ...pontoon boat skins they are located to the rear towards the inside of the boat XXQ00001L708 Example of HIN number C E R T I F I C AT E O F O R I G I N A N D H I N N U M B E R S HIN located on the mou...

Page 8: ...our pontoon boat to extreme temperatures hot or cold CAUTION On warm sunny days keep the pontoon boat either in water or in shade if kept inflated on land This will decrease the risk of overexpansion...

Page 9: ...ME WITH YOUR ELECTRIC MOTOR IMPORTANT A MAXIMUM ELECTRIC MOTOR SHAFT LENGTH OF 36 INCH 91 cm WITH A MAXIMUM THRUST OF 30 LBS 14 kg IS RECOMMENDED USING A BATTERY WITH YOUR PONTOON BOAT Be sure to secu...

Page 10: ...ntoon Bladder Patches Two 60mm self adhesive patches 1 Inflation Adapter 1 Inflation Valve Wrench 1 Retention Cord 1 Allen Wrench Set 4mm and 6mm ball end 1 Knob and Wire Basket Attachment Straps 1 Ve...

Page 11: ...down and closed when it is up B BEFORE INFLATING MAKE SURE THE VALVE IS IN THE CLOSED POSITION BY PUSHING THE CENTER BUTTON DOWN AND TURNING COUNTER CLOCKWISE 1 4 TURN Unscrew the valve cap make sure...

Page 12: ...view of seat with swivel base Install the first bolt through the swivel plate Position the bolt through the seat frame double rail Add the washer then the locking washer and finish with the wingnut H...

Page 13: ...toon frames Insert the seat platform tubes onto the pontoon frame posts with the seat facing the front The front of the pontoon frames are the ends labeled L left and R right You may need to LIGHTLY t...

Page 14: ...find the three sets of plastic loops sewn into each long side of the bag bottom These mate up with rip and grip straps along the tops of both pontoons Orient the storage bag on either pontoon so that...

Page 15: ...e pins as in step 8 To use the rod holder first unwrap the rip and grip strap on the end Put your rod in the holder butt end first then turn it to drop the reel handle into the cutout on the side of t...

Page 16: ...Slip the other washer over the end of the axle and secure with the cotter pin It may be necessary to apply side force to the forks in order to secure the cotter pin into the hole in the axle Applying...

Page 17: ...person on shore WARNING The goal is to find your balance point When you are floating in the boat it should be level in the water WARNING Using a motor and battery or placing heavy cargo in the wire ca...

Page 18: ...eps listed below Checking For A Leaking Valve The inflation valve consists of a two part assembly There is the inflation valve itself and the inflation valve cage The inflation valve cage protects the...

Page 19: ...alcohol prep pad use a 50 50 mixture of isopropyl alcohol and water After cleaning allow the surface to dry completely 3 Cut a patch to the correct size with scissors Allow for the patch size to exten...

Page 20: ...k bed trailer or roof rack can be used to transport your boat If you are carrying a partially or fully assembled and or inflated boat please consult with your vehicle trailer or roof rack manufacturer...

Page 21: ...RACT RISTIQUES ET CAPACIT DU BATEAU 23 CONSIGNES DE S CURIT ET SYMBOLES 24 RESPONSABILIT S DE L UTILISATEUR 25 CERTIFICATE OF ORIGIN AND HIN NUMBERS 26 GONFLAGE 27 UTILISATION D UN MOTEUR LECTRIQUE ET...

Page 22: ...ine exp rience avant d utiliser ce bateau En effet vous pourrez ainsi profiter de votre bateau pendant des ann es sans avoir de probl mes VEUILLEZ CONSERVER CES INSTRUCTIONS EN LIEU S R ET LES REMETTR...

Page 23: ...imum du moteur 30 lbs 13 6 kg Longueur maximum de l arbre moteur 36 po 91 cm CAPACIT DU BATEAU La capacit du bateau d pend partiellement d une assise correcte et de la r partition du chargement person...

Page 24: ...tra ner des blessures graves ou la mort ATTENTION Indique une situation potentiellement dangereuse qui si elle n est pas vit e peut entra ner des blessures l g res ATTENTION Indique une situation pote...

Page 25: ...u Tout quipement de s curit et gilet de sauvetage doit tre adapt l utilisateur en bonne tat de marche et appropri votre poids Veuillez conna tre les r gles de s curit de navigation locale Ne d passez...

Page 26: ...ste un N I C sur chaque ponton Ils sont situ s l arri re vers l int rieur du bateau Les N I C se trouvent sur la section lat rale en PVC vers l int rieur du bateau C E R T I F I C AT D O R I G I N E E...

Page 27: ...extr mes chaud ou froid ATTENTION Quand les jours sont chauds et ensoleill s gardez le bateau ponton dans l eau ou l ombre si gonfl sur la terre ferme Cela r duira le risque de surdilatation des chamb...

Page 28: ...NSIGNES DE S CURIT ET LES INSTRUCTIONS FOURNIES AVEC LE MOTEUR LECTRIQUE IMPORTANT IL EST RECOMMAND D UTILISER UN MOTEUR LECTRIQUE AVEC UN ARBRE D UNE LONGUEUR MAXIMUM DE 36 PO 91 CM AVEC D UNE POUSS...

Page 29: ...al amovibles 1 bandouli re 2 porte mouches en mousse 2 rustines pour chambres air des pontons deux rustines adh sives 1 adaptateur de gonflage avec un tuber 1 cl de valve de gonflage 1 corde de r tent...

Page 30: ...de ponton gauche et droite l avant de chaque armature de ponton ce qui sera l avant du bateau se trouve une tiquette L gauche ou une tiquette R droite indiquant la gauche ou la droite Placez l armatu...

Page 31: ...nt fournis pr mont s Localisez le cadre du si ge les boulons les rondelles les rondelles de blocage et les crous oreilles Fixez le si ge au cadre du si ge en suivant les tapes 5a 5f Apr s avoir instal...

Page 32: ...z par une position au milieu de la plage de r glage alignez les trous et verrouillez avec deux axes d paulement Assis confortablement dans le si ge les pieds sur les appui pieds vos jambes doivent tre...

Page 33: ...ompr hension 12 Fixez les sacs de rangement central Pour fixer les sacs au ponton trouvez tout d abord les trois jeux de boucles en plastique cousues dans le bas du c t le plus long du sac Faites corr...

Page 34: ...vez tenir votre canne vers l arri re 1 vers le c t 2 ou vers l avant 3 Le porte canne s attache avec des axes paulement comme l tape 8 Pour utiliser le porte canne commencez par ouvrir la sangle auto...

Page 35: ...a fourche pour pouvoir enfoncer la goupille dans son orifice sur l axe Mettez r guli rement une petite quantit de graisse tanche sur l axe pour que la roue tourne en douceur Il sera peut tre n cessair...

Page 36: ...uilibre Lorsque vous flottez sur l embarcation celui ci devrait tre de niveau dans l eau AVERTISSEMENT Si vous placez un moteur ou une batterie ou des articles lourds dans le porte bagages vous devrez...

Page 37: ...ifier que la valve ne fuit pas La valve de gonflage comporte deux parties La valve de gonflage et la cage de la valve La cage de la valve de gonflage prot ge la valve et est incorpor e la chambre air...

Page 38: ...r parer Si vous n avez pas de tampon alcoolis m langez un volume d alcool isopropylique et un volume d eau Apr s avoir nettoy la surface laissez la s cher compl tement 3 l aide d une paire de ciseaux...

Page 39: ...ur la galerie du toit de votre v hicule Si vous transportez un bateau compl tement ou partiellement d mont et ou gonfl veuillez vous adresser au constructeur du v hicule de la remorque ou au fabricant...

Page 40: ...de 7 30 h 16 h heure du Pacifique en cas de questions ou de probl mes Designed in the U S A Mis au point aux tats Unis C O L O R A D O X T S P O N T O O N B O AT O W N E R S M A N U A L M A N U E L D...

Reviews: