

2
Congratulations on the purchase of your Fairway Deluxe 3-Sided
Golf Car Enclosure.
First assembly will take about twenty minutes and is best done with two
people. However, once complete, much of it will not have to be repeated and it
will go much faster.
If you refuse to read instructions save yourself time and effort and read the
bold faced notes.
Safety
Periodically check to be sure that the top is not sagging over the side doors, that the
under-car straps are snug and that the lower hooks are not loose near the wheels.
Cleaning
Don't clean the plastic windows when they are dry—you can scratch them.
The best way to clean your windows is to hose them with water and to rub with your
bare hands or a very soft cloth. Liquid soap may be used.
During freezing weather an automotive windshield solvent and a soft cloth will work.
Fabric areas of the cab may be washed with a rag or soft bristle brush and a mild soap.
Storage
Store in a clean dry place. Never store a wet enclosure off of the car in an enclosed
area as it can become mildewed. Mildew can cause permanent stains.
Avoid folding the plastic windows of the enclosure for long periods. Wrinkles can be
relaxed with a hair dryer
but take care not to melt the plastic.
Warranty
Your Fairway Deluxe 3-Sided Golf Car Enclosure is factory warranted for
workmanship and materials for three years from the date of purchase.
This warranty assumes normal use and conditions and does not include rental use.
ALWAYS remove the enclosure before transporting your golf car on a truck or trailer.
Use during transportation will invalidate your warranty.
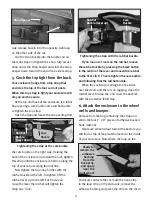
Fairway
Deluxe 3-Sided Golf Car Enclosure
Assembly and Care Instructions


