background image

Oswego

The

Pontoon Boat

O W N E R ' S   M A N U A L

CLASSIC ACCESSORIES, INC.
KENT, WA USA 

98032  

©

2011

c l a s s i c a c c e s s o r i e s . c o m

Bateau ponton

M A N U E L   D E   L ' U T I L I S A T E U R

Oswego

Le

Summary of Contents for OSWEGO PONTOON BOAT

Page 1: ...Oswego The Pontoon Boat O W N E R S M A N U A L CLASSIC ACCESSORIES INC KENT WA USA 98032 2011 c l a s s i c a cce s s o r i e s c o m Bateau ponton M A N U E L D E L U T I L I S A T E U R Oswego Le ...

Page 2: ...DUCT CAPACITY AND SPECIFICATIONS 4 SAFETY INFORMATION AND SYMBOLS 5 RESPONSIBILITIES OF THE OPERATOR S 6 CERTIFICATE OF ORIGIN AND HIN NUMBERS 7 INFLATION AND ASSEMBLY 8 ELECTRIC MOTOR AND BATTERY USE 9 PARTS LIST 10 ASSEMBLY AND USE 11 15 TROUBLESHOOTING 16 REPAIR AND TROUBLESHOOTING 17 CARE AND STORAGE 18 ...

Page 3: ...is type of boat for the first time for your own comfort and safety please ensure that you obtain handling and operating experience before serious use Doing so will assure many years of trouble free use and enjoyment PLEASE KEEP THESE INSTRUCTIONS IN A SECURE PLACE AND TRANSFER THEM TO THE NEW OWNER IF YOU SELL THE CRAFT MODIFICATIONS Because of possible interference with the factory design and int...

Page 4: ...h W x 26 inch H top of the seat 305 cm L x 142 cm W x 66cm H top of the seat Dry Weight 76 lbs 34 5 kg Maximum Persons Capacity 1 person Maximum Persons Gear Capacity 450 lbs 204 kg Recommended Inflation Pressure 2 5 psi 0 17 BAR Maximum Motor Thrust 30 lbs 14 kg Maximum Motor Shaft Length 36 inch 91 cm October 13 2011 Classic Accessories Inc Maximum Capacity Label 450 Lbs Max Label Size 4 5 inch ...

Page 5: ...ially hazardous situation which if not avoided could result in death or serious injury CAUTION Indicates a potentially hazardous situation which if not avoided may result in minor or moderate injury CAUTION Indicates a potentially hazardous situation which if not avoided may result in property damage This manual lists certain recommended practices and provides some basic precautions However this l...

Page 6: ...h cold air only Do not over inflate or use CO2 or a high pressure air compressor to inflate Follow the inflation sequence listed in this instruction manual Recommended working pressure is 2 5 psi 0 17 bar DO NOT EXCEED 2 5 PSI Check for leaks before using Not a life saving device Not a toy Not to be used by children under age 16 Do not overload Always wear an approved personal flotation device lif...

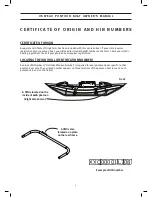
Page 7: ...he form Check your state s boating regulations to see if your pontoon boat requires registration LOCATING THE HIN HULL IDENTIFICATION NUMBER A unique HIN Number or Hull Identification Number is required for every pontoon boat specific to that pontoon boat only The assigned number appears on three locations of the pontoon boat once on each pontoon skin and on the frame A HIN is located on the insid...

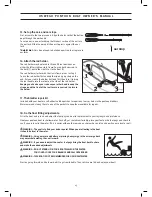
Page 8: ...add more air In hot weather the air will expand You must let out some air to prevent the pontoons from failing from over pressure Avoid exposing your pontoon boat to extreme temperatures hot or cold CAUTION On warm sunny days keep the pontoon boat either in water or in shade if kept inflated on land This will decrease the risk of overexpansion of the pontoon chambers posed by rising temperatures w...

Page 9: ...ALL SAFETY INSTRUCTIONS AND PROCEDURES THAT CAME WITH YOUR ELECTRIC MOTOR IMPORTANT A MAXIMUM ELECTRIC MOTOR SHAFT LENGTH OF 36 INCH 91 CM WITH A MAXIMUM THRUST OF 30 LBS 14 KG IS RECOMMENDED USING A BATTERY WITH YOUR PONTOON BOAT Be sure to secure your battery to the rear wire platform so that it will not move or tip during operation For the best weight distribution we recommend placing the batte...

Page 10: ...k washers and wingnuts installed 2 Foot pegs 1 Rear platform frame 1 Rear cargo platform 1 Rod holder with clevis pin 2 Pontoons 1 underseat apron 1 Anchor bag with cord 2 Pontoon bladder patches Two self adhesive patches 1 Inflation adapter 1 Inflation valve wrench 2 Oar locks 2 Oar lock cotter pins 8 Clevis Frame Pins with wire security retainers 2 Oars 4 pieces or 2 per oar Oar Parts Small Part...

Page 11: ...enter of gravity of the boat Where you attach the seat to the frame depends on your size and whether you will be using a motor and battery or carry cargo on the boat Use the following information about seat placement as guide to help you setup your boat for optimum balance in the water After setup load your boat with the gear you would use fishing and try your boat in shallow water to determine if...

Page 12: ... frame you must first partially attach the wire cargo deck Start by sliding the bent wire tabs into the slots welded on to the rear of each pontoon frame Next push the rear platform frame tubes into the open tubes on the rear of each pontoon frame Make sure to insert the wire guides on the rear of the wire cargo deck into the corresponding holes on the rear platform frame as you push the tubes tog...

Page 13: ...the same side of the pontoon as the pontoon zipper Illustrating right hand pontoon and frame 1 2 3 4 5 10 Inflate the pontoon completely Finish inflating the pontoons as outlined in Step 3 Inflate to approximately 2 5 psi 0 17 BAR Inflate until firm but not hard DO NOT over inflate Now attach the two inside and two outside webbing straps on the pontoon to the pontoon frame Thread the straps as fol...

Page 14: ...t Pull up and away from the cleat jaws to release If the anchor cord cleat or the anchor cord pulleys ever loosen use the included Allen wrenches to tighten 12 Insert the oar locks Insert an oar lock into the top of both oar lock brackets on the pontoon frames There are three oar lock positions we suggest starting with the forward most position If you have the seat set back you may prefer the midd...

Page 15: ...comfortable Then catch some fish and enjoy your boat 15 Set up the oars and oar stops First assemble the two piece oars Align the holes so that the button pops through the oar handle To set an oar in an oar lock drop the thinnest section of the oar into the oar lock Slide the oar until the oar stop rests against the oar lock Helpful hint Oars do not need to be taken apart in order to place in oar ...

Page 16: ...alve is difficult to turn remove the valve completely and add a small amount of silicon grease to the valve O ring and reassemble If the valve is not leaking around its edge you may have a defective valve Please visit our website at www classicaccessories com to order a new valve If the valves are OK proceed to bladder trouble shooting section You must remove the bladder from the pontoon skins to ...

Page 17: ... inch 1 4 inch 0 3 cm 0 6 cm of paper backing position and anchor the exposed patch edge allowing the patch to extend 1 inch 2 5 cm beyond all edges of the tear 4 Slowly peel the paper backing while carefully applying the patch over the tear Take care to avoid air bubbles 5 Rub the patch firmly for proper adhesion and allow to cure for 4 hours before use 6 Reinflate bladder to confirm repair 7 Onc...

Page 18: ...at If you are carrying a partially or fully assembled and or inflated boat please consult with your vehicle trailer or roof rack Manufacturer CARE FOR YOUR BOAT The pontoon boat can be cleaned with soap and water then rinsed Use a soft rag for hard to clean areas Temporarily hang the frame vertically to drain and dry the metal tubes of excess water after each use SEASONAL STORAGE OF YOUR BOAT Remo...

Page 19: ... 21 CONSIGNES DE SÉCURITÉ ET SYMBOLES 22 RESPONSABILITÉS DE L UTILISATEUR 23 CERTIFICAT D ORIGINE ET NUMÉROS D IDENTIFICATION DE COQUE 24 GONFLAGE ET ASSEMBLAGE 25 UTILISATION D UN MOTEUR ÉLECTRIQUE ET DE LA BATTERIE 26 LISTE DES PIÈCES 27 ASSEMBLAGE ET UTILISATION 28 32 GUIDE DE DÉPANNAGE 33 RÉPARATION DE LA CHAMBRE À AIR ET GUIDE DE DÉPANNAGE 34 ENTRETIEN ET REMISAGE 35 ...

Page 20: ...re sécurité veuillez vous exercer auparavant avec un autre bateau ponton et acquérir une certaine expérience avant d utiliser ce bateau En effet vous pourrez ainsi profiter de votre bateau pendant des années sans avoir de problèmes VEUILLEZ CONSERVER CES INSTRUCTIONS EN LIEU SÛR ET LES REMETTRE AU NOUVEAU PROPRIÉTAIRE SI VOUS VENDEZ CETTE EMBARCATION MODIFICATIONS Il est déconseillé à tout proprié...

Page 21: ...y Label 450 Lbs Max Label Size 4 5 inch L x 5 25 inch H For Oswego Job Number 11cF51_12705 Black White Yellow PMS 109C MAXIMUM CAPACITIES 204 kg 0 17 bar main chambers MANUFACTURER CLASSIC ACCESSORIES INC KENT WA USA 98032 5 25 inch 4 5 inch U S COAST GUARD 1PERSON OR 275LBS 450 LBS PERSONS GEAR PRESSURE 2 5 psi main chambers MAX 30 LB THRUST MOTOR CARACTÉRISTIQUES DU BATEAU Nom du produit Bateau ...

Page 22: ...aîner des blessures graves ou la mort ATTENTION Indique une situation potentiellement dangereuse qui si elle n est pas évitée peut entraîner des blessures légères ATTENTION Indique une situation potentiellement dangereuse qui si elle n est pas évitée peut entraîner des dégâts matériels Ce manuel comporte une liste des pratiques recommandées et fournit des précautions de base Cependant cette liste ...

Page 23: ...preserver Check for leaks before using Use only in water away from debris and obstructions Do not over inflate Never dive into or from this boat Never leave boat in water when not in use Do not use in high wind rapid currents open water or dangerous tides Know and follow local water safety rules and boating regulations Follow the inflation sequence listed in the instruction manual Partially deflat...

Page 24: ...otre province sur la conduite des bateaux pour savoir si votre bateau ponton doit être immatriculé LOCALISER LE N I C NUMÉRO D IDENTIFICATION DE COQUE Un N I C ou numéro d identification de coque est obligatoire pour tout bateau ponton Chaque bateau ponton comporte un numéro unique à cette embarcation Le numéro assigné figurera à trois endroits sur le bateau ponton sur l enveloppe un sur chaque po...

Page 25: ... sortir de l air pour éviter que les pontons éclatent du fait du trop de pression Évitez d exposer votre bateau ponton à des températures extrêmes chaud ou froid ATTENTION Quand les jours sont chauds et ensoleillés gardez le bateau ponton dans l eau ou à l ombre si gonflé sur la terre ferme Cela réduira le risque de surdilatation des chambres à air du ponton posé par les températures grimpantes et...

Page 26: ...IGNES DE SÉCURITÉ ET LES INSTRUCTIONS FOURNIES AVEC LE MOTEUR ÉLECTRIQUE IMPORTANT IL EST RECOMMANDÉ D UTILISER UN MOTEUR ÉLECTRIQUE AVEC UN ARBRE D UNE LONGUEUR MAXIMUM DE 36 PO 91 CM AVEC D UNE POUSSÉE DE MOTEUR MAXIMUM DE 30 LBS 14 KG UTILISATION D UNE BATTERIE AVEC VOTRE BATEAU PONTON Assurez vous d arrimer la batterie à la plateforme arrière grillagée afin d éviter qu elle ne se déplace ou so...

Page 27: ...appui pieds 1 armature de plateforme arrière 1 plateforme de rangement arrière 1 porte canne à pêche avec axe à épaulement 1 Jupe tablier de pêche 1 ancre type sac avec cordon 2 rustines pour chambres à air des pontons deux rustines adhésives 1 adaptateur de gonflage 1 clé de valve de gonflage 2 tolets 2 goupilles fendues pout tolets 8 axes à épaulement de l armature avec attaches de sécurité 2 ra...

Page 28: ...flage A D B C 4 Déterminez l emplacement du siège L emplacement du siège déterminera le centre de gravité du bateau L endroit où vous fixerez le siège dépendra de votre taille et de la quantité d équipement que vous comptez transporter sur le bateau Utilisez l information suivante en tant que guide pour vous aider à préparer le bateau et obtenir un équilibre optimum dans l eau Après l installation...

Page 29: ...ate forme arrière dans les tubes ouverts à l arrière de chaque armature de ponton Assurez vous d insérer les guides métalliques à l arrière de la plate forme de rangement dans les trous correspondants dans l armature de la plate forme arrière quand vous poussez les tubes ensemble Attachez les coins arrière avec deux axes d épaulement Ils permettent de fixer fermement l armature de la plate forme a...

Page 30: ... deux sangles intérieures et les deux sangles extérieures du ponton à l armature du ponton Enfilez les sangles de la façon suivante 1 Passez la sangle à travers le rectangle métallique de l armature 2 Revenez vers la boucle 3 Passez à travers la boucle 4 Faites correspondre les parties autoagrippantes 5 Pliez le reste de la sangle et faites la passer dans le rectangle métallique puis rangez la ent...

Page 31: ...e ou si les poulies du cordon de l ancre viennent à se détacher utilisez les clés Allen hexagonales pour les resserrer Si le taquet du cordon de l ancre se desserre prenez une clé Allen et resserrez le Embout de rame 14 Fixez le tablier de pêche Séparez les deux moitiés de la partie arrière de la toile derrière le trou du siège En commençant par l avant faites en sorte que la toile entoure le bas ...

Page 32: ... grillagée arrière AVERTISSEMENT Si vous devez ajuster le siège ou les appui pieds sur les pontons ou les appui pieds ramenez l embarcation sur la rive et effectuez les ajustements nécessaires AVERTISSEMENT NE VOUS TENEZ PAS DEBOUT SUR LE BATEAU LORSQUE VOUS ÊTES SUR L EAU VOUS RISQUEZ DE PERDRE L ÉQUILIBRE ET DE TOMBER PAR DESSUS BORD AVERTISSEMENT IL EST DÉCONSEILLÉ D UTILISER CE BATEAU EN EAU S...

Page 33: ...se à base de silicone sur le joint torique de la valve et remontez les pièces Si la valve ne fuit pas autour du bord la valve est probablement défectueuse Veuillez consulter notre site internet www classicaccessories com pour commander une nouvelle valve Si les valves sont en bon état de fonctionnement passez directement au guide de dépannage de la chambre à air Vous devrez retirer la chambre à ai...

Page 34: ...oyé la surface laissez la sécher complètement 3 Décollez environ 3 à 6 mm de l endos en papier collez la partie décollée de la rustine en veillant à ce que la rustine dépasse d environ 1 po 2 5 cm au delà de la déchirure 4 Retirez le reste de l endos en papier en collant avec précaution la rustine sur la déchirure Faites attention à ne pas créer de bulles d air 5 Frottez fermement la rustine afin ...

Page 35: ... complètement ou partiellement démonté et ou gonflé veuillez vous adresser au constructeur du véhicule de la remorque ou de la galerie ENTRETIEN DU BATEAU Le bateau ponton peut être nettoyé avec de l eau et du savon puis rincé Utilisez un chiffon doux pour les endroits difficiles à nettoyer Accrochez temporairement l armature à la verticale afin que les tubes métalliques puissent s égoutter et séc...

Page 36: ...é rigoureusement inspecté avant d être expédié En cas de problème veuillez ne pas retourner au magasin Appelez le 1 800 854 2315 de 7 30 h à 16 h heure du Pacifique en cas de questions ou de problèmes 11cF51_12399 32 034 010701 00 Classic Accessories Inc Kent WA USA 98032 Tel 253 395 3900 Fax 253 395 3991 www classicaccessories com Email customerservice classicaccessories com Classic Accessories I...

Reviews: