

CLASSIC ACCESSORIES, INC.
KENT, WA USA
98032
©
2013
c l a s s i c a c c e s s o r i e s . c o m
16
cOA
51
_
19447
CLASSIC ACCESSORIES, LLC
22640
68
th AVENUE SOUTH
KENT, WA
98032
, USA
©
2016
c l a s s i c a c c e s s o r i e s . c o m
18
-
164
-
010401
-RT
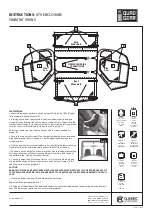
Installation
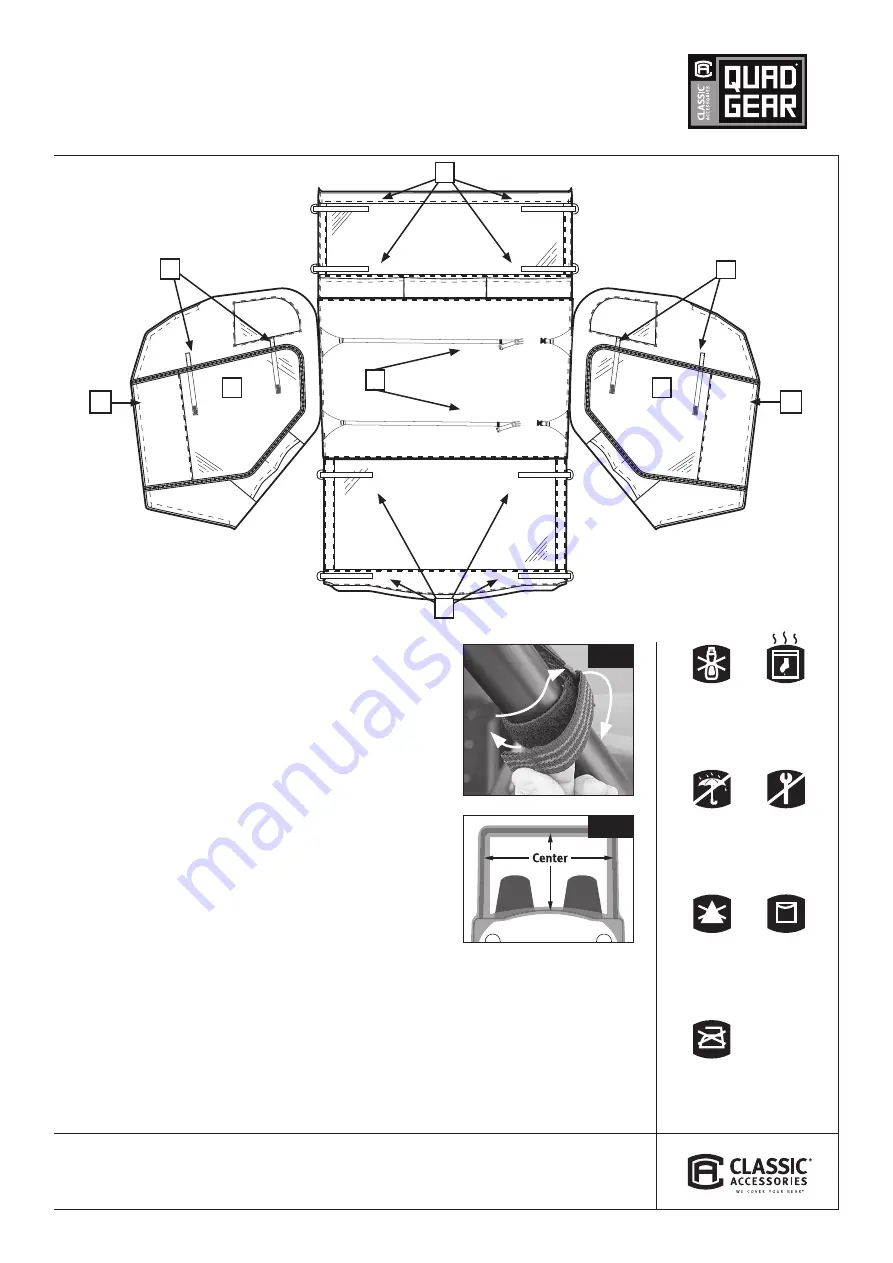
1. Loosely drape your enclosure shell over your UTV with the “BACK” label
facing toward the back of your UTV.
2. Starting at the front, loosely attach the front rubberized rip-and-grip
straps [A] to the frame of the roll cage bar as shown (Fig
1
). Then attach the
rear horizontal straps [B] to the rear vertical supports of the roll cage. Make
sure the cover is centered side to side on the roll cage (Fig
2
).
Adjust your enclosure from front to back or side to side as needed for
proper fit.
3. Locate the two sets of straps [C] on the roof inside of your enclosure and
wrap them around the roll cage bars. Clip the opposing ends of the two
straps together.
4. Tighten your enclosures front rubberized straps [A] to the lower roll cage
frame. Matching the front windshield edge to the UTV front cowling.
5. Pull down on the back of your enclosure to fit it onto the upper part of the
roll cage; the curves of the roll cage should nest into the curved shape of
the enclosure top. Tighten the four straps [B].
6. Check alignment and fit of the enclosure —all curves should match and
align with the shape of the roll cage. Secure and tighten all straps [A, B, C
and D] again to assure a proper fit.
CAUTION
DAMAGE TO ZIPPERS AND ENCLOSURE MAY BE CAUSED WITH EXCESSIVE FORCE. IF YOUR DOOR DOES NOT ZIP
TO THE ENCLOSURE SIDE WALLS CHECK AND ADJUST YOUR ENCLOSURE FOR PROPER ALIGNMENT TO THE ROLL
CAGE.
7. Locate the driver side door [E] and zip onto the enclosure.
Repeat with the passenger door [F].
8. Pull down at the bottom of the doors and fenders to verify that the door and fenders align with the frame of
your UTV. Adjust your enclosure as necessary for proper fit.
do not
use soap
ne pas utiliser
de savon
no usar
jabón
do not
pack wet
ne pas
ranger
mouillé
no guardar
húmedo
not
waterproof
non
imperméable
no es
impermeable
no tools
required
aucun outil
nécessaire
no requiere
herramientas
no bleach
ne pas
javelliser
no usar
lejía
line dry
étendre
mouillé
colgar para
secar
do not iron
ne pas
repasser
no
planchar
Fig.
1
Fig.
2
E
F
B
A
C
D
D
G
G
Side
Door
Side
Door
Front
Windshield
VIEW FROM INSIDE
OF ENCLOSURE
Back
Windshield
INSTRUCTIONS:
UTV ENCLOSURE
YAMAHA
®
VIKING


