background image

SONG

MELODY OFF

Operation

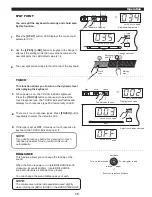
SELECT a song: 

Use the 

[+/YES] 

or 

[-/NO] 

button to select the song you 

want. If you select the new song, LED will display its 
number at first and then display introductory beat and 
the measure count.

INTRODUCTORY

 BEAT: 

After pressing

 [START/STOP]

 , the measure count begins 

from negative value to 1, and then begins to play the song.

Press the 

[TRACK1/SONG MELODY OFF]

 button to 

enter self-learning mode, and turn on/off the main melody 
of the song.

While the song stop playing, you can press the 

[VOICE],

[STYLE], [DUAL] 

or

 [SPLIT] 

button to exit.

VOICE

VOICE

STYLE

STYLE

SONG

SONG

+ / YES

+ / YES

- / NO

- / NO

BEAT

Select a song

Display the measure count

The beat LED indicators 
are lightened in turn.

The LED indicator is lightened.

START/STOP

DUAL

DUAL

FILL A/FILL B

SPLIT

SPLIT

ACC VOL

TOUCH

TOUCH

METRO

RECORD

TRACK 1

TRACK 2

PLAY / STOP

STYLE

STYLE

SONG

SONG

VOICE

VOICE

Exit the song mode

2

2

3

3

4

4

5

Voices and Effects

There are 20 voices in total (See Appendix 1).

Voice Select

When power is on, LED lightens the 

VOICE

  flag and 

displays the 001 voice number. 

Press the 

[VOICE] 

button to enter the voice mode, LED 

displays the 

VOICE R1 

number. 

Press the

 [DUAL]

 button to enter the dual voice mode,

LED displays the 

VOICE R2 

number.

you can select other voice by pressing the 

[+/YES] 

and

the 

[-/NO]

 or voice Direct Select buttons.

VOICE

VOICE

STYLE

STYLE

SONG

SONG

Display VOICE R1

Display VOICE R2

Select a voice

Press the first time to
select GRD.PIANO

Press the second time
to select BRT.PIANO

Use Direct Select buttons to select

There are 10 voices Direct Select buttons to select 20 
voices. Each Direct Select button can be used to choose 
2 different voices.

Press the first time to select upper layer voice , press the
second time to select the lower layer voice.

When you select the upper layer voice, the upper layer
indicator turns on;

when you select the lower layer voice, the lower layer 
indicator turns on and the upper layer indicator turns off.

1

13

Summary of Contents for DP-60

Page 1: ...00022171 00023425 00023428 Version 01 2012 Classic Cantabile DP 60 Users manual...

Page 2: ...multi plug adaptors since this could reduce sound quality causes operation errors and damages s Turn Power OFF When Making Connections To avoid damages turn off the power switches before you connect...

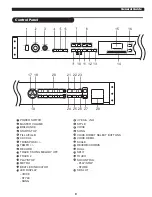
Page 3: ...ETRO TRANSPOSE TOUCH etc Buttons with indicator FILL A FILL B RECORD PLAY STOP ACC VOL SPLIT DUAL REVERB CHORUS TOUCH METRO SD STORE SD PLAY STOP TRACK 1 SONG MELODY OFF TRACK2 SCALE Pedal Sustain ped...

Page 4: ...Using the USB jack Operation Power on Master Volume Song Voices and Effects Metronome Style Control Record Lesson SD Function MIDI What is MIDI MIDI Connection Method Major Application Specifications...

Page 5: ...leg 5 Right leg component 6 Right front leg 7 Foot pedal unit 8 Back panel skirt 5 9 Left metal strip 10 Right metal strip 11 Hand screws 4pcs 12 Screws 6x45 2pcs 13 Screws 6x18 6pcs 14 Screws 6x35 4p...

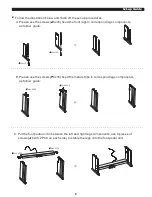
Page 6: ...use the screws 6x45 fixed the front legs to correspond legs components as follow guide B Please use the screws 6x18 fixed the metal strips to correspond legs components as follow guide C Put the foot...

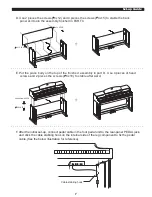
Page 7: ...the foot pedal unit to and stick the cable stabling hook on the internal side of the leg component to fix the pedal cable See the below illustration for reference the rear panel PEDAL jack D Use 2 pie...

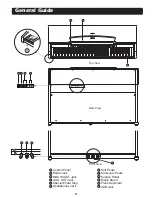
Page 8: ...nt View 5 Control Panel Pedal Jack MIDI IN OUT Jack AUX OUT Jack Special Pedal Clog Headphones Jack 1 2 3 4 5 6 Soft Pedal Sostenuto Pedal Sustain Pedal Music Stand Piano Keyboard USB Jack 7 8 9 10 11...

Page 9: ...18 19 20 21 22 23 24 25 26 27 28 9 VOLUME I SONG STYLE VOICE GRD PIANO BRT PIANO E PIANO 1 E PIANO 2 HARPSICD VIBES DRAWBAR CHR ORGAN ACCORDION HARMONICA ST GUITAR STR TRIO STRING SLOW STR TRUMPET BRA...

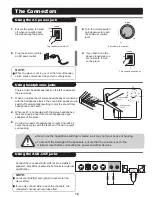
Page 10: ...e that the volume is set to the minimum level before connecting the power and other devices Ensure the piano is turned off when connecting and disconnectiong the power 1 Turn the volume switch anti cl...

Page 11: ...oot Pedals NOTE Step on the sustain pedal all notes played on the keyboard have a longer sustain Step on the sostenuto pedal the notes played before you step on have a sustain effect Step on the soft...

Page 12: ...iano please check the power supply If the piano is silent the volume may be adjusted to its minimum level Although Mains switch is in OFF position the piano is not disconnected from the power supply c...

Page 13: ...song mode 2 2 3 3 4 4 5 Voices and Effects There are 20 voices in total See Appendix 1 Voice Select When power is on LED lightens the VOICE flag and displays the 001 voice number Press the VOICE butt...

Page 14: ...grammed with the current R2 voice Press the DUAL button to turn on the DUAL mode the VOICE flag on the LED and the indicator are both lightened The dual voice number is also displayed on the LED Then...

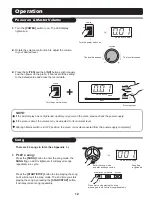
Page 15: ...ly to select the default is 002 If the type is set as OFF it means no touch response to keyboard the TOUCH indicator goes off NOTE If you don t press any button for 2 seconds in touch response type se...

Page 16: ...the pitch of the entire keyboard by semitone steps with TRANSPOSE function Press the TRANSPOSE or TRANSPOSE button for the first time LED displays current transpose value temporarily Press TRANSPOSE...

Page 17: ...e select status The indicator is flashing Display scale type Display scale root Press the G7 key C7 B7 VOICE DEMO SCALE REVERB CHORUS Press the button again to exit scale mode The indicator goes off V...

Page 18: ...on together with the style METRO RECORD TRACK 1 TRACK 2 PLAY STOP The beat LED indicators are lightened in turn The beat LED indicators are flashing at the same time 2 2 2 3 4 1 1 1 STYLE SELECT Pres...

Page 19: ...P START STOP FILL A FILL B FILL A FILL B FILL A FILL B FILL A FILL B FILL A FILL B FILL A FILL B FILL A FILL B FILL A FILL B FILL A FILL B ACC VOL ACC VOL ACC VOL ACC VOL ACC VOL ACC VOL ACC VOL ACC V...

Page 20: ...ave style data it will be overwrited by the new data Stop recording Press the RECORD button for the second time to stop recording LED display and indicator get back to the previous mode If the capacit...

Page 21: ...TRO METRO METRO METRO RECORD RECORD RECORD PLAY STOP STORE SD CONTROL RECORD RECORD RECORD TRACK 1 TRACK 1 TRACK 1 TRACK 1 TRACK 1 TRACK 1 TRACK 2 TRACK 2 TRACK 2 TRACK 2 TRACK 2 TRACK 2 PLAY STOP PLA...

Page 22: ...r is on press the STORE button to enter store mode and the STORE indicator is on It can save the recorded data to SD root directory as midi file midi file name is generated by system automa tically to...

Page 23: ...Application Musical Instrument Digital Interface The standard interface between PC and Electronic instrument It is equipped with standard MIDI interface including 1 MIDI IN and 1 MIDI OUT Connection...

Page 24: ...piano styles 60 songs LED display POWER SWITCH VOLUME SWITCH REVERB CHORUS DUAL TOUCH RECORD TRACK 1 TRACK 2 PLAY STOP SPLIT METRO TRANSPOSE TEMPO SD CONTROL VOICE DEMO SONG VOICE STYLE BRILLIANCE SCA...

Page 25: ...te Pianist 8 Beat 16 Beat Ballad Pop Piano Boogie Slow Rock Swing Jazz Jazz Waltz Swing Fox Shuffle Twist Country Ballad Bossa Nova Latin March 6 8 March Waltz Slow Waltz 001 002 003 004 005 006 007 0...

Page 26: ...Rising Sun The Blue Bells Of Scotland Over The Rainbow Beautiful Dreamer Edelweiss O Sole Mio Silent Night Ave Maria Name of Song Chinese No South Mud Bay Give You A Rose Flowing Rill Five Hundred Mi...

Page 27: ...nge 1 5 6 7 10 11 64 65 66 67 80 81 91 93 120 121 123 O O Bank Select Modulation Portamento Time Data Entry Volume Pan Expression SustainPedal Portamento ON OFF SostenutoPedal Soft Pedal ReverbProgram...

Reviews: