background image

25

TA3690_IM 

26.07.17

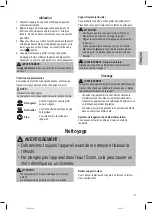
Roll Rack (Removable)

Want to warm up or toast some rolls?
Place the roll rack onto the toasting slot.

 CAUTION:

•  Do not overload the roll rack! Place a maximum of one 

roll on the roll rack!

•  Set the browning control to level 3 at maximum.

•  Wait for 

one

 minute between two toasting cycles.

• 

Never

 coat the roll with fat or butter. Fat could drip down 

and ignite!


WARNING: Danger of burns!

Let the roll rack cool down before storing it again.

Storage

 WARNING:

As the housing and the metal parts become hot during 

operation, allow the appliance to cool down before putting 

it away.

•  Clean the appliance as described and allow to dry 

completely. We recommend to keep the appliance in the 

original packaging if the appliance will not be used for 

long periods.

•  Always keep the appliance out of the reach of children in 

a dry, well ventilated place.

Mains Cable Take-Up Appliance

The mains cable can be wound up on the base.

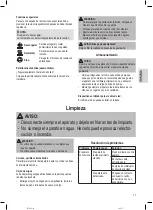
Cleaning

 WARNING:

•  Pull the mains plug out of the mains socket before you clean the 

appliance and allow the appliance to cool down.

•  Do not immerse the appliance in water! Doing so may result in an 

electric shock or fire.

 CAUTION:

•  Do not use any wire brush or other abrasive objects.

•  Do not use abrasive or aggressive cleaners.

Housing, Roll Rack

Only use a slightly damp cloth to clean the outside of the 

appliance.

Crumb Tray

The crumb tray is located on the opposite side to the carriage 

lever.
•  Pull the crumb tray out by the handle, remove the small 

pieces of bread and push the tray back in place.

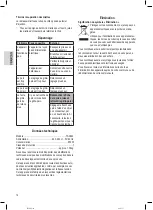
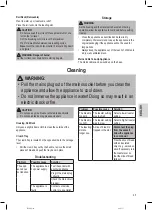
Troubleshooting

Problem

Possible cause

Solution

The appli-

ance does 

not function.

The appliance has 

no power supply. 

Test the socket with 

another appliance.
Plug in the mains plug 

correctly. 
Check the main circuit 

breaker. 

The appliance is 

faulty.

Contact our service 

center or a specialist.

Problem

Possible cause

Solution

The bread is 

too dark.

The toaster setting 

was too high.

Select a lower toaster 

setting.

The bread is 

too light.

The toaster setting 

was too low.

Select a higher toaster 

setting.

The toasting 

slots no 

longer rise.

A slice of bread is 

trapped in the slot.

Disconnect the plug 

from the socket! 

Allow the appliance 

to cool down!

Free the slice of bread 

with an insulated 

object, e. g. a wooden 

stick. If necessary turn 

the toaster over so 

that the slice of bread 

falls out.

Summary of Contents for TA 3690

Page 1: ...d emploi Instrucciones de servicio Istruzioni per l uso Instruction Manual Instrukcja obs ugi Gwarancja Haszn lati utas t s Toaster Automatische broodrooster Grille pain Tostador Tostapane Toaster To...

Page 2: ...fern Benutzen Sie das Ger t nicht mit feuchten H nden Bei feucht oder nass gewordenem Ger t sofort den Netzstecker ziehen Schalten Sie das Ger t aus und ziehen Sie immer den Stecker aus der Steckdose...

Page 3: ...timmt bei der Reinigung in Wasser eingetaucht zu werden Beachten Sie dieAnweisungen die wir Ihnen im Kapitel Reinigung dazu geben Anwendungshinweise Vor der ersten Benutzung ACHTUNG Zum Entfernen der...

Page 4: ...n WARNUNG Verbrennungsgefahr Lassen Sie den Br tchenaufsatz abk hlen bevor Sie diesen wieder verstauen Aufbewahrung WARNUNG Da das Geh use und die Metallteile w hrend des Betriebes hei werden lassen S...

Page 5: ...ur gewerblichen Nutzung geeignetes Ger t auch teilweise gewerblich nutzen 2 Voraussetzung f r unsere Garantieleistungen sind der Kauf des Ger ts in Deutschland bei einem unserer Vertragsh ndler sowie...

Page 6: ...t Ihnen weitere Leistungen an Downloadbereich f r Bedienungsanleitungen Downloadbereich f r Firmwareupdates FAQ s die Ihnen Probleml sungen anbieten Kontaktformular Zugang zu unseren Zubeh r und Ersat...

Page 7: ...n Schakel het apparaat uit en onderbreek altijd de stroom toevoer trek aan de stekker niet aan de kabel wanneer u het apparaat niet gebruikt hulpstukken aanbrengt reinigt of wanneer storingen optreden...

Page 8: ...chakelen Kies hiervoor de hoogste bruiningsgraad OPMERKING Lichte rook en stankontwikkeling zijn bij deze procedure normaal Zorg voor voldoende ventilatie Netkabel Rol de benodigde kabellengte van de...

Page 9: ...g te bewaren als het gedurende een langere periode niet gebruikt wordt Bewaar het apparaat altijd buiten bereik van kinderen en op een droge goed geventileerde plaats Oprolinrichting voor netkabel De...

Page 10: ...passing zijnde CE richtlijnen zoals bijvoorbeeld elektro magnetische compatibiliteit en laagspanningsvoorschriften en is geconstrueerd volgens de nieuwste veiligheidstechnische voorschriften Verwijder...

Page 11: ...des S il arrive que de l humidit ou de l eau atteignent l appareil d branchez aussit t le c ble d alimentation Arr tez l appareil et d branchez toujours le c ble d ali mentation de la prise de courant...

Page 12: ...tre effectu s par les enfants moins qu ils soient g s de plus de 8 ans et supervis s Conservez l appareil et son cordon hors de port e des enfants de moins de 8 ans ATTENTION Cet appareil n est pas c...

Page 13: ...le pain ATTENTION Ne chargez pas trop le support roulant Placez au maximum un petit pain sur le support roulant R glez la commande de brunissage au maximum sur le niveau 3 Attendez une minute entre de...

Page 14: ...chniques Mod le TA 3690 Alimentation 220 240V 50 60Hz Consommation 850W Classe de protection Poids net approx 1 06kg Nous nous r servons le droit d apporter des modifications techniques ainsi que des...

Page 15: ...e el aparato est h medo o mojado retire de momento la clavija de la caja de enchufe Desconecte el aparato y siempre retire la clavija de la caja de enchufe por favor tire de la clavija y no del cable...

Page 16: ...ectora en la espiral de calefacci n deber a accionar el aparato aprox tres veces sin alimentos para tostar Para ello elija el grado m ximo de tueste NOTA La leve generaci n de humo y de olor es en est...

Page 17: ...omo se describe y deje que se seque por completo Le recomendamos que guarde el aparato en el embalaje original si no va a utilizar el aparato durante un largo per odo de tiempo Mantenga siempre el apa...

Page 18: ...es t cnicas y de dise o en el curso del desarrollo continuo del producto est reser vado Este aparato se ha examinado seg n las normativas actuales y vigentes de la Comunidad Europea como p ej compatib...

Page 19: ...con le mani umide Nel caso in cui si bagni o si inumidisca l apparecchio staccare immediatamente la spina Disattivare l apparecchio e staccare sempre la spina dalla relativa presa prendendo in mano l...

Page 20: ...enza contenuto Scegliere il livello di doratura desiderato NOTA Facendo questo possibile che si formi un leggero fumo e odore Arieggiare sufficientemente Cavo di alimentazione Svolgere il cavo di alim...

Page 21: ...mpletamente Si consiglia di tenere il dispositivo nella confezione originale se l apparecchio non sar usato per lunghi periodi Tenere sempre l apparecchio fuori dalla portata dei bam bini in un luogo...

Page 22: ...ulla base di tutte le direttive CE attuali in vigore in questo settore quali per esem pio la normativa in materia di compatibilit elettromagnetica e la direttiva in materia di bassa tensione ed stato...

Page 23: ...switch off the appliance and always pull out the plug from the socket pull the plug itself not the lead if the appliance is not being used and remove the attached accessories Do not operate the appli...

Page 24: ...cient ventilation Mains Lead Unwind the required mains lead from the base Pass the cord through the cable guide at the back of the appliance Electrical Connection Check whether the mains voltage that...

Page 25: ...down Do not immerse the appliance in water Doing so may result in an electric shock or fire CAUTION Do not use any wire brush or other abrasive objects Do not use abrasive or aggressive cleaners Housi...

Page 26: ...constructed in accordance with the latest safety regulations Disposal Meaning of the Dustbin Symbol Protect our environment do not dispose of elec trical equipment in the domestic waste Please return...

Page 27: ...zi Prosz nie obs ugiwa urz dzenia wil gotnymi d o mi Je eli urz dzenie jest wilgotne lub mokre prosz natychmiast wyci gn wtyczk Je eli nie korzystacie Pa stwo z urz dzenia je eli chcecie Pa stwo zamon...

Page 28: ...yszczeniem ani konserwacj urz dzenia chyba e uko czy y 8 lat i s nadzorowane Trzyma urz dzenie i jego przew d z dala od dzieci poni ej 8 roku ycia UWAGA Tego urz dzenia nie wolno zanurza w wodzie podc...

Page 29: ...a bu ki na otworze do opiekania UWAGA Rusztu na bu ki nie wolno przeci a Na ruszcie mo na umie ci tylko jedn bu k Pokr t o regulacji stopnia przyrumienienia nale y usta wi maksymalnie w pozycji 3 Prze...

Page 30: ...abywca otrzyma zwrot ceny zakupu urz dzenia Za uszkodzone urz dzenie uwa a si takie kt re nie spe nia funkcji okre lonych w instrukcji obs ugi a przyczyn takiego stanu jest wewn trzna wada fabryczna l...

Page 31: ...vizes k zzel Ha a k sz l k vizes vagy nedves lett azonnal h zza ki a konnektorb l Kapcsolja ki a k sz l ket s mindig h zza ki a csatlako z t a dugaszol aljzatb l a csatlakoz t ne pedig a veze t ket h...

Page 32: ...esse a pir t t kb h romszor egym s ut n resen V las sza ehhez a legnagyobb pirul si fokozatot MEGJEGYZ S Enn l a folyamatn l az enyhe f st s szagk pz d s ter m szetes Gondoskodj k megfelel szell z sr...

Page 33: ...radni Javasoljuk hogy az eredeti csomagol sban tartsa a k sz l ket ha hosszabb ideig nem fogja haszn lni A k sz l ket mindig gyerekekt l t vol egy j l szell ztetett helyis gben t rolja A h l zati k be...

Page 34: ...ektrom gnesess g elvisel k pess g vagy kisfesz lts g elvisel k pess g ellen rizt k s a leg jabb biztons gtechnikai el r sok szerint k sz lt Hullad kkezel s A kuka piktogram jelent se K m lje k rnyezet...

Page 35: ...35 TA3690_IM 26 07 17...

Page 36: ...36 TA3690_IM 26 07 17 8 8 8...

Page 37: ...37 TA3690_IM 26 07 17 1 2 1 6 3 4 3...

Page 38: ...38 TA3690_IM 26 07 17 TA 3690 220 240 50 60 850 1 06...

Page 39: ...39 TA3690_IM 26 07 17 TA 3690 50 60 240 220 850 I 1 06 CE...

Page 40: ...40 TA3690_IM 26 07 17 1 1 2 2 6 1 3 3 4 4 LED 3...

Page 41: ...41 TA3690_IM 26 07 17 8 8 8...

Page 42: ......

Page 43: ......

Page 44: ...TA3690_IM 26 07 17 Stand 07 2017 TA 3690 Internet http www clatronic germany de Made in P R C...

Reviews: