background image

16 | NordElEctro4HPUsErMaNUalosv1.x

Effect 2

Effect .2 .offers .three .types .of .modulation .effects: .

Phaser

, .

Flanger

 .and .

Chorus

 .

Each .of .these .effects .has .3 .selectable .depths .in .the .same .fashion .as .
the .tremolo .and .pan .in .the .Effects .1 .section . .The .Rate .knob .control .the .
rate .of .the .effect . .

Speaker/Comp

This .section .contains .the .speaker/amp .emulations, .the .rotary .speaker .
emulation .and .a .compressor . .

Small

, .

JC

 .and .

Twin

 .emulates .three .different .kinds .of .amplifier .and .

speaker .cabinets . .The .amount .of .drive .is .controlled .by .the .Speaker/
Comp .knob .

Rotary

 .simulates .a .rotary .speaker .including .its .built-in .amplifier . .The .

knob .sets .the .amount .of .overdrive .of .the .rotary .amplifier; .the .speed .
of .the .rotating .speaker .is .set .with .the .rotary .speed .controls .on .the .left .
side .of .the .panel .

Comp

 .is .a .compressor .that .will .even .out .the .dynamics .of .what .you .

play, .making .low .level .sounds .louder .and .high .level .sounds .lower .in .
volume . .This .produces .a .tight, .punchy .sound .and .makes .the .overall .
level .easier .to .control .in .a .live .mix .situation . .When .this .effect .is .active, .
the .Drive/Comp .knob .controls .the .amount .of .compression .applied .

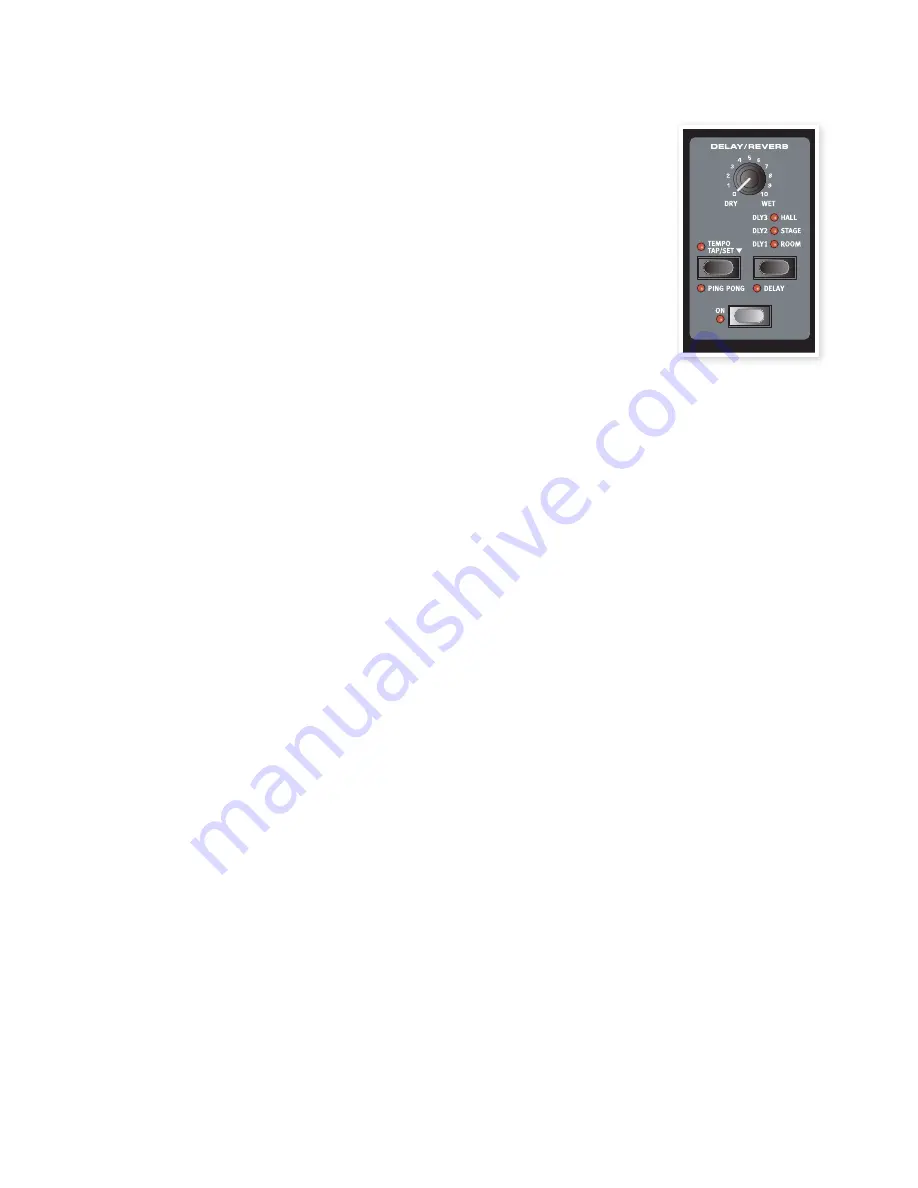
Delay / Reverb

Hold .Shift .and .press .the .selector .button .to .toggle .between .Reverb .and .
Delay .functionality . .The .Delay .LED .will .be .lit .when .the .Delay .is .active .

The .Reverb .section .simulates .the .natural .sound .reflections .in .various .
acoustic .environments . .You .can .choose .between .five .reverb .types .with .
various .lengths .and .densities, .indicated .by .the .three .LEDs .that .light .up .
one .or .two .at .a .time . .

The .Dry/Wet .knob .sets .the .balance .between .the .unprocessed .and .the .
processed .signal .


The .Delay .effect .produces .echo .effects . .The .Delay .time .is .set .with .the .

Up/Down .buttons .(20 .– .750 .ms) .while .you .hold .the .Tempo .Tap/Set .
button . .

The .Dry/Wet .knob .adjusts .the .balance .
between .the .dry .signal .and .the .delay .
repeats .

Feedback

Press .the .Delay/Reverb .button .repeat-
edly .to .set .the .feedback, .the .number .
of .delay .repeats . .There .are .5 .feedback .
settings, .indicated .by .the .Dly .1-3 .array .
of .LEDs

Ping Pong

Holding .Shift .and .press .the .Tempo .Tap .button .to .light .up .the .Ping .
Pong .LED, .will .make .the .delay .repeats .alternate .between .the .left .and .
right .channels . .If .short .delay .times .are .used, .these .repeats .will .be .
“asymmetrical” .and .produce .delays .that .are .more .like .early .reflections .
in .reverb .units .

Tempo Tap

You .can .use .Tap .Tempo .to .set .a .delay .time .matching .the .tempo .of .
a .song . .Simply .tap .the .Tap .Tempo .button .in .the .tempo .you .wish .the .
delay .to .sync .to .a .number .of .times, .and .the .delay .time .will .be .adjusted .
automatically . .As .long .as .the .Tap .Tempo .LED .is .lit, .the .tempo .is .cal-
culated .- .wait .until .it .goes .dark .to .tap .in .another .tempo . .A .numerical .
indication .of .the .delay .time .will .be .briefly .shown .in .the .LED .

Gain

This .is .the .programmable .Gain .control .which .allows .you .to .adjust .the .
output .level .of .each .of .the .individual .programs .

Summary of Contents for Nord Electro 4HP

Page 1: ...User Manual Nord Electro 4HP OS Version 1 x Part No 50385 Copyright Clavia DMI AB Print Edition 1 0 ...

Page 2: ...e arrowhead symbol within an equilateral triangle is intended to alert the user to the presence of uninsulated voltage within the products en closure that may be of sufficient magnitude to constitute a risk of electric shock to persons Le symbole éclair avec le point de flèche à l intérieur d un triangle équilatéral est utilisé pour alerter l utilisateur de la presence à l intérieur du coffret de ...

Page 3: ...8 MIDI Menu 18 1 Local Control 18 2 MIDI Interface 18 3 MIDI Channel 18 4 Lower Channel 18 5 Control Change CC Mode 18 6 Program Change Mode 18 7 MIDI Split Mode 18 8 Dump One 18 9 Dump All 18 10 Send CC 18 B3 Menu 19 1 Tonewheel Mode 19 2 Key Click Level 19 3 Key Bounce 19 4 Perc Fast Decay 19 5 Perc Slow Decay 19 6 Perc Norm Level 19 7 Perc Soft Level 19 8 Perc Drawbar 9 Cancel 19 Rotary Menu 19...

Page 4: ... use the Electro 4HP in the very first few pages of this manual After that follows the reference section where all the functions are explained in detail Disclaimer All trademarks and brand names mentioned in this manual are the property of their respective owner s and are not affiliated or associated with Clavia These trademarks and brand names are only mentioned to describe the types of sounds re...

Page 5: ...s are conveniently printed to the right on the panel The menus are de scribed in the Menu chapter that begins on page 17 Knobs buttons Knobs The knobs control the continuously variable pa rameters in the Nord Electro 4HP M M A parameter value can be totally different from the knob s physical position when you load a Program As soon as you start turning the knob the value will snap to the knob s ph...

Page 6: ...ppear at the Electro 4HP s left and right output jacks MIDI Connections MIDI Out MIDI connection used for sending keyboard and panel generated MIDI data from the Nord Electro 4HP to other equipment such as sound modules or computers MIDI In MIDI connection used to receive MIDI data to the Nord Electro 4HP from other equipment such as keyboards or computers USB Connection The USB connection is used...

Page 7: ...onnected to the sustain pedal input to control sustain for piano sounds and rotary speed selection for organ sounds page 17 Control Pedal stereo connector for a pedal of the potentiometer type also known as expression pedals A connected pedal can be used as a swell pedal for the organs a volume pedal for pianos and samples and also as a controller for two of the effects the P wah and the ring modu...

Page 8: ...cation 4 Press the Up button to get to the next electric piano You can of course organize the programs in any order you want Such a process can be done quite easily by using the drag and drop features in the Nord Sound Manager Edit a program Editing a program is just as easy as grabbing a knob and change a set ting or press a button to select a different setting The knob s physical position isn t ...

Page 9: ...r manual key The Rotary effect The rotary effect adds some great sonic drama to the organs but can of course be used with any other sound as well The Electro 4HP rotary has three available speeds fast slow and stop Stop does not disengage the effect it only stops the rotating speakers 1 Make sure that the Speaker Comp effect is activated and select the Rotary by pressing the effect selector until ...

Page 10: ...that upper keys may become silent if you transpose upwards Adding effects 1 Select the program number 1 1 which is a Grand Piano with a hint of reverb 2 Turn on Effect 2 the On LED should be lit and press repeatedly on the Effect 2 selector The effect options are indicated with the selector LEDs and changes in a cyclical clockwise fashion for each time the selec tor is pressed Some of the effects ...

Page 11: ...heel Mode on page 19 These will dramatically change the sound of the B3 model from squeaky clean to a battered old work horse The VX model The original instrument is probably the most famous of all the tran sistor based combo organs that emerged in the early 60 s Transistor technology made it possible to manufacture much more compact and portable organ instruments Compared to the mighty sound of t...

Page 12: ...al if the Split function is active The Percussion is a single triggered non legato effect It is only present when you hit the keys when no other note is sounding In other words if you play a note or a chord and then add on more notes without releasing the previously pressed keys there will be no percussion effect in the new notes You have to release all keys to be able to play new notes with the p...

Page 13: ... faithfully simulated in the Nord Electro 4HP which means that you get all the possible original Clavinet D6 sound variations plus an additional four by selecting different pick up and filter combinations Here s how it works Pick up type A Clavinet D6 has two separate pick ups one on the neck and one on the bridge By selecting either one pick up or both in different combinations you can alter the ...

Page 14: ...d Rotary menus The 128 programs in the Electro 4HP are organized in 32 pages with 4 programs in each page Up Down buttons The Up Down buttons to the left of the display have several functions in the Nord Electro 4HP Press repeat edly to select one of the 32 pages the page and pro gram number be presented in the display Press Shift together with Up Down to scroll through every location 1 1 1 2 1 3 ...

Page 15: ...rom for example a piano performance with some effects turned on to an organ performance with another set of effects turned on by just pressing the appropriate instrument selector Press and hold Shift and press the Effect selector to cycle through the effects in a counter clockwise fashion EQ This is a 3 band EQ with treble bass and a sweepable midrange The Bass frequency is 100Hz and the High freq...

Page 16: ...tural sound reflections in various acoustic environments You can choose between five reverb types with various lengths and densities indicated by the three LEDs that light up one or two at a time The Dry Wet knob sets the balance between the unprocessed and the processed signal The Delay effect produces echo effects The Delay time is set with the Up Down buttons 20 750 ms while you hold the Tempo ...

Page 17: ...o use it for sustain with piano sounds and as a Rotor Speed switch with organ sounds In this case select rt rotor toggle with the Up Down buttons If you re using two separate sustain pedals one in the Sustain Pedal Input and one in the Rotor Speed Input you probably want to use the sustain pedal in the Sustain Pedal input for sustain also when using Organ sounds In this case select SU sustain Rang...

Page 18: ...DI interface on the DIN connectors or the USB MIDI functionality Range P DIN MIDI ports U USB MIDI default 3 MIDI Channel This sets the MIDI Channel that the Nord Electro 4HP transmits and responds to Range 1 16 OF off default 1 4 Lower Channel This sets the MIDI channel that the Lower Manual of the Nord Electro 4HP organ section responds to when the organ split and the MIDI split modes are active...

Page 19: ...will be muted when the percus sion is activated to mimic the behavior of an original organ Range C Cancel nO Normal default Rotary Menu 1 Rotary Model There is one rotary model available with two separate microphone positions The 122 is modeled with the microphones placed tradition ally a bit away from the speaker The 122 Close have the microphones placed closer to the cabinet Range nO 122 default...

Page 20: ... check for any Sound Manager updates Overview You can manage the contents of the Piano the Sample the Program and the Synth partitions These are accessed from the tabs If no Nord Electro 4HP is connected to the computer pages icons and memory locations will be grayed out E E The actions that take place in the Nord Sound Manager will affect the memory in the Nord Electro 4HP The Manager is on line ...

Page 21: ...ly available if you right click on an empty location that does not contain a sound This allows you to choose a file on the hard drive to be downloaded to the location in the Nord Electro 4HP Replace Pianos Samples This feature makes it possible to replace a piano or a sample in the unit with another piano or sample from your hard drive The process will update all the programs that used the former ...

Page 22: ...new sound will be automatically placed at the first free location in the bank The various locations are selected using the Model selector on the Nord Electro 4HP M M The pianos are categorized and can only be added to the correct bank electric pianos can not be added to the Grand bank the grand s cannot be dropped in the Clavinet bank etc 1 Using the Toolbar or Menu command Click on the Sound Down...

Page 23: ...an process the Cancel option is not available Files waiting in the queue can be deleted from the queue if you change your mind Right click on the queued sound or use the Toolbar or Menu Delete command Files already in the unit can be moved or deleted during the pro cessing of the queue Upload sounds from the Nord Electro 4HP 1 Select the desired partition that holds the sounds that you wish to sto...

Page 24: ...ams will use the new or existing locations of the pianos and samples when they are downloaded to the free locations in the program partition 1 Make sure the Program Tab is open 2 Click on the Bundle Down icon in the Toolbar You can also use the Bundle Download command from the File menu Ctrl Shift D 3 Navigate to the Bundle file that you wish to download and click Open After the Manager has verifi...

Page 25: ...lly be selected in the Nord Electro 4HP Double clicking on a piano sample or program in the Manager list will also select it in the Nord Electro 4HP Backup 1 Click on the Backup icon to make a backup file that contains all the content in your Nord Electro 4HP The Nord instruments are built to the highest standards of reli ability but doing regular backups is always a good thing 2 Give the backup f...

Page 26: ...s can be used and the supported characters are a z AZ 0 9 and the hyphen Any other characters will not be displayed in the Sound Manager lists M M Pianos or samples cannot be renamed so this function is not available if you have selected any of these Delete Allows you to delete one or several selected sounds You will be asked to confirm your intentions You may also use the delete or backspace key ...

Page 27: ... to be appended to the existing programs in the bank in focus or if the Bundle should replace the contents in an entire bank of your choice Programs in a Program Bundle will be downloaded to the locations where they came from if the Replace option is selected Backup This will make a backup of all the pianos programs Live programs and the menu settings in the Nord Electro 4HP The file that is creat...

Page 28: ...d or programs that have been changed since the previous backup will be saved Restore Ctrl R To restore a previously saved backup file to the Nord Electro 4HP select this option and browse to a backup file on the hard drive file extension ne4b and click Open E E The restore function will begin after you have clicked Open and confirmed your intentions in the dialogue All the content of a con nected ...

Page 29: ...ect When this function is active pianos samples or programs will be auto matically selected in the Nord Electro 4HP when you browse through the sounds in the Manager list with the computer keyboard arrow keys Help About Brings up the About box with a information regard ing the version of the Nord Sound Manager You will also see a list of compatible instruments and OS versions Tabs Piano Samp Lib P...

Page 30: ...hat is available for additional sounds Cancel Button Use this function if you need to cancel a process that is in progress Certain functions like e g a restore process cannot be cancelled Progress Bar The progress bar indicate the progress of an ongoing process Message Text Area The left part of the text area will present any confirmations or error messages from the Nord Sound Manager The right pa...

Page 31: ...lectro 4HP with a sequencer Connections 1 Connect the MIDI Out on the Nord Electro 4HP to the MIDI In on your sequencer 2 Connect the MIDI Out from your sequencer to the MIDI In on the Nord Electro 4HP Local On Off Local Off may be used when you use a sequencer to record and play back from Nord Electro 4HP If the sequencer echoes back incoming MIDI data the Nord Electro 4HP may respond twice to ev...

Page 32: ...ssion on the transmitting device If the dump contained all Programs All it will replace all programs currently stored in the Nord Electro 4HP If the dump contained only a single program it will be temporarily placed in the currently selected program memory location A dot will appear to in the lower right corner to indicate an unsaved edit You will then have to store the program manually to a memor...

Page 33: ...r Key s Touch Channel X X X X Pitch Bender X X Control Change O O Program Change True O 0 127 O 0 127 System Exclusive O O System Song Pos Common Song Sel Tune X X X X X X System Clock Realtime Commands X X X X Aux Local on off Message All notes off Active Sense Reset X X X X X X X X Number True Voice Mode 1 Omni On Poly Mode 2 Omni O Mono Mode 3 Omni Off Poly Mode 4 Omni Off Mono O Yes X No Model...

Page 34: ...gan Model 11 Organ section 11 Organ Trig 18 Output Routing 17 P Partition Memory 30 Perc Drawbar 9 Cancel 19 Perc Norm Level 19 Perc Slow Decay 19 Perc Soft Level 19 Percussion 12 Phaser 16 Piano 13 Piano Type 14 Pick up 13 Preset Split 12 Program Bundle 23 28 Program Change 18 Program memory 8 Progress 30 P Wa 15 Q Queue 23 R Rel 14 Relink 21 23 26 Rename 26 28 Replace 22 26 Restore 27 28 Reverb ...

Page 35: ...d to be the source of interference to radio or television reception which can be determined by turning the equipment off and on the user is encouraged to try to correct the interference by one or more of the following measures Reorient or relocate the receiving antenna Increase the separation between the equipment and receiver Connect the equipment into an outlet on a circuit different from that t...

Page 36: ......
Reviews: