background image


Clavia DMI 

Service manual Nord Modular G2 rev. 1.2 

Page 9 


Opening the synth 

WARNING

: Take necessary precautions against ESD before opening the synth.


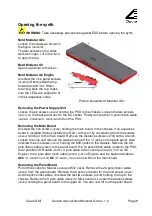
Nord Modular G2x 

Loosen the screws as shown in 
the figure 

(9x40018).


The two screws on the sides 
work as hinges. Lift in the front 
to open the top. 

 
Nord Modular G2 

Opens up similar to the G2x. 
 

Nord Modular G2 Engine 

Unscrew the nine panel screws 

(9x40203 )

Gently slide the top 

forward and lift it of. When 
mounting back the top, make 
sure the LEDs are aligned to fit 
in their respective holes. 


Picture shows Nord Modular G2x 

 
Removing the Power Supply Unit 

Loosen the six screws 

(40262)

 holding the PSU to the chassis. Loosen the two screws 

(40013)

 on the back panel next to the AC socket. Finally remove the 10 pole ribbon cable 

(G2/G2X - 23880 G2E - 23930)

 and lift out the PSU. 


Removing the Main Board 

Unscrew the five screws 

(40262)

 holding the main board to the chassis. If an expansion 

board is installed (factory installed on G2X), remove it by unscrewing the three screws 

(40262)

 holding it to the main board. Remove the distance screws 

(40195)

 with a wrench. 

Loosen the nuts and remove the washers around the ¼” jacks on the back panel. Also 
unscrew the six screws 

(40010)

 holding the MIDI jacks to the chassis. Remove the 26 

pole ribbon cable 

(23830)

 to the panel board, the 10 pole ribbon cable 

(23880)


to the PSU, 

the 2 pole Mic XLR cable 

(23291)

, 3 pole cable to Mic Level pot 

(23840) (

 not on G2 

Engine), the 4 pole after touch cable 

(24080)

 (not on Engine) and the keyboard cables  

G2x


(P1-24090 P2-24100) 

G2

 (P1-22420). 

You can now lift out the main board. 


Removing the Panel Board 

Pull off the knobs for Master Level and Mic Level. Remove the 26 pole ribbon cable 

(23830)

 from the panel board. Remove the 3 pole connector for the mod wheel 

(23040)


and the pitch stick cables. Unscrew the last two screws 

(40038)

 holding the top to the 

chassis. Remove the 3 pole cable 

(23840) 

to Mic Level pot. Loosen the eleven screws 

(40262)

 holding the panel board to the upper lid. You can now lift out the panel board. 


Summary of Contents for Nord Modular G2

Page 1: ...SERVICE MANUAL ...

Page 2: ...f contents Overview 3 Test program 4 Running the test program 4 Testing the G2 Engine 6 Error Codes 7 Hardware 8 Hardware structure 8 Opening the synth 9 Hardware configuration 10 Hardware versions 10 Installing the USB transient patch 11 Software 12 Spare Parts 13 ...

Page 3: ...e works or distributed to other sources such as end users or retailers that do not repair Clavia products IIn this manual the Nord Modular G2 G2X will be referred to as Nord Modular G2 hImportant safety information Dangerous voltage levels are present within the unit Unit should be opened exclusively by qualified service personnel Always disconnect the power supply cord before opening to avoid ele...

Page 4: ...ndard Rack version G2 Engine Internal memory The Nord Modular G2 has 4096 memory locations to store Patches 32 Banks with 128 memory locations each and 1024 memory locations for Performances 8 Banks with 128 locations each Fuse ratings Voltage 115 V 230 V Fuse 300 mA 125 mA Physical Dimensions Modular G2 W 665 mm 26 2 D 284 mm 11 2 H 104 mm 4 1 Weight 5 1Kg 11 24 lbs Modular G2x W 1007 mm 39 6 D 2...

Page 5: ...de Display Mode Store at power up When test mode is entered a DRAM test is performed After the DRAM test has finished successfully the test program will start The DRAM test progress is indicated by the LED s on the leftmost encoder on the front panel indicated by MIDI and USB LED s on the Engine The LED s are divided into three groups where each group of LED s represents a part of the DRAM test pr...

Page 6: ...l input jacks 12 Engine LED test Not applicable on G2 G2X 13 Engine reset test Not applicable on G2 G2X 14 Flash test Tests the entire Flash memory area The test takes approximately 18 minutes to complete Flash data is not altered PNL Panel board 1 Full Performs all of the tests below 2 Buttons Press the buttons as indicated to verify their function 3 LCDs Test the LCD panels 4 LED s Lights the LE...

Page 7: ...test program Make sure the power to the G2 Engine is turned off Connect the panel board to the G2 Engine main board with the 26 pole ribbon connector Press the hidden update mode button inside the hole to the right of the G2 Engine logotype and power on the synth The test program is now executed and should behave in the same way as if this configuration was a full G2 G2X For instructions on how to...

Page 8: ...Error message will indicate if the error is on main board or expansion board if installed For example ERR Mnb Uxx boot or ERR Exp Uxx SRAM ERR Mnb Exp Uxx boot DSP not starting ERR Mnb Exp Uxx SRAM Ext DSP memory error ERR SDOx Mnb Exp Uxx Serial bus error SDOx SDO1 SDO3 Mnb Uxx U16 U20 Exp Uxx U5 U8 FLASH TEST ERRORS ERR Check U7 U37 check U7 or U37 ...

Page 9: ...uits U12 and U13 23170 1M 16 bits Boot code for the host processor is stored in the BootPROM U21 23890 512k 8 bits OS user patches and performances are stored in another Flash memory U7 U37 24000 16M 16 bits Various other information for example user settings is stored in an EEPROM U36 24147 2k 8 bits Audio D A conversion is performed by U32 and U33 23430 A D conversion of the control pedal takes ...

Page 10: ...sis If an expansion board is installed factory installed on G2X remove it by unscrewing the three screws 40262 holding it to the main board Remove the distance screws 40195 with a wrench Loosen the nuts and remove the washers around the jacks on the back panel Also unscrew the six screws 40010 holding the MIDI jacks to the chassis Remove the 26 pole ribbon cable 23830 to the panel board the 10 pol...

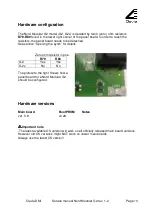
Page 11: ...s to be detached See section Opening the synth for details Zero ohm resistor in pos R79 R80 G2 Yes Yes G2x No No The picture to the right Shows how a panel board for a Nord Modular G2 should be configured Hardware versions Main board BootPROM Notes ver 0 9 v0 28 I I I IImportant note The latest available OS version will work on all officially released main board versions However old OS versions mi...

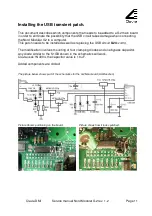
Page 12: ...ar G2 to a computer This patch needs to be installed as well as replacing the USB circuit U24 23190 The modification involves mounting of four clamping diodes and one bypass capacitor Any diode similar to the S1GB shown in the schematics will work Clavia uses 1N4004 the capacitor value is 10 uF Added components are circled The picture below shows part of the schematics for the G2 Main board USB se...

Page 13: ...isit www clavia se there you can find the latest Software packages The software version is briefly shown on the LCD when you power up the Nord Modular G2 not on G2 engine I I I I Important Update Note Before downloading and installing the latest software version make sure you save the patches from the G2 internal memory to a computer Clavia can in no way be held responsible for any loss of data on...

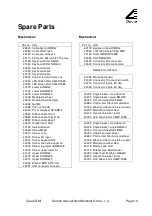
Page 14: ...Screw upper lower lid 40174 Upper lid NMG2 40172 Upper lid NMG2E 40201 Upper lid NMG2X 40046 Washer BRB 4 3 9 0 8 23291 XLR connector w cable Mechanical Part no Item 60179 Expansion board NMG2 20960 10uF 35V 5 0x6 0 Ellyt SMD 23160 Sram NMG2 NS 4MB 23280 DSP NMG2 NS 23490 Connector 20 pole male 23500 Connector 20 pole female NMG2X mod Wheel 61028 Mod wheel board 24040 Connector 10 pole micromatch ...

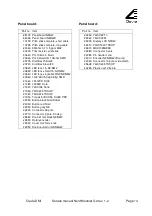
Page 15: ... 10uF 35V 5 0x6 0 Ellyt SMD 21460 LF412CD SO8 21480 LF353D So 8 21920 74AC138 So16 21930 74HC245 TSSOP 21940 74HC374 TSSOP 21950 Transistor BCX53 Sot89 PNP 22030 Button black Nord ddrum 22040 Button red Nord 22050 Button grey NE 22520 Connector 26 pole 22710 Connector 3 pole 90 deg 22880 Knob 21mm black N3 NM2 22890 Rotary encoder 22940 Cover for 21mm knob 22950 Knob neutral for N3 NMG2 Panel boar...

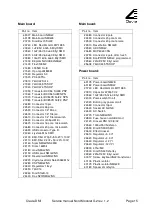
Page 16: ... 23170 Dram 16Mbit 23180 Host NMG2 NS 23190 USB circuit NMG2 NS 23200 Resetcircuit NMG2 NS 23270 Crystal oscillator 56 620363 Mhz 23280 DSP NMG2 NS 23340 Regulatorv1 8v yt 23350 74AC14 23360 Diod S1GB 13 23430 Dac N2X NMG2 NS Main board Part no Item 23480 Connector 3 pole 23490 Connector 20 pole male 23500 Connector 20 pole female 23510 Resetbutton NMG2E 23540 ADC NMG2 23680 MCP6022 I SN 23790 Con...

Reviews: