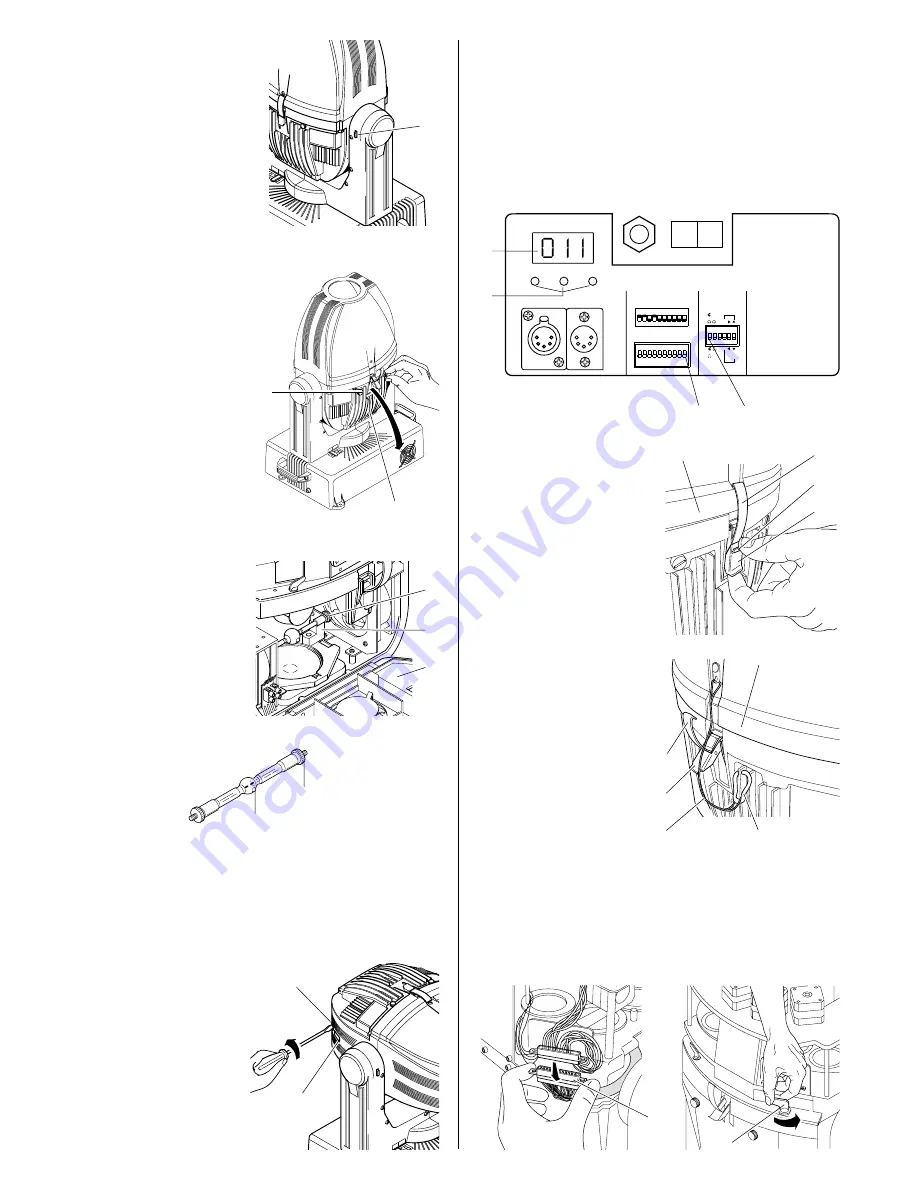
• Centring the lamp
To achieve optimum lighting
efficiency, it is necessary to centre
the lamp on the horizontal axis using
a flat-headed screwdriver on the set
screw (30) indicated by the label
(31).
10
• Re-lamping
Open the side cover (26) on the
same side where the PAN locking
lever (10) is accessible. Then, loosen
the two side ring nuts (27) of the
lamp to be replaced and remove it
from its mountings (28).
Take the new lamp out of its
package, loosen the two side ring
nuts (27) and insert the lamp in its
mountings (28). Finally, screw on the
ring nuts.
IMPORTANT: to distribute the beam of light uniformly, the lamp needs to be
positioned with the protrusion (29) visible on the bulb outside the optical axis of the
projector. For this purpose it is recommended to turn the protrusion towards one of
the side covers (26).
27
29
30
31
• Zeroing lamp time
To zero the hours of life of the lamp (“Bulb hours”), memorized in the DMX Receiver
microprocessor, it is necessary to operate according to the following procedure:
1. Set the TEST microswitch (22) onto ON.
2. Shift the option 1 microswitch (32) from ON to OFF (or from OFF to ON) and vice
versa 3 times within a time of 6 seconds. If the procedure has been carried out
correctly, the three signal control LEDs (20) will come on at the same time, while
the display (19) will go out completely. This situation lasts for approximately
5 seconds.
3. Put the TEST microswitch (22) back onto OFF.
• Opening and closing the effects
compartment
Lock the PAN and TILT mechanisms
so that the head of the projector is in
the most expedient position for the
operation you want to carry out on
the fitting.
Use your thumb to push the safety
tab (33) upwards and, at the same
time, pull the lever (34) upwards with
your index finger. Free the hook (35)
and move it towards the outside of
the projector.
Unhook the clamp (36) of the safety
rope (37) and remove the effects
cover (38).
32
35
38
33
34
40
39
After maintenance, fit the cover (38)
back on in correspondence with the
movable head, then fasten the hooks
(35) onto it and lower the levers (34)
so the safety tab (33) clicks home.
Hook the safety rope (37) back on
with the clamp (36) and release the
PAN and TILT mechanisms.
• Extracting effects kit
To facilitate some of the maintenance operations described further on, it is possible
to take the entire effects kit out of the projector by proceeding as follows:
Open the effects compartment, disconnect the connector “D” (39) gripping it by its
side lugs and forcing in the direction shown by the arrow, taking care not to stretch
the wires, then release, turning the four levers (40) of the quick lock/release devices
anticlockwise.
• TILT Mechanism Lock/Release
To lock the TILT mechanism, position
the movable head in a horizontal or
vertical position manually, then press
on the device (11) on the green-
coloured side, making the red-
coloured side that indicates locked
protrude, as a result, from the
opposite side.
To release the TILT mechanism,
push the device (11) in the opposite
direction, making the green-coloured
side appear, indicating it is released.
• Opening and closing the side
covers
Lock the PAN and TILT mechanisms
in the most suitable position for the
type of operation to be performed,
then loosen the handwheels (25) and
open the desired side cover (26).
After maintenance, close the cover
(26), lock the handwheels (25) and
release the PAN and TILT
mechanisms.
11
25
27
28
26
26
DIGITAL INPUT
ADDRESS/HOURS
1
2
4
8
16
128
32
64
TEST
256
ON
1
2
4
3
6
5
7
8
10
9
1
6
5
4
3
2
1
ON
LAMP ON/OFF
8
TIL
T
PA
N
16
2
8
>5 MINS = OFF
I
O
DIGITAL INPUT LEDS
+
GOBO
COL
+
19
20
22
38
37
34
35
36


