Copyright © 2016 Clayton Associates, Inc. • 1650 Oak St. • Lakewood, NJ 08701
800-248-8650 • www.VacuumSanding.com
7
2. Lightly grease the o-ring and place it in the groove of
the Valve Stem. Install the Valve Stem into the Sleeve.
3. Install the Valve Seat, the Valve and the Spring. Press
the Seal Assembly into the Motor Housing.
4. Install the Throttle Lever into the Motor Housing with
the Spring Pin.
5. Install the Shroud onto the Motor Housing.
6a. For NV and CV machines: Install the NV/CV Exhaust
Nozzle and the Gasket using the three Screws. Torque
setting to be 21-30 in-lbs (2.4-3.4 N-m). Insert the
exhaust Tubing and the inlet Tubing into the Tub
-
ing Clamp. Then insert the exhaust Tubing into the
Exhaust Nozzle and insert the inlet Tubing into the Seal
Assembly.
6b. For SGV machines: Install the SGV Exhaust Nozzle
and Gasket using the three Screws. Torque setting to
be 21-30 in-lbs (2.4-3.4 N-m). Insert the inlet Tubing
into Seal Assembly.
7. Install the two Mufflers, O-Ring, Captive Ring, O-Ring
into the End Cap. Lightly grease the o-rings before
installation.
8. Coat the threads of the Bushing Assembly with 1 or 2
drops of Loctite™ 222 or equivalent non-permanent
pipe thread sealant. Screw the Bushing Assembly into
the inlet port on the End Cap until hand tight. Torque
setting to be 60-72 in-lb (6.8-8.1 N-m).
9a. For CV and SGV machines: Insert the Inlet Tubing into
the End Cap. Install the Inlet Tubing into the Seal As
-
sembly.
9b. For NV machines: Insert the inlet Tubing into the End
Cap.
10. Install the Muffler and Seals into the Housing.
11. Install the internal components into the Housing. Then
install the Housing.
12. Install the Screws. Torque setting to be 27- 30 in-lbs
(3.0-3.4 N-m) for Screw. Torque setting to be 29- 33
in-lbs (3.3-3.7 N-m) for Screw.
13. Lightly grease the O-Ring and place it in the groove on
the Speed Control. Insert the Speed Control into the
Motor Housing in the full on position. Install the Retain
-
ing Ring. Caution: Make sure the Retaining Ring is
completely snapped into groove in the Motor Housing.
14. Install the Spacer Ring into the Hanger. Secure the
hanger by screwing in the Plugs and/or install the Side
Handle.
Spindle, AirSHIELD™ and Shaft Balancer Assembly:
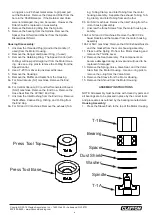
1. Place the T-1A Spindle Bearing Pressing Tool Base
onto a flat, clean surface of a small hand press or
equivalent with the pocket facing upward. Place the
Spindle into the spindle pocket with the shaft facing
upward.
2. Place the Washer on the Spindle shaft with the curve
of the Washer facing up so that the outside diameter
of the Washer will contact the outer diameter of the
Bearing. Place the Dust Shield onto the Spindle shaft.
Place the Spacer onto the shoulder of the Spindle.
Note: Be sure that the Dust Shield is past the shoulder
where Spacer rests.
Place the Bearing on the Spindle
with the seal side toward the Washer. Note: Make sure
that both the inner and outer races of the Bearing are
supported by the Bearing Press Tool when pressing
them into place. Press the Bearing to the Spacer using
the T-1B Spindle Bearing Pressing Tool Top.
3. Take the Filter and center it on the small bore that the
original Filter was in before removal. With a small
diameter screwdriver or flat-ended rod, press the Filter
into the bore until it is flat in the bottom of the bore.
Place the Valve into the bore so it is oriented correctly,
then press the Retainer into the bore until it is flush with
the surface of the Shaft Balancer.
4. Apply a pin head size drop of #271 Loctite® or
equivalent to the outside diameter of the Bearing of
the Spindle Assembly. Spread the drop of bearing
locker around the Bearings until it is distributed evenly.
Caution: Only a very small amount of bearing locker
is needed to prevent rotation of the bearing OD. Any
excess will make future removal difficult. Place the
Spindle Assembly into the bore of the Shaft Balancer
and secure with the Retaining Ring. Caution: Make
sure that the Retaining Ring is completely snapped into
the groove in the Balancer shaft. Allow the adhesive to
cure.
Motor Assembly:
1. Place the Dust Shield onto the shaft of the Shaft Bal
-
ancer.
2. Lightly grease the O-Ring with a light mineral grease
and place it in the groove of the Lock Ring, then place
it on the Shaft Balancer with the O-Ring facing towards
the keyway.
3. Use the larger end of the T-13 Bearing Press Sleeve to
press the front Bearing (with 2 Shields) onto the shaft
of the Shaft Balancer.
4. Slide the Front Endplate with the bearing pocket facing
down onto the motor shaft. Gently press the Front
Endplate onto the Bearing using the larger end of the
T-13 Bearing Press Sleeve until the front Bearing is
seated in the bearing pocket of the Front Endplate.
Caution: Only press just enough to seat the Bearing
into the pocket. Over-pressing can damage the Bear
-
ing.
5. Place the two Keys into the grooves of the Shaft
Balancer. Place the Rotor onto the shaft of the Shaft
Balancer, making sure that it is a light slip fit.
6. Place the Cylinder Assembly over the Rotor with the
shorter end of the spring pin engaging the blind hole in
the Front Endplate. Note: The spring pin must project
.060 in. (1.5 mm) above the flanged side of the Cylin
-
der. Oil the five Vanes with a quality pneumatic tool oil
and place in the slots in the Rotor. One or two drops of
oil should be sufficient.
7. Press fit the rear Bearing (2 shields) into the Rear
Endplate with the T-1B Bearing Press Tool. Make sure
the T-1B Press Tool is centered on the O.D. of the


