background image

BLX-200W Manual  Page 5 of 9

Updated: 02/11/21

USER MANUAL: BLX-200W

READ ALL INSTRUCTIONS BEFORE OPERATING EQUIPMENT

Gener

al

Ins

talla

tion

Oper

ation

Appendix

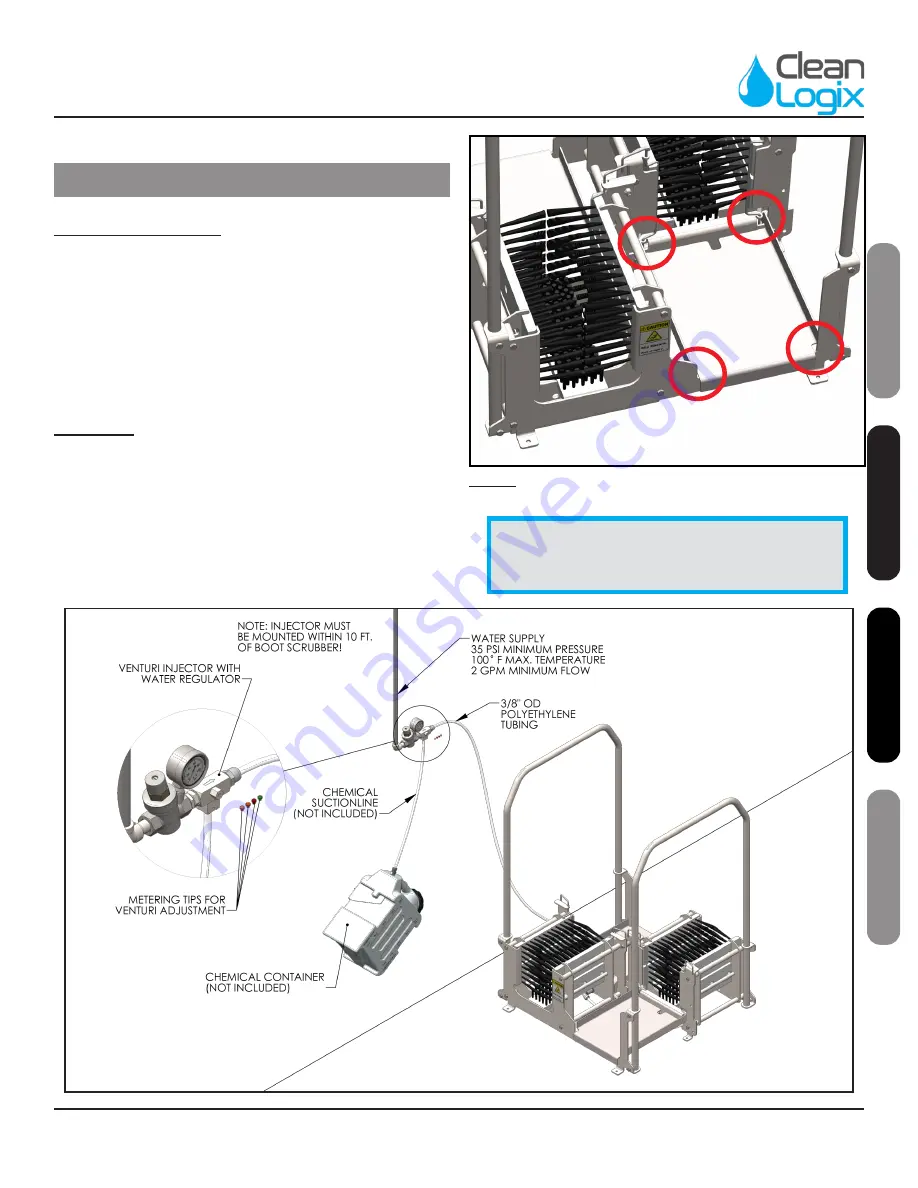
Installing Foot Plate

1.  Place the Foot Plates at the opening of each end 

of the unit.

2.  Make sure the notches on the plate line up with 

the holes on the unit, as shown in [Figure 5.1].

Installation (continued)

Fig. 5.1:

 Inserting Foot Plate

Plumbing

1.  Connect the water regulator on the Venturi to the 

water supply line (regulator thread = 1/2")

2. 

Using 3/8" OD polyethylene tubing (or similar) 

connect the sanitizer solution to be used to the 

Venturi's hose barb, as shown below:

NOTE: 

A back flow preventer must be installed 

in the water line for this unit. Check local 

codes to ensure proper installation.

Summary of Contents for BLX-200W

Page 1: ...USER MANUAL English Original Instructions Updated 02 11 21 MODEL BLX 200W Dual Manual BootScrubber Wet ...

Page 2: ...ntact of cleaning agent with skin and eyes If contact occurs see MSDS sheet for further first aid measures 2 Follow safety instructions of chemical manufacturer MSDS 3 Always follow plant and OSHA guidelines about the use of hygiene equipment 4 All personnel using this unit must be familiar with the information contained in this manual Follow all installation and maintenance instructions 5 Always ...

Page 3: ...ed location use a level to make sure the unit is stable and level in all directions Figure 3 1 Make sure the location is a flat surface 4 Using the 4 mounting brackets located at each corner securely fasten the unit to the floor with appropriate hardware for the given material i e concrete anchors and bolts as shown in Figure 3 2 5 Dosing of sanitizing chemicals into water supply can be accomplish...

Page 4: ...andrail disconnected 1 Place handrail through the mounting brackets on each side of the unit Figure 4 1 2 Using two 1 2 wrenches tighten the bolt through the locknut until the bolt bottoms out against the handrail to secure in place Figure 4 2 3 Repeat for remaining bolts to secure the handrail 8 bolts total Installation continued Fig 4 1 Installing Handrail Fig 4 2 Handrail stablization bolts ...

Page 5: ... plate line up with the holes on the unit as shown in Figure 5 1 Installation continued Fig 5 1 Inserting Foot Plate Plumbing 1 Connect the water regulator on the Venturi to the water supply line regulator thread 1 2 2 Using 3 8 OD polyethylene tubing or similar connect the sanitizer solution to be used to the Venturi s hose barb as shown below NOTE A back flow preventer must be installed in the w...

Page 6: ...3 Once unlocked the brushes can be removed for cleaning by slipping them out from their holders Plumbing continued 3 Using the push to connect fitting connect the Venturi system to the BLX s water line located under the unit near one of the foot plates Figure 6 1 4 Test the system by stepping on the footplate to engage the unit and begin spraying 5 Adjust the solution output as necessary using the...

Page 7: ...an remove it and walk through to the second scrubber and repeat the process with the other boot 5 If boots are extremely dirty it may be necessary to scrub them multiple times Cleaning and Wash Down 1 Shut off water supply to unit and depressurize water lines 2 Remove the Foot Plates and brushes from the unit 3 Brushes and Foot Plates can be washed individually in a COP tank or wash machine 4 The ...

Page 8: ...NDRAIL BLX 200 M1398 REAR PLATE BLX 200 M1399 SPRAY BAR BLX MANUAL M1407 SPACER BLX 200 P1047 VENTURI INJECTOR 3 8 SS P1100 PIPE HEX NIPPLE 3 8 SS P1102 PIPE NIPPLE 1 4 CLOSE SS Part No Description P1108 PIPE CAP 1 4 SS P1196 PIPE COUPLER 1 4 P1211 QUICK FIT 1 4 NPT X 3 8 TUBE P1214 QUICK FIT 3 8 T JOINT POLYPRO P1219 QUICK FIT 3 8 NPT X 3 8 TUBE P1221 QUICK FIT ELBOW 1 4 NPT x 3 8 TUBE P1248 LABE...

Page 9: ...BLX 200W Manual Page 9 of 9 Updated 02 11 21 USER MANUAL BLX 200W READ ALL INSTRUCTIONS BEFORE OPERATING EQUIPMENT General Installation Operation Appendix Appendix B Dimensions ...

Reviews: