background image


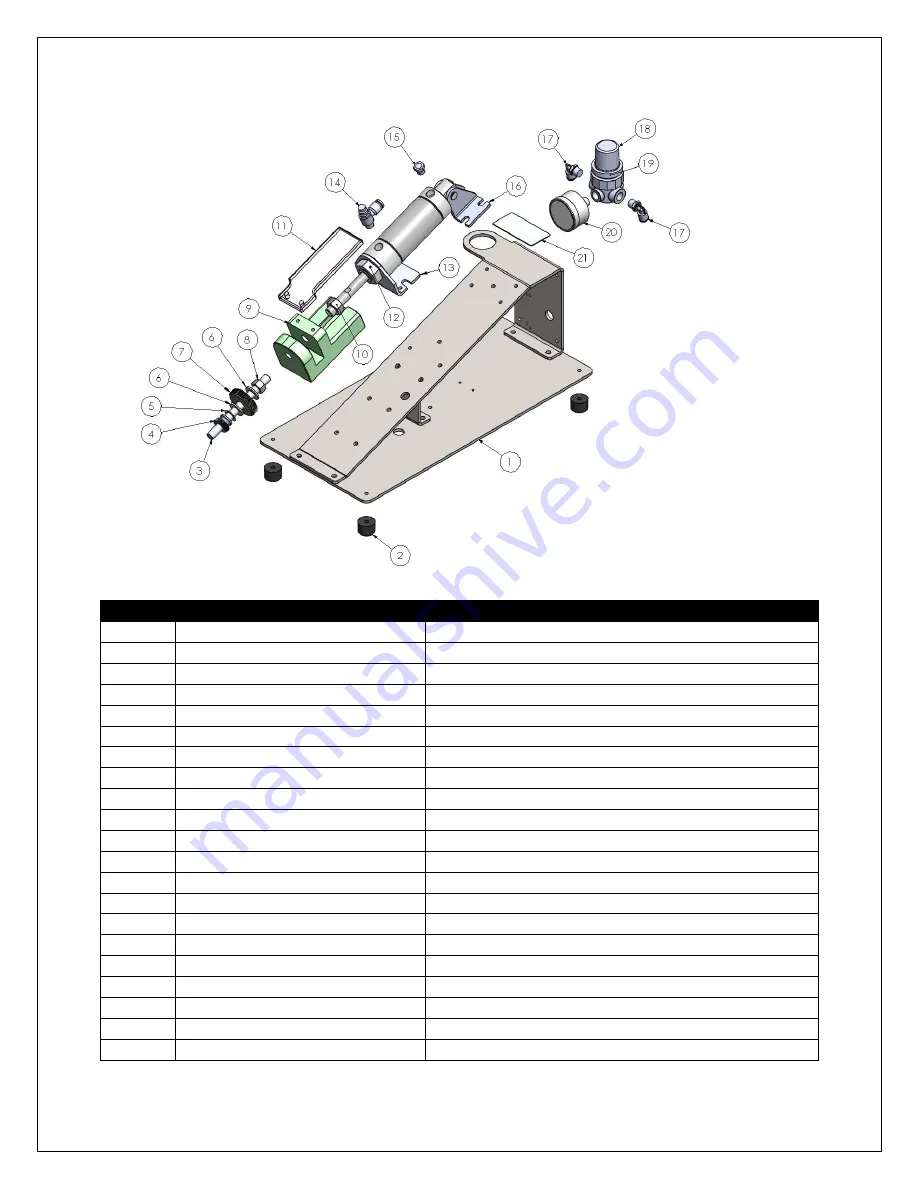
4.0    Parts List 


   Item 

                  Part Number 

                                  Description 

     1 

CD220-001 

Base Assembly 

     2 

P00026 

Rubber Foot 

     3 

P00057 

Threaded Rod 

     4 

P00059 

3/8-16 Hex Nut 

     5 

P00056 

Steel Flat Washer 

     6 

P00086 

Nylon Flat Washer 

     7 

CD002-137 

Thumb Knob 

     8 

P00059 

3/8-16 Hex Nut 

     9 

CD002-138 

Lower Jaw Block 

    10 

P00453 

1/2-20 Hex Nut 

    11 

CD002-055 

Jaw Guard 

    12 

P00452 

1.25-12 Hex Nut 

    13 

CD220-004 

Front Cylinder Mounting Bracket 

    14 

P00141 

Flow Valve 

    15 

P00022 

Muffler 

    16 

P00450 

Rear Cylinder Mounting Bracket 

    17 

P00063 

90° Elbow Air Fitting 

    18 

P00066 

Regulator 

    19 

P00067 

Regulator Nut 

    20 

P00280 

Pressure Gauge 

    21 

CD001-0027 

Nameplate 

Summary of Contents for CRD220SS

Page 1: ...CRD220SS HEAVY DUTY TUBE EXPANDER OPERATIONS MANUAL VERSION 1 3 LAST EDITED 10 30 2018 cleanroomdevices com ...

Page 2: ...Information 2 0 Installation 2 2 1 Air Supply 3 0 Operation 3 3 1 Tube Expanding 3 2 Jaw Installation and Removal 4 0 Parts List 7 5 0 Trouble shooting 8 6 0 Maintenance 8 6 1 Periodic Cleaning annually 7 0 Safety 8 8 0 Product Specifications 9 9 0 Durometer Scale 9 10 0 Warranty 10 10 1 Warranty 10 2 Warranty Period ...

Page 3: ...ty Information The device has a foot pedal actuated air cylinder that actuates the expanding jaws The unit is not intended to expand anything other than flexible tubing Avoid placing your fingers between the upper jaw block and the air cylinder mounting bracket while operating unit sufficient pressure exists to cause personal injury The air supply should be free of moisture contaminates and set at...

Page 4: ...r material Once you have the expansion size you want tighten the Lock Nut to secure the adjustment Release the foot pedal Place the tube over the ends of both expander jaws and hold firmly in place Actuate the Tube Expander by pressing the foot pedal Once the tube is expanded release the foot pedal rotate the tubing 90 degrees on the jaws and actuate the Tube Expander by pressing the foot pedal ag...

Page 5: ...sing a 3mm hex wrench Turn the thumb wheel clockwise until the cylinder shaft is fully extended in the jaw block channel Figure 3 2 1 Cylinder shaft shown fully extended in jaw block channel Figure 3 2 1 Using a 3 4 open end wrench break the upper jaw nut loose Figure 3 2 2 Using a 9 16 open end wrench break the lower jaw nut loose Figure 3 2 3 Figure 3 2 2 Figure 3 2 3 ...

Page 6: ... 5 Rotate the upper jaw by hand counter clockwise until removed Important note when screwing upper jaw onto cylinder shaft it is important to only screw the jaw 1 2 to 2 3 of the way on Any farther and the jaw may slip off the jaw block when the cylinder is retracted Remove the Knurled lock nut and grab threaded rod by hand and rotate rod counter clockwise while holding the lower expander jaw unti...

Page 7: ... set screws on the front cylinder mount bracket will need to be adjusted To make the adjustment you must first loosen the two 6x12mm screws using a 5mm hex wrench Figure 3 2 7 and then by adjusting the two set screws using a 3 32nd hex wrench Figure 3 2 8 Now tighten the two 6x12mm screws and ensure jaw alignment 6x12 mm screws Set Screw Figure 3 2 7 Figure 3 2 8 ...

Page 8: ... CD002 137 Thumb Knob 8 P00059 3 8 16 Hex Nut 9 CD002 138 Lower Jaw Block 10 P00453 1 2 20 Hex Nut 11 CD002 055 Jaw Guard 12 P00452 1 25 12 Hex Nut 13 CD220 004 Front Cylinder Mounting Bracket 14 P00141 Flow Valve 15 P00022 Muffler 16 P00450 Rear Cylinder Mounting Bracket 17 P00063 90 Elbow Air Fitting 18 P00066 Regulator 19 P00067 Regulator Nut 20 P00280 Pressure Gauge 21 CD001 0027 Nameplate ...

Page 9: ...er and size range Flexible tubing is splitting tearing 1 Verify that the tubing is within the recommended durometer and size range 2 Ensure the lower jaw has been adjusted correctly for the tubing inside diameter I D 3 Verify facility air supply psi or unit pressure adjustment 6 0 Maintenance 6 1 Periodic Cleaning annually Wipe down outer surfaces with alcohol septihol or mild detergents as requir...

Page 10: ...9 8 0 Product Specifications Unit Weight 13 5 LBS 6 1 KG Overall Dimensions 15 1 4 l x 7 w x 7 1 2 h Minimum Facility Air Supply 100 PSI Unit Air Regulator Setting 80 100 PSI 9 0 Durometer Scale ...

Page 11: ...ny buyer of the manufacturer s product The maximum damages liability for the manufacturer is the original purchase price of the product or part THE FOREGOING WARRANTY IS EXCLUSIVE AND IN LIEU OF ALL OTHER WARRANTIES WHETHER WRITTEN ORAL OR STATUTORY AND IS EXPRESSLY IN LIEU OF THE IMPLIED WARRANTY OF MERCHANTABILITY AND THE IMPLIED WARRANTY OF FITNESS FOR A PARTICULAR PURPOSE THE MANUFACTURER SHAL...

Reviews: