background image


10 

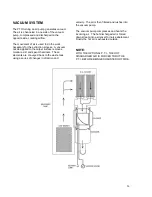
into the blower chamber which could damage the blower 
itself. The inline vacuum breaker adds years to the 
vacuum blowers life by reducing stress caused plugged 
filters and limited air intake. The recovery tank also has 
two access lids for easy access to the lint basket and the 
stainless steel blower protection filters. These filters 
require regular cleaning on a daily basis as a minimum. 
To finish off the recovery tank Cleanco added an 
integrated storage shelf, giving the operator added 
space for specialty tools that may be required at the 
cleaning site. 


MAINTENANCE 

 
To avoid costly repairs and downtime, it is imperative to 
develop and practice good maintenance procedures. 
These procedures must be preformed on a daily, weekly, 
monthly, quarterly and bi annual schedule. 
 
As part of your Cleanco package you receive a 

Cleanco 

Maintenance Booklet.

 This booklet provides you with a 

convenient format for recording the required 
maintenance of your Cleanco unit and van. You are 
required to perform all maintenance items in the 
Maintenance Schedule and record that you have done 
so in this booklet as part of your Cleanco Warranty. It is 
your responsibility to keep a copy of all repair orders and 
receipts that relate to your Cleanco unit and Van. These 
records of services and purchases will be required to 
substantiate proper maintenance to your Cleanco unit 
and Van for any warranty claim. 
 

DAILY 


Check van engine oil. 


Check van engine coolant level. 


Check high-pressure pump oil level. 


Check vacuum blower oil level. 


Clean vacuum tank lint basket. 

(Should be cleaned 

after every job)


Clean the stainless steel blower protection filters. 


Lubricate blower with 

LPS/TKX

 lubricant. 


Winterize system if necessary. 


WEEKLY 


Check engine air cleaner filter. (clean as necessary) 


Check Front drive belts. (adjust if necessary) 


Check blower belts. (adjust if necessary) 


Check high-pressure pump belt. (adjust if necessary) 


Clean in-coming water filter. 


Flush chemical system with 50/50 mixture of vinegar 
and water. 


Inspect unit for loose wires, oil leaks, and water 
leaks. 


Check engine RPM with unit running at fast idle. 
(setting 1450 RPM under load ) 


Blower Speed. (actual reading) 


Vacuum Gauge. (actual reading) 


Temperature Gauge. (actual reading) 


Hour Meter. (actual reading) 


Clean wand and inspect for clogged jets. 


Clean recovery tank thoroughly with high pressure 
water. 


MONTHLY 


Change van engine oil. 


Check van transmission oil level. 


Check van coolant level. 


Check engine air cleaner filter. (clean as necessary) 


QUARTERLY SERVICE 


Change oil in high-pressure pump. 


Change oil in vacuum blower. 


Flush entire water flow system. (coil flush if 
necessary) 


Check that all nuts and bolts are tight. 


Check all hose clamps, tighten if necessary. 


Grease front and rear PTO shaft bearings with SKF 
LGMT 3/0.4 bearing grease. 


BI - ANNUAL MAINTENANCE 


Change the coolant and flush the                     
coolant system completely. 


AS REQUIRED / COIL FLUSH 

If your area has hard water you may see evidence of 
hard water deposits form in the water system, or on the 
quick connects. If scale is present, the water system 
should be flushed with Coil Cleaner. This procedure may 
have to be increased to a monthly interval if heavy built-
up is present. For information on flushing coils contact 
your nearest Cleanco distributor. 
Over all machine maintenance and appearance is very 
important. It represents your company’s professional 
appearance and is how you make your living. A clean 
well maintained machine will give you years of reliable 
performance. Maintenance, troubleshooting, and repair 
is much easier on a clean well maintained unit. Regular 
cleaning and maintenance will give you the opportunity 
to spot any potential problems normally before they 
occur. 
 
It is important that you follow and record the 
maintenance on your Cleanco unit and van according to 
the Cleanco Maintenance Booklet to insure complete 
warranty coverage. 


Summary of Contents for Compact 45

Page 1: ...VERSION AUG 2017...

Page 2: ...uum Relief Valve Drive Belts Pressure Regulator Hoses Optional Waste Pump out Engine Coolant Replacement 23 Water Pump Drive Belt Waste Tank Lint Basket Waste Tank Float Valve Inline Water Filter Trou...

Page 3: ...anual are explained in such a manner that servicing may be performed accurately and safely Proper service varies with the choice of procedure the skill of the mechanic and the tools or parts available...

Page 4: ...d Avoid creating any ignition until the gasoline has been cleaned up Never use gasoline as a cleaning agent DO NOT place hands feet hair or clothing near rotating or moving parts Avoid any contact wit...

Page 5: ...vehicle s weight limit The console with waste tank and accessories weighs approximately 800 lbs Make certain to account for any additional accessories in your weight and balance calculations Make cer...

Page 6: ...th waste tank 500 lbs Pump Belt size AX42 Blower Belt size AX45 JET SIZING Recommended floor tool tip sizing should not exceed a total of 045 Using larger jet sizes on your cleaning unit may reduce cl...

Page 7: ...terials must be processed before they are safe to re enter our streams rivers and reservoirs AS PER FEDERAL STATE AND LOCAL LAWS DO NOT DISPOSE OF WASTE WATER INTO STORM DRAINS GUTTERS STREAMS RESERVO...

Page 8: ...top of the recovery tank START UP 1 Make sure the van is in the park position and the emergency brake is set 2 With the van engine running turn the main power switch to UPHOLSTERY or CARPET MODE depen...

Page 9: ...passes through the high pressure pump where it is pressurized The pressure is then control by the BPR Balanced Pressure Regulator which is fully adjustable from the front panel After the water flow ex...

Page 10: ...sing with three bearings protects the shaft These bearings are designed to withstand extremes of heat and friction without breaking down The PTO shaft has two grease jerk fittings one at the front of...

Page 11: ...belts adjust if necessary Check high pressure pump belt adjust if necessary Clean in coming water filter Flush chemical system with 50 50 mixture of vinegar and water Inspect unit for loose wires oil...

Page 12: ...coil cleaner Possible air lock in water flow system make sure coolant level is at proper level then open pet cock valves located on the heat exchangers and bleed air from heat exchangers then close p...

Page 13: ...12...

Page 14: ...13...

Page 15: ...Interior Light Switch This switch controls the spot lights located in the cargo area 11 Auto Drain Switch This switch controls the Optional auxiliary pump to drain the waste collection tank automatic...

Page 16: ...tential folding over of the fins or build up of debris lint dirt etc This will cause excessive stress on the drive line including the blower PTO shaft and PTO clutch The blower must be removed to see...

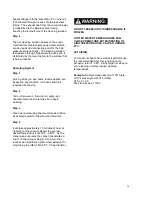
Page 17: ...set chemical meter and enter the site to begin cleaning Step 3 Clean as normal using the recommended orifice sizes listed below for the wand and stair tool Step 4 It will take approximately 15 minute...

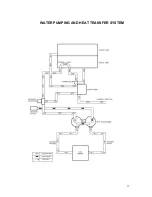
Page 18: ...17 WATER PUMPING AND HEAT TRANSFER SYSTEM...

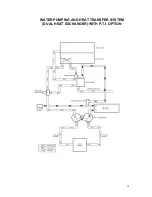
Page 19: ...18 WATER PUMPING AND HEAT TRANSFER SYSTEM DUAL HEAT EXCHANGER WITH P T I OPTION...

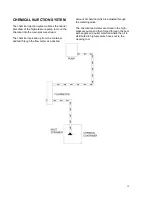
Page 20: ...stream The chemical is picked up from the container and fed through the flow meter at a desired amount of chemical which is adjusted through the metering valve The chemical and water are mixed in the...

Page 21: ...surface removes moisture dirt and spent chemicals These elements are conveyed back to the waste tank using a series of changes in direction and velocity The air is then filtered and rushes into the v...

Page 22: ...replace oil every 200 hours or yearly whichever comes first Change oil more frequently if inspection so indicates With Roots Synthetic lubricant perform the oil change maintenance every 500 hours or o...

Page 23: ...r worn belts proper belt tension and pulley alignment after the first 25 hours and then again at 100 hours Check for belt ride in the groove PRESSURE REGULATOR Lubricate the o rings and bullet every 5...

Page 24: ...BELT To tighten the water pump belt 1 Loosen the nuts which hold the water pump mount to base 2 Adjust the position of the belt tension adjusting bolt until the proper belt tension is achieved 1 2 def...

Page 25: ...oose clamps or fittings Tighten any loose fittings or Loss of water clamps Replace any ruptured hose s pump pressure Pressure regulator o rings are Lubricate o rings using o ring lubricant dry Pressur...

Page 26: ...valve and the vacuum gauge and remove any blockage Vacuum hose s is damaged Inspect hose s repair or replace causing a suction leak Waste tank gaskets not Inspect the gasket Repair seal or sealing pro...

Page 27: ...Pump Volume in the Troubleshooting section in this manual Chemical flow External leak in chemical Tighten fittings Re apply thread meter indicates piping sealant where required If any fittings flow wi...

Page 28: ...27 CLEANCO COMPACT OVERHEAD VIEW...

Page 29: ...28...

Page 30: ...29 FRONT PANEL 45 47 FRONT VIEW...

Page 31: ...30 FRONT PANEL 45 47 BACK VIEW...

Page 32: ...n RB Zinc 18 415 025 LW 1 4 SS 19 415 125 FW 1 4 SS 20 425 140 Clamp Tube 3 4 21 460 010 Strap 1 2 22 465 670 BRKT Clamp Panel 23 465 675 BRKT Angle 24 498 050 Plug 5 8 Nylon 25 498 070 Plug 1 Nylon 2...

Page 33: ...32 FRONT PANEL PLUMBING P 1...

Page 34: ...33 FRONT PANEL PLUMBING P 2...

Page 35: ...04 Elbow 90 1 8 Street Forged 22 555 206 Elbow 90 1 4 FPT Extruded 23 555 208 Elbow 90 1 4 Street Extruded 24 555 212 Elbow 90 3 8 FPT 25 555 214 Elbow 90 3 8 Street Extruded 26 555 242 Extruded Cross...

Page 36: ...Shutoff 47 580 106 Q C 1 8 Fem Shutoff 48 580 110 Q C 1 8 Fem Open 49 580 120 Q C 1 4 Fem Open 50 580 125 Q C 1 4 Male Open 51 580 140 Q C 3 8 Fem Open 52 580 145 Q C 3 8 Male Open 53 581 065 Crimp FT...

Page 37: ...36 COMPACT RECOVERY TANK...

Page 38: ...116 Clamp 10 16 445 040 Catch Rubber 17 415 115 FW 10 SS 18 475 090 Gasket Intake Rec Tank 19A 475 101 Gasket Channel Lint Basket 19B 475 103 Gasket Channel Filter 20 498 020 Plug Rubber 10 C W Tether...

Page 39: ...38 COMPACT BASEPLATE 45 47 P 1...

Page 40: ...39 COMPACT BASEPLATE 45 47 P 2...

Page 41: ...15 390 145 Tensioner 16 397 030 Belt Compact Pump 17 400 005 Hex nut 1 4 x 20 SS 18 400 015 Nut 3 8 x 16 Zinc 19 400 045 Hex Nut 5 16 Zinc 20 400 050 Hex Nut 1 2 Zinc 21 400 115 Locknut 1 4 x 20 Nylo...

Page 42: ...90 1 4 Street Extruded 62 555 210 Elbow 90 3 8 MPT x 1 4 MPT 63 555 214 Elbow 90 3 8 Street Extruded 64 555 218 Elbow 90 1 2 Street Extruded 65 555 250 Ferrule 675 ID 66 555 274 Hex Nipple 3 8 67 555...

Page 43: ...Mal CP Baseplate 45 99B 358 255 Exhaust Port 47 Vr 2 CP Baseplate 47 100 845 313 Cover Clutch 101A 845 545 Baseplate 45 CP Baseplate 45 101B 845 547 Baseplate 47 CP Baseplate 47 102A 850 030 45 Silenc...

Page 44: ...43 COMPACT PUMP KITS PART 516 205 VALVE KIT INCLUDES 1 2 3 4 5 6 PART 516 200 HI TEMP SEAL KIT INCLUDES 7 8 9 10...

Page 45: ...44 KIT INSTALLATION 45 47 P 1...

Page 46: ...45 KIT INSTALLATION 45 47 P 2...

Page 47: ...9 410 252 Wafer Screw SLF Tapping 3 4 22 20 410 253 Wafer Screw SLF Tapping 1 1 4 15 21 415 050 LW 1 2 Zinc 5 22 415 130 FW 3 8 Zinc 14 23 415 375 Washer 3 8 Timber 13 24 420 151 Rivet Fully sealed 68...

Page 48: ...ATION 45 47 P 2 45 703 506A Decal Cleanco Universal VR2 1 46 703 800 Maintenance Schedule Cleanco 1 47 703 805 Operating Instructions PTO 1 48 759 005 Chemical Jug 10LT 1 49 760 910 CD Compact 45 47 O...

Page 49: ...48 DUAL HEAT EXCHANGER...

Page 50: ...a Yellow 8 400 005 Hex Nut 1 4 x 20 SS 9 405 600 Clinch Stud 1 4 x 1 S S 10 415 025 LW 1 4 SS 11 415 125 FW 1 4 SS 12 475 085 Gasket 5 3 4 Heat Exch 13 478 005 Insulation 1 By the SQ FT Not Shown 14 2...

Page 51: ...50 P T I...

Page 52: ...5 208 Elbow 90 1 4 Street Extruded 10 555 214 Elbow 90 3 8 Street Extruded 11 555 452 Plug 1 4 MPT Hex 12 555 512 Reducing ADPT 3 8 FPT x 1 4 MPT 13 555 636 Tee 1 4 Street Extruded 14 555 640 Tee 3 8...

Page 53: ...52 COVER HOLDER KIT...

Page 54: ...00 Gasket channel 3 478 010 Insulation Heat Exchanger Cover Not Shown 4 498 035 Grommet Rubber 11 16 5 499 005 Trim 1 2 Black 6 703 225 Decal Warning Rotating Machinery Not Shown 7 703 506A Decal Comp...

Page 55: ...54 PTO SHAFT...

Page 56: ...R SB 62 2 230 364 PTO Shaft Assy VR SB 64 3 230 367 PTO Shaft Assy VR SB 67 4 230 370 PTO Shaft Assy VR SB 70 5 230 375 PTO Shaft Assy VR SB 75 6 365 220 Clutch 6 V Groove 7 365 225 Clutch 6 Groove Se...

Page 57: ...S S 2 545 035 Ball Valve 3 4 3 555 025 Cap Nut 4 555 079 Close Nipple 3 4 short 5 555 144 Coupling M Hose to 3 4 FTP 6 555 222 Elbow 90 3 4 Street Forged 7 555 278 Hex Nipple 3 4 8 555 400 Hose Barb 1...

Page 58: ...57 C A D EXTERNAL OPTION PAGE 1...

Page 59: ...58 C A D EXTERNAL OPTION PAGE 2...

Page 60: ...t 3 8 x 16 Zinc 14 400 100 Locknut 3 8 x 16 Nylon Zinc 15 405 115 Bolt 3 8 x 1 1 2 GR5 Zinc 16 405 452 Bolt 1 4 x 3 4 soc NF 17 415 025 LW 1 4 SS 18 415 030 LW 3 8 Zinc 19 415 125 FW 1 4 SS 20 415 130...

Page 61: ...60 F W TANK AQUA STORAGE 120 GALLON...

Page 62: ...cess Cover Clear 14 499 005 Trim 1 2 Black 15 545 036 Ball Valve 1 16 550 004 Air Valve 1 17 555 004 ADPT 3 8 M x 3 8 F 18 555 080 Close Nipple 1 19 555 214 Elbow 90 3 8 Street Extruded 20 555 324 H B...

Page 63: ...62 F W TANK AQUA REEL TANK 125 GAL P 1...

Page 64: ...63 F W TANK AQUA REEL TANK 125 GAL P 2...

Page 65: ...nal Ring 10 Yellow 9 330 005 Wire 10A Red 10 340 105 Fuse 30 Amp 11 345 105 Fuse Holder 12 345 115 Fuse Holder Cover 13 380 580 Key Woodruff 3 16 x 1 2 14 385 149 Pulley AK20 5 8 15 397 105 Belt A104...

Page 66: ...390 Hose Barb 5 8 Barb x 3 8 MPT 38 555 516 Reducing ADPT 3 4 MPT x 1 2 F 39 555 544 Reducing Nipple 1 2 MPT x 3 8 MPT 40 555 605 Swivel 3 8 MPT x F SVL Water 41 572 042 Blue Neptune 1 4 42 572 136 He...

Page 67: ...ra Plate 7 538 421 Machine Screw 8A 539 005 Repair Kit 8B 539 010 Seal Kit 9 553 105 Manifold 2 jet 10 555 108 Comp Fitting 1 4 x 1 4 MPT 11 555 116 Comp Union Coupling 1 4 x 1 4 12 555 184 Elbow 45 S...

Page 68: ...g 1 4 O D S S 6 535 020 Valve Para Plate 7 538 322 Spacer Jet ABS 8A 539 005 Repair Kit 8B 539 010 Seal Kit 9 555 912 1 4 PT x 1 4 Compression Fitting 10 555 108 Comp Fitting 1 4 x 1 4 MPT 11 552 025...

Page 69: ...p 1 1 2 x 6 Black 3 555 184 Elbow 45 Street 1 4 4 535 110 Valve ASSY 5 538 110 Valve Repair Kit 6 580 117 QC 1 8 Male Female Close 7 561 075 9503 Vee Jet 8 538 322 Spacer Jet 538 322 9 555 272 Hex Nip...

Page 70: ...184 Elbow 45 Street 1 4 4 535 115 Valve ASSY 5 555 108 Comp Fitting 1 4 x 1 4 MPT 6 480 200 Tubing 1 4 O D S S 18 7 555 116 1 4 x 1 4 Comp Fitting 8 553 105 Y Manifold 9 561 110 Vee Jet 11003 10 566...

Page 71: ...NO DESCRIPTION NOTES 1 538 205 Valve Hanger 2 535 105 Valve ASSY 3 538 025 Valve Repair kit 4 555 106 1 8 x 1 4 Comp Fitting 5 562 100 Tee Jet 11002 6 564 250 Jet Retainer Plate Hardware 7 566 020 Ha...

Page 72: ...4 S S 4A 535 011 Valve Angle c w trigger 4B 540 015 Repair kit 5 564 060 Manifold 2 jet S Bend 6 555 108 Comp Fitting 1 4 x 1 4 7 553 201 Vinyl Grip 1 3 4 x 6 8 561 003 Vee Jet 9501 1 8 9 580 015 Q C...

Page 73: ...2 435 021 Handle Wand 1 5 Tube 3 480 200 Tubing 1 4 S S 4A 535 012 Valve Angle Brass c w trigger 4B 540 015 Repair kit 5 555 108 Comp Fitting 1 4 x 1 4 6 553 200 Vinyl Grip 1 1 2 x 6 7 561 130 Vee Jet...

Page 74: ...ION NOTES 1 552 050 Wand Glide Kit 2 561 001 Vee Jet 1 8 8001 SS 3 560 006 Jet screen Strainer Check 1 8 4 535 115 Valve 800 PSI 5 555 184 Elbow 45 Street 1 4 6 553 210 Vinyl Grip 2 x 6 Black 7 435 03...

Page 75: ...74 CLEANCO COMPACT ELECTRIC WIRING P 1...

Page 76: ...75 CLEANCO COMPACT ELECTRIC WIRING P 2...

Page 77: ...76...

Page 78: ...77...

Page 79: ...78...

Page 80: ...79...

Page 81: ...80...

Page 82: ...81...

Page 83: ...82...

Page 84: ...83...

Reviews: