21
VACUUM PUMP
Refer to the Vacuum Pump Operation and
Service Manual for specific instructions.
Lubrication:
We recommend that you use Roots
Synthetic Blower Lubricant in the vacuum pump
for all operation temperatures. This lubricant is
formulated especially for positive displacement
blower service to provide maximum blower
protection at any temperature. One filling of
Roots Synthetic oil will last many times longer
than a premium mineral oil.
NOTE: Roots Synthetic oil is the oil
which ESTEAM puts in the vacuum pump
at the factory. Topping off or adding
petroleum oil to synthetic oil is NOT
recommended.
1.
Check the oil level
daily
to assure the
proper level.
PROPER LEVEL
cannot be
overemphasized. Too little oil will ruin
bearings and gears. Too much oil will cause
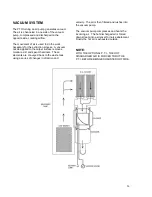
overheating. Use the illustration as a guide
when adding oil.
2.
To prevent rust from building up inside the
vacuum pump (if moisture exists) we have
provided a lubrication cup on the front of the
unit.
First run the unit at least
1 minute
to remove any
moisture from the vacuum pump. Next, fill the
lubrication cup with
LPS-TKX
, or a similar
lubricant, for
5 seconds
while the unit is running
and the vacuum inlets are sealed. Do this at the
end of
each working day.
3.
Drain, flush and replace oil
every 200 hours
or yearly, whichever comes first.
Change
oil more frequently if inspection so indicates.
With Roots Synthetic lubricant, perform the
oil change maintenance
every 500 hours or
once per year, whichever comes first.
4.
Vacuum pump lubrication is vital to
performance of our pump. Failure to follow
the maintenance schedule in the
“Maintenance Schedule” can lead to
permanent damage to your blower.
WATER PUMP
1.
Check the crankcase oil level
daily
to assure
the proper level. Use the illustration as a
guide when checking the oil level. If the
level has dropped, check for the source of
leakage and repair.
2.
Change the crankcase oil with Cat Pump
Crankcase Oil, after the
first 50 hours
of
operation. Drain and refill the crankcase oil
with Cat Pump Crankcase Oil
every 500
hours
thereafter.
3.
Other Cat approved oil equivalents are: Mobil
DTE 16, Amoco Rykow 68, and Shell Tellus
T68.
VACUUM INLET FILTERS
(IN WASTE TANK)
1.
The vacuum filters in the waste tank should
be removed and cleaned
daily
. If this is
done, the filters will last for a long period of
time.
VACUUM RELIEF VALVE
While the unit is running at full RPM, block the
air flow at the vacuum inlet connection and read
the vacuum gauge. If adjustment is required,
shut the unit down and adjust the vacuum relief
valve locking nut tension. Start your unit and
read the vacuum gauge. Repeat this process
until the relief valve opens
at 14” Hg on a
Compact 45 and 12
”Hg on a Compact 47.
Summary of Contents for Compact 45
Page 1: ...VERSION AUG 2017...
Page 13: ...12...
Page 14: ...13...
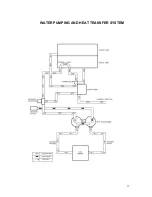
Page 18: ...17 WATER PUMPING AND HEAT TRANSFER SYSTEM...
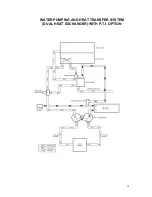
Page 19: ...18 WATER PUMPING AND HEAT TRANSFER SYSTEM DUAL HEAT EXCHANGER WITH P T I OPTION...
Page 28: ...27 CLEANCO COMPACT OVERHEAD VIEW...
Page 29: ...28...
Page 30: ...29 FRONT PANEL 45 47 FRONT VIEW...
Page 31: ...30 FRONT PANEL 45 47 BACK VIEW...
Page 33: ...32 FRONT PANEL PLUMBING P 1...
Page 34: ...33 FRONT PANEL PLUMBING P 2...
Page 37: ...36 COMPACT RECOVERY TANK...
Page 39: ...38 COMPACT BASEPLATE 45 47 P 1...
Page 40: ...39 COMPACT BASEPLATE 45 47 P 2...
Page 45: ...44 KIT INSTALLATION 45 47 P 1...
Page 46: ...45 KIT INSTALLATION 45 47 P 2...
Page 49: ...48 DUAL HEAT EXCHANGER...
Page 51: ...50 P T I...
Page 53: ...52 COVER HOLDER KIT...
Page 55: ...54 PTO SHAFT...
Page 58: ...57 C A D EXTERNAL OPTION PAGE 1...
Page 59: ...58 C A D EXTERNAL OPTION PAGE 2...
Page 61: ...60 F W TANK AQUA STORAGE 120 GALLON...
Page 63: ...62 F W TANK AQUA REEL TANK 125 GAL P 1...
Page 64: ...63 F W TANK AQUA REEL TANK 125 GAL P 2...
Page 75: ...74 CLEANCO COMPACT ELECTRIC WIRING P 1...
Page 76: ...75 CLEANCO COMPACT ELECTRIC WIRING P 2...
Page 77: ...76...
Page 78: ...77...
Page 79: ...78...
Page 80: ...79...
Page 81: ...80...
Page 82: ...81...
Page 83: ...82...
Page 84: ...83...


