background image

OPERATING THE EXTRACTOR

9

OPERATING:

1. Start and continue cleaning until the clean water tank is empty and/or recovery tank is full or until cleaning job is  

    done.

2. If foam is detected in the recovery tank and hose, use a defoamer to prevent damage to the vacuum motors.
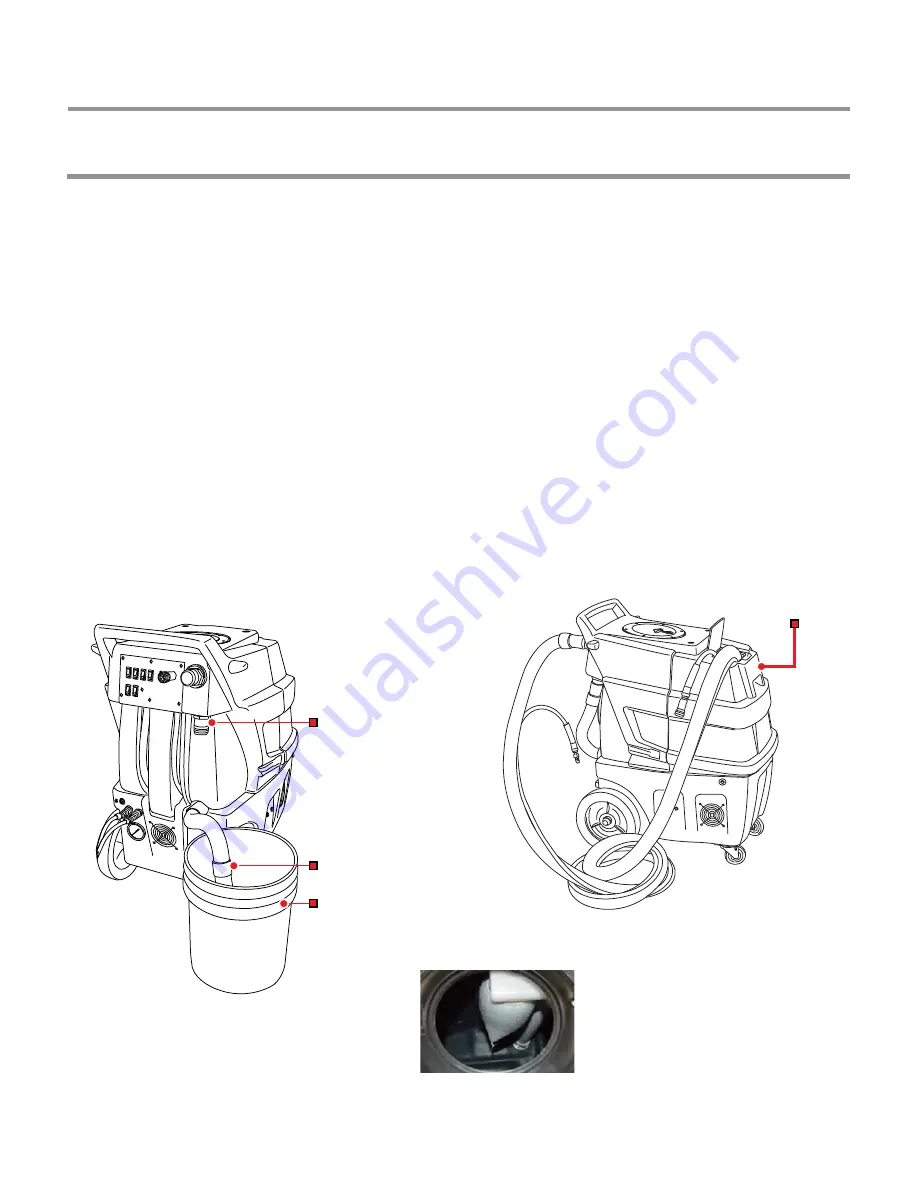
AFTER OPERATING:

1. Turn off all the switches and disconnect electric power cord from power plug, then empty the recovery tank into a  

    bucket or another proper drain area. (see below image 11.1) 

2. Remove remaining water from clean water tank, disconnect the vacuum hose from wand and insert the vacuum  

    hose into clean water tank. Vacuum out all the excess water. (see below image 11.2.) 

3. Drain and thoroughly clean the recovery tank. At this point the tank can be rinsed while dumping. 

4. The vacuum filter (wet filter) and ball float cage have to be rinsed and cleaned thoroughly when it’s still wet. (see  

     below image 11.3.)    See “Preventative Maintenance” page.   Wrap power cords around handle for storage. Do not  

    use solution or recovery tanks for storage, extractor can be damaged. 

Consult your sales representative for more information on cleaning methods.

IMAGES AND ILLUSTRATIONS ARE FOR REFERENCE ONLY.     ACTUAL PRODUCTS MAY NOT BE EXACTLY AS SHOWN.

vacuum filter and ball 

float cage in recovery tank 

upper drain 

hose connect

drain hose 

drain bucket

solution tank

image 11.1

image 11.2

image 11.3

Summary of Contents for CF-100 Series

Page 1: ...LLUSTRATIONS ARE FOR REFERENCE ONLY ACTUAL PRODUCTS MAY NOT BE EXACTLY AS SHOWN Owner s Manual CF 100 SERIES MODEL CF 100 CF 100 HEAT CF 25XG CF 25XG HEAT 5109 N NATIONAL DR KNOXVILLE TN 37914 TEL 888...

Page 2: ......

Page 3: ...NTENANCE 10 HOW TO 12 How to use attachment tools How to bleed the system System without electric instant water heater System with electric instant water heater OPTIONS 14 Auto Dump Pump Auto Fill Che...

Page 4: ...purchase by sending CleanFreak the warranty registration form within 10 days of purchase Page 5 This warranty is in lieu of all other warranties expressed or implied and no person is authorized to gi...

Page 5: ...ated surfaces 7 Do not unplug by pulling on electric power cord To unplug grasp the plug not the electric power cord 8 Do not handle plug or appliance with wet hands 9 Do not put any object into openi...

Page 6: ...pump optional drain valve pressure gauge unloader valve aka pressure regulator two circuit TEST SWITCH only with two power cords unit standard equipment for unit with 500 psi pump reset switch for le...

Page 7: ...image ground blade DO NOT break off three prong receptacle image 9 1 CONNECT HOSE Vacuum hose connection to attachment tool Solution hose connection to attachment tool quick connector Solution hose l...

Page 8: ...tes that you are not on two separate circuits and are increasing your chance of a circuit blowout 2 Always thoroughly pre vacuum the surface to be cleaned Using an upright vacuum cleaner or the extrac...

Page 9: ...o clean water tank Vacuum out all the excess water see below image 11 2 3 Drain and thoroughly clean the recovery tank At this point the tank can be rinsed while dumping 4 The vacuum filter wet filter...

Page 10: ...and debris into the solution lines that will block filters orifices and generally degrade the systems 4 Keep equipment out of extreme temperatures i e Freezing temperatures will make water expand and...

Page 11: ...FILTER A clean vacuum filter must be installed in the recovery tank at all times to protect the motor See below image 13 1 IMAGES AND ILLUSTRATIONS ARE FOR REFERENCE ONLY ACTUAL PRODUCTS MAY NOT BE E...

Page 12: ...pulling back on the wand image 14 3 14 2 Pull the tool with the valve lever pressed to insure the best results 2 Release the solution control valve lever image 14 4 14 1 and pass the tool over the da...

Page 13: ...clean water 2 Connect desired tool and extractor with vacuum hose and solution hose 3 Turn pump switch to ON 4 Open trigger valve from your attachment tool See image 15 1 and spray until all air is o...

Page 14: ...lean water tank is empty and or cleaning job is done 8 Turn off all the switches and disconnect electric power cord from power plug then empty the left over recovery tank into a bucket or another prop...

Page 15: ...tank fill up No need to turn off water faucet until cleaning job is completed NOTE 1 If IN LINE hose is dirty or not used recently clean before use 2 Water needs to be flowing into the extractor const...

Page 16: ...l feed system page chemical feed mixing quick connect from chemical feed line to extactor quick connect See below image 18 3 image shown Chemical bottle hand on the extractor CHEMICAL FEED MIXING SYST...

Page 17: ...in powder form mix it with water thoroughly make sure it is fully dissolved Any undissolved powder can clog up the flowmeter spray jets and other parts on the extractor damaging them in the process A...

Page 18: ...r to the chart See image 20 3 Can be found metering system in between solution tank and the pump plumbing system OPTIONS metering preset chemical feed system tips TO USE Have a bottle or bucket of cle...

Page 19: ...heater switch ON and wait approximatley 3 4 minutes to heat up Now it is ready to use The in line heater has a pre set thermostat for 210 degrees fahrenheit Keep solution tank clean and do not use any...

Page 20: ...urn pump switch to ON 4 Open trigger valve from attachment tool See image 22 1 And spray until all air out from the solution system See image 22 1 if no trapped air in the system water should spray th...

Page 21: ...ent or electric cord not grounded See authorized repair person Pump motor stopped 1 Pressure build up cause by jet clogged 1 Released pressure by opening up press the lever on the Wand 2 Thermal overl...

Page 22: ...um hose 8 See authorized repair person connection inside the extractor 9 Foriegn object accumulated in 9 See authorized repair person vacuum fans Vacuum motors run intermittently See authorized repair...

Page 23: ...heater 1 Bleed See How to bleed page 2 Bad thermostat 2 Replace 3 Heating element burned out 3 Replace 4 Safety valve open 4 Check safety valve and close it WARNING This product contains chemicals kno...

Page 24: ...All rights reserved 5109 N NATIONAL DR KNOXVILLE TN 37914 TEL 888 722 5508 WWW CLEANFREAK COM R...

Reviews: