


26
27
The battery charger can be transported on its supports,
both vertically and horizontally. Take the same
precautions and follow the same instructions provided
for the machine together with those in the special
manufacturers manual.
5. TECHNICAL INFORMATION
5.1 GENERAL DESCRIPTION
5.1.1 MACHINE
We can summarise the machines main features as
follows:
- The form of the squeegee, the air flows and the
specially designed rubber blades produce excellent
drying results even on tiled floors. Thanks to the particular
balanced shape of the machine frame and the squeegee
support, no water residues are left behind in a curve,
and even when a smaller squeegee is used.
- Excellent distribution of weights and geometries: the
centre of gravity is very low, also thanks to the very
heavy brush plate and because the batteries are located
at the level of the wheels.
- A heavy weight on the brushes makes them work
efficiently on the floor. The pressure is generated by
the weight of the plate, without springs or additional
devices that lead to difficulties and inaccuracy. The
entire mass is generated by the hanging weight of a
15 mm steel ships plate.
- A large volume of water in the tanks reduces dead
time since fewer trips are needed to collect water and
dump dirt. There is no delicate flexible diaphragm that,
at a technical level, is difficult to clean.
- Some dozen litres of water in the recovery tank are
used to decant any foam (dangerous for the suction
motor). The traction system is designed for the machine
weights, making the machine responsive and easy to
handle.
- Robust construction. The frame and the squeegee,
built with thick sheet metal - thickness 6 mm, 8 mm, 10
mm up to 20 mm are laser cut and welded. The brush
plate is made from 15 mm ships sheet metal, with a
surface treatment that protects the plate and the paint
for thousands of hours in a saline fog. All screws are
made with stainless steel; the tanks (body) are made
with 7-8 mm thick shockproof polyethylene. Everything
is simple and very strong, without any other complicated
designs.
- The battery compartment can house very large
batteries, which guarantees extended running time.
- The suction motor is housed inside the machine, thus
reducing operating noise to a minimum.
- The recovery tank is very easy to clean due to the
lack of the characteristic difficult access points of
recovery tanks located in a lower position.
5.1.2 BATTERY
Regardless of the type of construction, battery
performances are indicated with the term capacity,
which always refers to a discharge period. Another
important value is the number of possible discharges.
The capacity is expressed in amps per hour (Ah), while
the discharge period is generally indicated as 20 hours
(C20 or 20h, or not expressly indicated) or 5 hours (C5
or 5h). The discharge/charge cycles indicate the number
of times that the battery can hold a charge under the
best conditions, i.e. they indicate the useful battery
service life complying with all the necessary measures.
Therefore, the capacity of a battery varies depending
on how fast it uses energy (current). Thats why theres
such a variation in the capacity values expressed as
C5 or C20. These factors must be taken into account
when comparing products available on the market with
our own.
This machine can be equipped with two types of batteries
that differ in terms of their construction and features.
- Pb-Acid battery the electrolyte level in each element
must be periodically checked!
If one element is no longer covered by the acid
solution it will oxidise in 24 hours, thus permanently
affecting that elements performance.
Refer to the battery manual to avoid physical damage
and economic loss.
- Gel battery this type of battery is maintenance free
and does not require special environments for recharging
(since it does not emit any harmful gases); therefore,
it is highly recommended.
It should not be taken for granted that batteries
and battery chargers with the same technical
features as those we offer will produce the same
results. Only perfect compatibility between these
elements (Pb-Acid batteries, gel batteries and battery
chargers) will safeguard the performances, the
service life, the safety and the economic value
invested.
5.1.3 BATTERY CHARGER
This type of high-frequency battery charger efficiently
charges batteries, extending their operating and service
life. The same battery charger can be used for both
Pb-Acid batteries and for gel batteries.
The information indicated on the digital display can be
used to always keep the charging process, the battery
and the battery charger under control (read the specific
manual for more details).
It should not be taken for granted that batteries
and battery chargers with the same technical
features as those we offer will produce the same
results. Only perfect compatibility between these
elements (Pb-Acid batteries, gel batteries and battery
chargers) will safeguard the performances, the
service life, the safety and the economic value
invested.
5.2 STRUCTURE AND FUNCTIONS
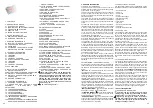
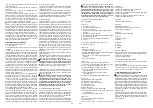
5.2.1 MACHINE
PHOTO A
1 Dirty water recovery tank
2 Detergent solution tank
3 Left rear wheel
4 Left front bumper disk (brush unit)
5 Left splash guard
6 Brush plate lift/lower pedal
7 Front steering wheel
8 Electric component dashboard
9 Steering wheel
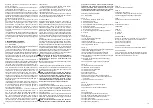
PHOTO B
10 Drivers seat
11 Squeegee lift/lower lever
12 Accelerator pedal
13 Right splash guard
14 Right front bumper disk (brush unit)
15 Right rear wheel
PHOTO C
16 Squeegee bumper disk (left/right)
17 Knob for squeegee rubber blade replacement
18 Squeegee inclination adjustment screw
19 Suction hose
20 Squeegee pressure wheel (left/right)
21 Squeegee pressure adjustment knob (left/right)
22 Squeegee fast release/connection screw
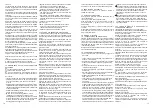
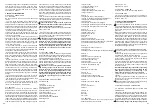
PHOTO D
23 Suction motor switch
24 Battery power test
25 Brush motor switch
26 Key switch
27 Horn
28 Service brake button
29 Brush motor thermal breaker (40A)
30 Operation emergency button/temporary interruption
31 Forward/reverse selector (joystick)
PHOTO E
32 Detergent solution outlet lever
33 Hour meter
34 Battery connector to charge with the battery charger
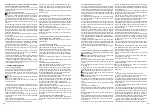
PHOTO F
35 Blinker
36 Recovery tank inspection plug
37 Recovery tank drain hose
38 Solution tank filler plug
39 Suction hose
40 Recovery tank drain hose plug
41 Suction filter inspection plug
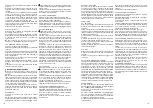
PHOTO G
42 Detergent solution filter
PHOTO H
43 Suction motor
44 Recovery tank support chain
45 Battery compartment with batteries
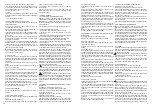
PHOTO I
46 Battery connection diagram
PHOTO L
47 Front motor wheel
48 Brush
PHOTO M
A Lever
B Seating
C Ring nut
5.2.2 BATTERY
If supplied, the Pb-Acid (if not dry charged) or gel
batteries are ready to be installed:
Positive pole - red
Negative pole - black.
5.2.3 BATTERY CHARGER
If supplied, refer to the corresponding booklet.
5.3 ACCESSORIES
Your machine supplier can provide a complete and
updated list of all available accessories, such as brushes,
scrapers, disks, etc.
6. INSTALLATION INFORMATION
6.1 BATTERY PREPARATION
The technical features of the batteries used must
match those indicated in the technical features section.
Using different batteries may cause serious damage to
the machine or may require them to be charged more
frequently.
During installation or when performing any type of
battery maintenance, the operator must be equipped
with adequate safety accessories to prevent accidents.
Work far from open flames, do not short-circuit the
battery poles, do not generate sparks and do not smoke.
The batteries are normally supplied full of acid solution
(for the Pb-Acid type) and ready for use. In any case,
follow the steps indicated in the manual supplied with
the battery and carefully follow the instructions regarding
safety and operating procedures.
6.2 BATTERY INSTALLATION AND PREPARATION
These operations must be carried out by specialised
personnel.
Make sure the two tanks are empty. If not, empty them
in accordance with the specific procedure.
Lift the recovery tank by 90°, making sure it is stable
in that position. This provides access to the battery
compartment from the top.
Disconnect the Anderson connector of the battery wiring
from the Anderson connector of the machine wiring.
Always hold the connectors with the hands and never
pull on the cables.
Attach the battery wiring to the battery, connecting
the terminals only on the poles marked with the
same symbol (red wiring +, black wiring -)! A
battery short-circuit may cause an explosion!
Tighten the terminals at the poles and cover them with
Vaseline.
After checking that all the controls on the panel are in
position 0 or at rest, connect the battery connector to
the machine connector.
Close the battery compartment (lowering the recovery
tank) making sure not to crush any wires.
6.3 BATTERY CHARGER PREPARATION
6.4 BATTERY CHARGER INSTALLATION AND
CONNECTION
The battery charger is generally supplied ready to use
if requested with a specific battery. Make sure that the
battery charger was correctly programmed to charge
the battery supplied: when the machine is switched on,
the display will indicate the charge settings. Check the
voltage and charge current relative to the type of battery.
If the battery charger and battery settings do not
Summary of Contents for KF75B
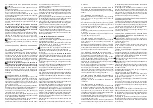
Page 4: ...4 5 D C E F...
Page 5: ...4 5 D C E F...
Page 6: ...7 G H I L M 6...
Page 7: ...7 G H I L M 6...