background image

I C S - 2 1 / 2 1 D T   S P E A K E R   S T A T I O N

1 - 5

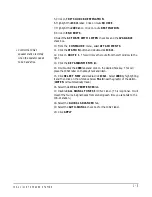
5. Click on E

DIT SOURCE-DESTINATION

.

6. Highlight the 

ICS21

 label.  Click on route 

SOURCE

.

7. Highlight the 

2003 

label.  Click on route 

DESTINATION

.

8. Click on 

END EDITS

.

9. Select the 

ACTIVATE WITH LISTEN 

check box and the 

AVAILABLE 

check box

.

10. From the  

CONFIGURE 

menu,  select 

ATTACHMENTS

.

11. Click the 

STATION

 button and double-click 

ICS21

.

12. Click on 

ROUTE 1

.  This will move the route from the left window to the 

right.

13. Click the 

KEY ASSIGNMENTS

 tab.

14. Double-click the 

2003

 label and click on the desired Talk key.  This will 

place the ICS21 label on that key's talk and listen. 

15. Click 

SELECT NEW

 and double-click 

ICS21

.  Select 

2003

 by highlighting 

it and then click on the white box below 

TALK

 near the graphic of the station. 

(

LISTEN

 will automatically track.)

16. Select the 

LOCAL PEREFENCES

 tab.

17. Disable 

CALL SIGNAL TONES

 for ICS-21 label.  (This is optional.  It will 

prevent the four call-signal beeps from sounding each time you set a talk to the 
ICS-21 station.)

18. Select the 

GLOBAL ADVANCED

 tab.

19. Select the 

AUTO-SIGNAL

 check box for the ICS21 label.

20. Click 

APPLY

.

• Control the ICS-21 

speaker station remotely 

when the operator needs 

to be hands-free. 

Summary of Contents for ICS-21

Page 1: ...SPEAKER STATION I N S T R U C T I O N M A N U A L ICS 21 21DT...

Page 2: ...lear Com is a registered trademark of Clear Com Intercom Systems The Clear Com Logo is a registered trademark of Clear Com Intercom Systems Matrix Plus is a registered trademark of Clear Com Intercom...

Page 3: ...ll Alert Tone Level Control 1 1 6 Minimum Volume Control 2 1 6 Option Switches 3 1 6 Remotely Controlled Operation S1 2 and S1 3 1 7 Matrix Connector 4 1 7 Program Input Connector 5 1 7 Power Connecti...

Page 4: ...I C S 2 1 2 1 D T S P E A K E R S T A T I O N...

Page 5: ...er will suffice The connections to this transformer are made to the circuit board s two terminal plug on connector The unit mounts either in a standard four gang electrical outlet box or in an optiona...

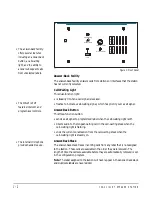
Page 6: ...ation from the call waiting stack when the call waiting light is steadily on Answer Back Stack The answer back stack tracks incoming calls from any label that is not assigned to the station These call...

Page 7: ...om another unselected label will be activated when the answer back button is released Sending a Call Signal The answer back button can send call signals to a station or interface currently on the sele...

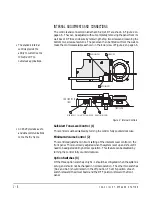
Page 8: ...closure 3 Set Option Switches S1 2 and S1 3 to the ON position towards the front panel Refer to Figure 2 4 Fasten the ICS 21 into its box or enclosure and reconnect power To set remotely controlled op...

Page 9: ...ouble click the 2003 label and click on the desired Talk key This will place the ICS21 label on that key s talk and listen 15 Click SELECT NEW and double click ICS21 Select 2003 by highlighting it and...

Page 10: ...com level control on the front panel This is normally adjusted when the system is set up and shouldn t need to be adjusted during normal operation This feature can be disabled by turning the control f...

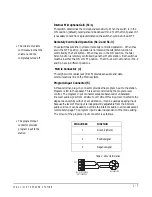
Page 11: ...data communications link to the Matrix system Program Input Connector 5 A three terminal plug on connector provides the program input to the station Program is fed to the speaker This level is contro...

Page 12: ...part number 400008 can be used for powering the station from 120 VAC Use part number 400011 for 220 VAC power This connection is a better choice if the headset or speaker is mounted in a desktop box s...

Page 13: ...I C S 2 1 2 1 D T S P E A K E R S T A T I O N 1 9...

Page 14: ...r 5 Install the ICS 21 21DT into the four gang outlet box or DT Box 6 Set listen levels see Intercom Level Control on page 3 7 The speaker station should now be operating properly 8 Read the rest of t...

Page 15: ...I C S 2 1 2 1 D T S P E A K E R S T A T I O N...

Page 16: ...I C S 2 1 2 1 D T S P E A K E R S T A T I O N...

Page 17: ...on 2 If the station is installed in a DT Box remove the front panel It is retained with four screws 3 Using long nosed pliers grasp the top and bottom of the plug so that the retaining clip will be de...

Page 18: ...I C S 2 1 2 1 D T S P E A K E R S T A T I O N...

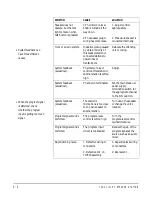
Page 19: ...ation with the system is lost Make sure each eight wire modular connector is securely plugged in check the wiring and ensure that the Matrix system is turned on System does not operate and the call wa...

Page 20: ...ted Set the main station or power supply termination switch for the appropriate channel to the ON position System feedback acoustical The station s microphone is too close to an open speaker on anothe...

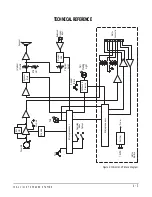
Page 21: ...am EQ LIM Talk Min Vol Call Waiting Light Answer Back Intercom Volume Speaker Call Send Receive Microprocessor Talk Balanced Program Input Speaker Mute Program Mute Mic Mute Operating Mode Options Mic...

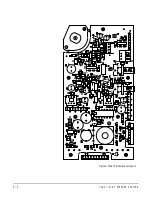
Page 22: ...I C S 2 1 2 1 D T S P E A K E R S T A T I O N 4 4 Figure 6 Main PCB Component Layout...

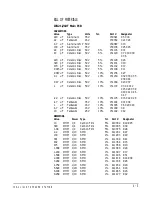
Page 23: ...ic Disc 50V 10 151172 C3 C4 C12 C15 C29 C39 C40 C41 C46 C47 22 uF Ceramic Disc 50V 10 151176 C16 C22 C28 47 uF Tantalum 35V 10 151184 C31 C34 1 uF Tantalum 16V 10 151185 C6 C20 C43 4 7 uF Tantalum 16V...

Page 24: ...IC LM384 POWER 4W AMP 480012 IC5 IC 7805L POS 5V REG 480088 IC10 Diode BAV70 DUAL DIODE 481019 D1 D7 IC LM833 DUAL OP AMP 481023 IC1 IC2 IC8 Transistor 2907A PNP 60V 600MA 481027 Q2 Diode BAV99 DUAL D...

Page 25: ...C18 220uF R19 10 R9B 10K R9C 10K R9D 10K R20 4 7K R1D 10K IC8A LM833 R27 2 2 P2 C30 47pF D5 BAV99 P1 C44 01uF R26 3 24K C10 390pF R33 15K R34 10K POT C6 1uF C20 1uF P4 Bias V2 V2 V2 V2 V2 VDD VDD VDD...

Page 26: ...uminum 35V 150136 C2 2200 uF Aluminum 35V 20 150163 C1 RESISTORS Value Power Type Tol Part Designator 2K OHM 1 4 Carbon Film 5 410014 R5 47K OHM 1 4 Carbon Film 5 410021 R6 1 5K OHM 1 4 Carbon Film 5...

Page 27: ...10MA 75PIV 480000 D3 Transistor TIP41 NPN 40V 6A TO 220 POWER 480099 Q1 Diode 1 5A 200V BRIDGE 480158 D1 INTEGRATED CIRCUITS Device Description Part Designator IC LM833N 480175 IC3 IC MAX488E 480231...

Page 28: ...1 8 4 1 2 3 4 5 6 7 1 2 1 1 7 8 1 6 5 3 4 2 1 6 5 3 4 2 1 2 1 2 3 4 5 6 7 8 1 2 3 4 5 6 7 8 1 2 3 4 5 6 3 1 5 6 8 7 4 2 RB0 13 RB1 12 RB2 11 RB3 4 RB4 3 RB5 2 RC0 10 RC1 9 RC2 8 RC3 7 RC4 6 RC5 5 VDD...

Page 29: ...ss balanced differential input Input Level 20 dBV Input Impedance 100k ohm Frequency Response 150 Hz to 15 kHz 3 dB Power Requirements Voltage 16 to 18 VAC Current 100 mA average Internal Connectors I...

Page 30: ...makes every attempt to maintain the accuracy of the information contained in its product manuals that information is subject to change without notice Performance specifications included in this manual...

Page 31: ...is express limited warranty Neither Clear Com nor the dealer who sells Clear Com products is liable for incidental or consequential damages of any kind For your own records fill in the information bel...

Page 32: ...Equipment that is not under warranty must be sent prepaid to Clear Com If requested an estimate of repair costs will be issued prior to service Once repair is approved and repair of equipment is comp...

Reviews: