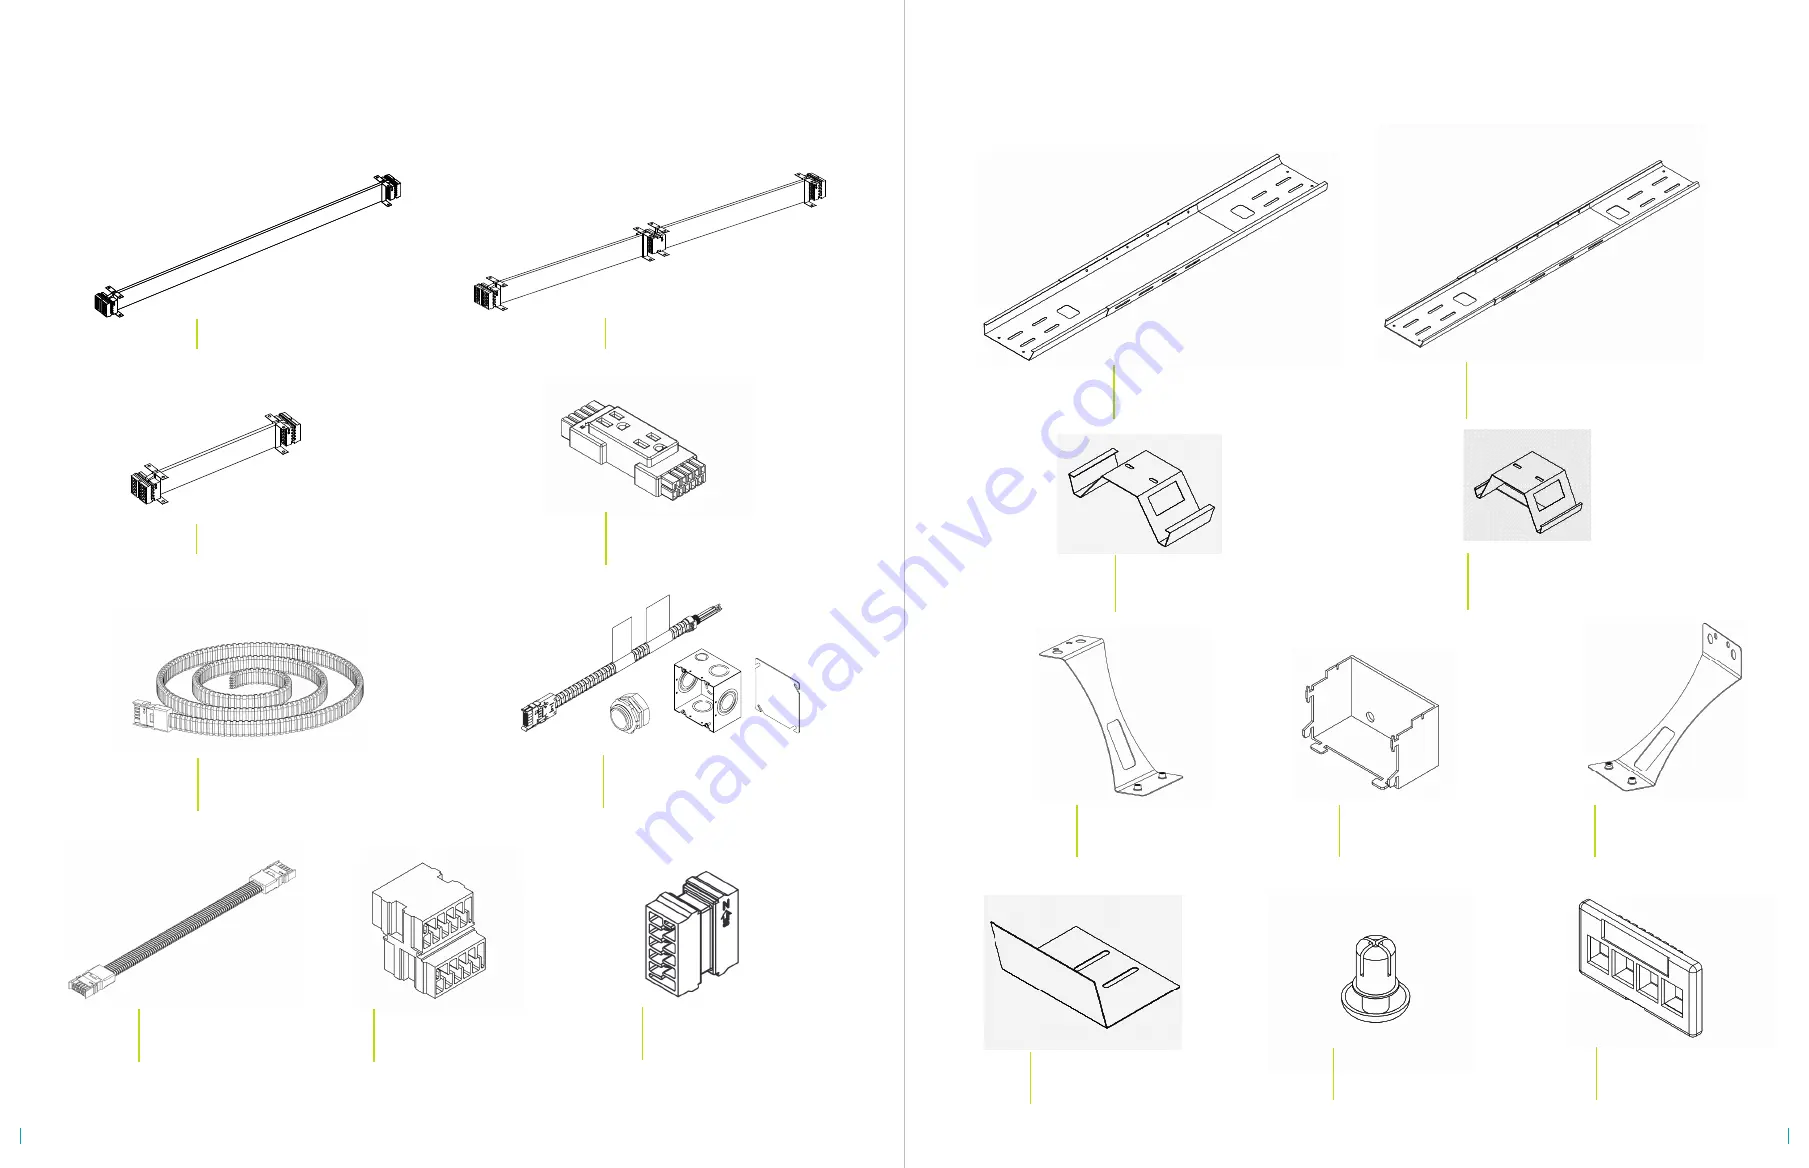
background image

COMPONENTS

BPDR_(X)

BP4PFP

BPDH60

BPJCB

BPJ(##)

BPIF(##)

Duplex Receptical 

2 Power Outlets Each

Will be Labeled 1, 2, 3, or 4 

36" Power Harness

Distributes Power to 8 Outlets

Four-Way Jumper Block

Joins up to 4 Jumpers

Directs Power in Multiple Directions

Data Faceplate

4 Data Ports

Snaps into Harness Riser

Power Jumper

Joins Power Harnesses 

to Distribute Power Supply

Power Infeed

Connects to Power Source

Introduces Power to the System

BPDH60-8

36" Power Harness

Distributes Power to 16 Outlets

BPDH18-4

18" Power Harness

Distributes Power to 8 Outlets 

BSMCTB

Leg Mount Bracket

Hanger Kit For Mounting 

Cable Tray to Legs 

BSMCTB-120

Surface Mount Bracket

Hanger Kit for Mounting

to Underside of Surface

BTEC

PR1

Push-In Rivet

Secures Harness onto

the Harness Risers

BCTX

Wide Cable Tray

Use with Facing Workstations

Longer than 48"

BNCT

Narrow Cable Tray

Use with Side by Side Workstations

and 48" Wide Surfaces

BCTX-RK

Wide Harness Riser

Use with Wide Cable Tray.

Holds Power/Data Components

BNCT-RK

Narrow Harness Riser

Use with Narrow Cable Tray

Holds Power/Data Components

Cable Tray End Cap

Caps the End of a Cable Tray 

to Hide Power/Data Components

For installation questions call


210.648.2095


or email

 customerservice@mycleardesign.com

BPPCB

Two-Way Jumper Block

Joins 2 Jumpers Together

Use to Make Alternate Jumper Lengths

ELECTRICAL

CABLE TRAYS

B120CTB

120 Cable Tray Bracket

Converts Cable Tray For Use

with 120 Degree Stations

KIT-NYC

NYC Infeed Kit

Connects to Power Source

NYC Electrical Code Compliant

8

9

Summary of Contents for BLADE BPDH18-4

Page 1: ...BLADE POWER DATA DETAIL DOCUMENT The images in this document are not to scale...

Page 2: ...CAL SPECIFICATIONS 7 COMPONENTS 8 BPDH18 4 11 BPDH60 12 BPDH60 8 13 POWER DATA ASSEMBLY 14 INFEED 16 POWER POLE 18 VERTEBRAE 20 J CHANNEL J CLIPS 21 DESKTOP UNITS 22 For installation questions call 21...

Page 3: ...printed on each duplex Circuit 4 is the sensor activated control circuit 2 Every duplex harness jumper and infeed displays a North arrow The North arrows MUST point the same direction on all parts 3 T...

Page 4: ...cause shock and or personal injury IMPORTANT NOTES Connections to the building wiring must be done by a qualified electrician according to national state and local codes Never connect components whil...

Page 5: ...for Mounting to Underside of Surface BTEC PR1 Push In Rivet Secures Harness onto the Harness Risers BCTX Wide Cable Tray Use with Facing Workstations Longer than 48 BNCT Narrow Cable Tray Use with Si...

Page 6: ...e Guides Cables from the Floor to the Cable Tray BPMA Desktop Power Unit 2 Power Outlets Clamp to the Surface Edge or to the Grommet Hole BPJ47 J Channel Mount to Surface for Wire Management OPTIONAL...

Page 7: ...RT START START C4 C4 BPDH60 8 36 INCH HIGH CAPACITY POWER HARNESS RECEIVES 8 DUPLEXES C1 C2 C3 C4 C1 C2 C3 C4 1st Harness Jumper 2nd Harness C1 C2 C3 C4 REPEAT STANDARD SEQUENCE C1 C2 C3 C4 C4 C4 REPE...

Page 8: ...p the duplexes onto the harness 1 2 PRESS EXPANDS Insert Data Faceplates Data faceplates snap into the riser cutout Position the risers so that the faceplates are turned in opposite directions 3 Place...

Page 9: ...TYPES A Ceiling Infeed B Wall Infeed C Floor Infeed PASS THE INFEED DIRECTLY FROM THE WALL INTO THE CABLE TRAY A VERTEBRAE CAN BE USED TO GUIDE THE INFEED FROM THE FLOOR TO THE CABLE TRAY For install...

Page 10: ...round the power pole Push the bracket halves together 3 Secure the Bracket Attach the bracket halves with 4 bolts The power pole will be clamped in place Bracket Box Bracket Collar BPPBRK Power Pole B...

Page 11: ...bracket and into the underside of the surface For installation questions call 210 648 2095 or email customerservice mycleardesign com J CHANNEL J CLIP 1 Remove Adhesive Tape Backing Stick the J channe...

Page 12: ...over 1 2 3 BPMA Desktop Power Unit 2 Power Outlets BPDMA Desktop Data Unit 2 Data Ports BMFDA Desktop Combo Unit 2 Power Outlets 2 Data Ports NOTE This unit must be edge mounted See space differently...

Reviews: