8 Pentz EF5 Installation Guide
© Clear Vue Cyclones 2018
Mounting the Backer Board and Wall Bracket
(for wall-mounted systems only)
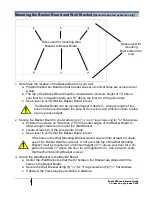
1. Determine the location of the Backer Board on your wall:
a. Position the Backer Board so that at least one set of vertical holes are centered over
a stud.
b. The top of the Backer Board must be mounted at a minimum height of 73” above
your floor for a 30-gallon drum and 79” above the floor for a 55-gallon drum.
c. Use a level to verify that the Backer Board is level.
The Backer Board can be mounted higher if desired – a longer length of flex
hose can be used between the base of the cyclone and collection drum to take
up any excess height.
2.
Secure the Backer Board to your wall using
(4)
5
/
16
"-9 x 4" lag screws and (4)
5
/
16
" flat washers.
a. Position the screws no more than 2” from the outer edges of the Backer Board to
allow enough clearance to mount the Wall Bracket.
b. Locate at least (2) of the screws into a stud.
c. Use a level to verify that the Backer Board is level.
If the holes in the Wall Mounting Bracket can be secured into at least (2) studs,
use of the Backer Board is optional. If not used, the top of the Wall Mounting
Bracket must be mounted at a minimum height of 71” above your floor for a 30-
gallon drum and 77” above the floor for a 55-gallon drum. Use a level to verify
that the Wall Mounting Bracket is level.
3. Attach the Wall Bracket to the Backer Board:
a. Center the Wall Bracket so that the (6) holes on the Bracket are aligned with the
holes on the Backer Board.
b. Secure the Wall Bracket using (6)
5
/
16
"-9 x 3" lag screws and (6)
5
/
16
" flat washers.
c. If desired, the holes may be pre-drilled in advance.
Holes used for mounting Wall
Bracket to Backer Board
Space used for
mounting
Backer Board to
wall


